Ionix
Aficionado

- Total Posts : 314
- Scores: 8
- Reward points: 4329
- Joined: 2011/08/01 11:02:49
- Status: offline

Re: Mk1 2 Door Build (& rebuild & rebuild)
2016/05/22 18:39:53
(permalink)
Slowly but surely today. Fuel lines are finished bar a few clamps to hold in place. Extractors are painted and wrapped ready to go back in. I was just making a bit of a list of what needs to happen before I try starting. Finish off clutch cable Mount radiator Fill up all fluids and oils .... Then crank...... And start ((hopefully)
Attached Image(s)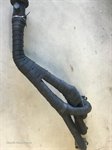
|
Matt75
Deity

- Total Posts : 2185
- Scores: 67
- Reward points: 6533
- Joined: 2011/08/01 11:02:49
- Location: Doncaster Vic Australia
- Status: offline
Re: Mk1 2 Door Build (& rebuild & rebuild)
2016/05/24 10:52:01
(permalink)
Can I ask why you wrapped them? I've heard that the wrap will trap moisture and accelerate rusting.
Great work so far
Matt
|
evobda2
Scholar

- Total Posts : 412
- Scores: 20
- Reward points: 4930
- Joined: 2011/08/01 11:02:49
- Location: NSW, Australia
- Status: offline
Re: Mk1 2 Door Build (& rebuild & rebuild)
2016/05/24 14:28:59
(permalink)
I would think they only trap moisture if the car is left outside and not run often. The temp they get up to when running would dry any moisture surely..
|
Ionix
Aficionado
- Total Posts : 314
- Scores: 8
- Reward points: 4329
- Joined: 2011/08/01 11:02:49
- Status: offline
Re: Mk1 2 Door Build (& rebuild & rebuild)
2016/05/24 18:56:36
(permalink)
Matt75
Can I ask why you wrapped them? I've heard that the wrap will trap moisture and accelerate rusting.
Great work so far
Matt
Thanks Matt appreciate that. I ended up wrapping as previously I had the clutch cable wrapped to keep the heat off it. So I just decided to go the other way this time. Thought it may help slightly to keep heat in the engine bay down also as since I don't have an external fresh air feed into my intake. I am not too sure about rust factor. It will live inside so hopefully this isn't an issue
|
gazz
Enthusiast

- Total Posts : 139
- Scores: 2
- Reward points: 4043
- Joined: 2011/08/01 11:02:49
- Location: Adelaide S.A Australia
- Status: offline
Re: Mk1 2 Door Build (& rebuild & rebuild)
2016/05/25 07:40:07
(permalink)
i wrapped my pipes and didnt have a rusting problem for years. i painted the pipes and heated them up to cure the paint before i wrapped them.
definately helped with not frying the speedo and clutch cable.
my car was kept in a shed and not driven in the rain much though.
|
Flighter
Deity
- Total Posts : 1107
- Scores: 43
- Reward points: 5151
- Joined: 2011/10/17 14:55:59
- Status: offline
Re: Mk1 2 Door Build (& rebuild & rebuild)
2016/05/25 19:35:59
(permalink)
I'm doing the same with mine - sandblasted, painted and ready for wrapping.
WTB: Recaro seat - any condition considered
|
Ionix
Aficionado
- Total Posts : 314
- Scores: 8
- Reward points: 4329
- Joined: 2011/08/01 11:02:49
- Status: offline
Re: Mk1 2 Door Build (& rebuild & rebuild)
2016/05/29 20:22:19
(permalink)
And it cranks and gets oil pressure! It took awhile to build though, but I think that was because of the new oil pump etc Next weekend it will be started! I had to have a fiddle with some of the original wiring to get it to crank, but now I know that all is well. For all those with a good memory, does the charge wire which goes to the coil from the starter motor, is that normally from the top connection or the bottom of that makes sense ?
post edited by Ionix - 2016/05/29 20:27:29
Attached Image(s)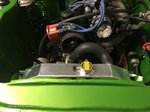
|
Chuff
Aficionado
- Total Posts : 145
- Scores: 12
- Reward points: 5593
- Joined: 2011/08/01 11:02:49
- Location: VICTORIA Australia
- Status: offline
Re: Mk1 2 Door Build (& rebuild & rebuild)
2016/05/30 09:03:29
(permalink)
Ionix
For all those with a good memory, does the charge wire which goes to the coil from the starter motor, is that normally from the top connection or the bottom of that makes sense ?
One of the spade terminals on the solenoid of the starter will energise the solenoid & power the starter motor. If memory serves me right it will be the bottom one. The other spade terminal goes to the coil to give the coil a 12V boost during cranking, as opposed to the 9V it uses during running. If you get them the wrong way around nothing will happen and no damage will be done. Just swap them over.
|
Ionix
Aficionado
- Total Posts : 314
- Scores: 8
- Reward points: 4329
- Joined: 2011/08/01 11:02:49
- Status: offline
Re: Mk1 2 Door Build (& rebuild & rebuild)
2016/05/30 12:56:01
(permalink)
Thanks chuff
It's engaging so it must be right which is good then! It just threw me as it had provision for 3 terminals.
|
Chuff
Aficionado
- Total Posts : 145
- Scores: 12
- Reward points: 5593
- Joined: 2011/08/01 11:02:49
- Location: VICTORIA Australia
- Status: offline
Re: Mk1 2 Door Build (& rebuild & rebuild)
2016/05/30 13:37:31
(permalink)
Ionix
Thanks chuff
It's engaging so it must be right which is good then! It just threw me as it had provision for 3 terminals.
If you've got 3 terminals, you'll find that 2 of them are for the same input into the solenoid. One will be bent around the side as that's where the later wiring looms placed the plug at the end of the wire. Maybe this was Ford's attempt to make it idiot proof as the wires, if run correctly, could not be plugged into the wrong terminals in case you couldn't tell by wire colour. Or, then again, maybe it just allowed Ford to employ colour blind workers. 
|
Ionix
Aficionado
- Total Posts : 314
- Scores: 8
- Reward points: 4329
- Joined: 2011/08/01 11:02:49
- Status: offline
Re: Mk1 2 Door Build (& rebuild & rebuild)
2016/05/30 16:14:45
(permalink)
Awesome. Thankyou. Seems like everything is in order then :) I can already imagine how good I'll feel getting it going this weekend after 4 years!
post edited by Ionix - 2016/05/30 19:52:42
|
Ionix
Aficionado
- Total Posts : 314
- Scores: 8
- Reward points: 4329
- Joined: 2011/08/01 11:02:49
- Status: offline
Re: Mk1 2 Door Build (& rebuild & rebuild)
2016/06/10 20:51:51
(permalink)
It's alive again!!
After a week of over complicating why it wouldn't start (worried about ecu issues, Hall effect sensor etc) I pulled the leads off the distributor cap and the copper had corroded from sitting. New distributor cap and got new leads and plugs and started first time!
|
Drewdog
Deity
- Total Posts : 1073
- Scores: 177
- Reward points: 5652
- Joined: 2013/03/06 22:31:01
- Status: offline
Re: Mk1 2 Door Build (& rebuild & rebuild)
2016/06/11 09:31:25
(permalink)
Awesome news, you must be stoked, especially after an easy fix like that... Much left to do before it hits the road?
Cheers Drew...
GT Cortina Project "The Ugly Duckling"
|
Ionix
Aficionado
- Total Posts : 314
- Scores: 8
- Reward points: 4329
- Joined: 2011/08/01 11:02:49
- Status: offline
Re: Mk1 2 Door Build (& rebuild & rebuild)
2016/06/11 11:08:32
(permalink)
Absolutely! A fair bit to go...kind of anyway. Time till completion will depend on how long I can keep working on it and ignoring the wife 😬
Now that I know the wiring works I'll pull radiator out again and do all the final taping of the loom and engine bay tidy up. That should then complete it up front.
Fix the fuel lines to chassis rails and general things mainly.
New wheels, enjoy for a bit.....then new paint.
|
Ionix
Aficionado
- Total Posts : 314
- Scores: 8
- Reward points: 4329
- Joined: 2011/08/01 11:02:49
- Status: offline
Re: Mk1 2 Door Build (& rebuild & rebuild)
2016/06/15 19:17:55
(permalink)
The wife sorted me out with a gift. She has acknowledged the second wife it seems....
Attached Image(s)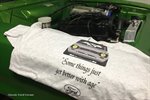
|