mwg88
Enthusiast

- Total Posts : 32
- Scores: 1
- Reward points: 371
- Joined: 2015/05/24 01:58:23
- Status: offline
Mk2 heater core replacement
Sorry if this has been covered before or in the wrong place - I've acquired a new heater core for my mk2, and am wondering about replacement. Has anyone successfully completed this, any tips, info or guides? Thanks
|
NQRS
Deity

- Total Posts : 897
- Scores: 58
- Reward points: 6931
- Joined: 2011/08/01 11:02:49
- Location: Townsville QLD Australia
- Status: offline

Re: Mk2 heater core replacement
2015/06/04 22:15:27
(permalink)
Rebuilt my heater box from scratch during my RS rebuild. The heater box has two sections joined together in the middle and held by interlocking clips which have to be separated. The components are plastic which can be brittle from age and heat so use plenty of lube and patience and a flat blade. Remember the fan unit at the top is just held in place in locating slots and this will come out when the box is split. The little fan resistor is also held in place, these are really fragile so be carefull.
Once the box is separated you will see the flap for the air vent is also located in slots inside the main air chamber so take note of their location when reassembling . Mine were rusted and dirty so were beadblasted, painted and a piece of thin rubber glued on to replace the rotted seal originally fitted. The old heater core comes out quite easily and the new one goes in the same way. The trick is getting everything lined up again in their slots and pushing the two halves together while lining up the flaps, fan motor etc. Found it easier with two people. From memory I think I was able to ziptie the fan motor head to the topframe to help keep it in place during assembly. Unfortunately for me after all that effort when I reassembled it the clips weren't up to the task of holding it together and ended having to get another one!
Cheers,
Len
|
mwg88
Enthusiast
- Total Posts : 32
- Scores: 1
- Reward points: 371
- Joined: 2015/05/24 01:58:23
- Status: offline
Re: Mk2 heater core replacement
2015/06/06 06:30:01
(permalink)
uuuurgh this already sounds infuriating haha. definitely not as easy as 'remove old care, replace new core' is it?
any tips on accessing the heater box? i literally have no idea where to start, any in depth guide appreciated!!
|
PeterM
Master

- Total Posts : 933
- Scores: 34
- Reward points: 4984
- Joined: 2011/08/01 11:02:49
- Status: offline
Re: Mk2 heater core replacement
2015/06/06 09:55:04
(permalink)
Sounds like you need to find a copy of the Ford 1977 Escort Repair Manual printed by Ford.
Chapter 16 - Ventilation, Heating and Accessories/Heater Remove and Install.
Allow 4 to 5 hours for the entire job. Not difficult if mechanically minded.
Manual is available from time to time on Ebay AU.
|
troppo
Aficionado

- Total Posts : 376
- Scores: 8
- Reward points: 4348
- Joined: 2014/01/05 13:45:37
- Status: offline
Re: Mk2 heater core replacement
2015/06/06 10:31:44
(permalink)
Great post NQRS, explains some of the problems really well. Might save some folk from what could be serious problems
|
NQRS
Deity
- Total Posts : 897
- Scores: 58
- Reward points: 6931
- Joined: 2011/08/01 11:02:49
- Location: Townsville QLD Australia
- Status: offline
Re: Mk2 heater core replacement
2015/06/06 11:46:29
(permalink)
Thanks, I was lucky in that my interior was pretty well stripped out so access was pretty easy. If you can't access the manual then you need to be prepared to disconnect a lot of stuff for access. Firstly start in the engine bay and disconnect the heater hoses. Inside the cab take out centre console if fitted. Make sure you mark your wiring for clock, stereo so it all connects up again-marker and masking tape does the job. Same with the centre switch/ ashtray module- in particular watch for where the bottom right hand bracket attaches to the bottom of the heater unit. The heater control cables attach to the heater on the driver side-disconnect these and make sure to watch for the retaining clips. On the front of the unit there will be some wiring attached for the speed control for the fan switch, mark and disconnect. Should be able to get access from P/S footwell.
Once you have a bit of clear access under the dash pull off the heater/ vent tubes- they are just push on and hook them up out of way. The main unit is held in place by 4 bolts at the top where the fan motor fits up into the plenum ( the under bonnet bulge in the firewall ) Should be 10/11mm bolts and a long extension for the ratchet will make access easier. Once undone the unit should come straight out. Be aware there is a rubber seal around the fan unit section at the top where it sits up against the underside of the bulkhead. If its broken/tatty or missing it should be replaced. It can be easily cut out of thin sheet rubber. Then the fun begins......
May have missed some minor details but should cover most of what needs to be done. Also a good opportunity to give it a good clean and a lick of paint. Found all sorts of rubbish in the bottom of mine- leaves etc.
Cheers,
Len
|
mwg88
Enthusiast
- Total Posts : 32
- Scores: 1
- Reward points: 371
- Joined: 2015/05/24 01:58:23
- Status: offline
Re: Mk2 heater core replacement
2015/06/06 17:20:38
(permalink)
Thanks! I had a manual lying around and located the heater replacement section. I'm worried my new core might be the wrong one, the pipes seem to look different to the diagram....
|
mwg88
Enthusiast
- Total Posts : 32
- Scores: 1
- Reward points: 371
- Joined: 2015/05/24 01:58:23
- Status: offline
Re: Mk2 heater core replacement
2015/06/06 17:33:09
(permalink)
Does anyone have any good or bad news about my new core? For. 1976 escort.
Attached Image(s)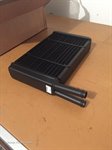
|
troppo
Aficionado
- Total Posts : 376
- Scores: 8
- Reward points: 4348
- Joined: 2014/01/05 13:45:37
- Status: offline
Re: Mk2 heater core replacement
2015/06/06 19:05:07
(permalink)
looks pretty much like the one in my 78
|
mwg88
Enthusiast
- Total Posts : 32
- Scores: 1
- Reward points: 371
- Joined: 2015/05/24 01:58:23
- Status: offline
Re: Mk2 heater core replacement
2015/06/06 19:21:02
(permalink)
|
mwg88
Enthusiast
- Total Posts : 32
- Scores: 1
- Reward points: 371
- Joined: 2015/05/24 01:58:23
- Status: offline
Re: Mk2 heater core replacement
2015/07/25 06:48:44
(permalink)
just an FYI for anyone ever in need - the core I have, and posted a photo above didn't fit. It seems, my 1976 Mk2 still had a Mk1 heater box, and a Mk1 heater core.. managed to make it work with some slight modification.. The core pipes leave the firewall into the engine bay about 3 inches higher than the original.
|
troppo
Aficionado
- Total Posts : 376
- Scores: 8
- Reward points: 4348
- Joined: 2014/01/05 13:45:37
- Status: offline
Re: Mk2 heater core replacement
2015/07/25 09:08:07
(permalink)
good tip mate, a data base of things like that would be so handy. Little things like that could save a lot of headaches for some people
|
Drewdog
Deity
- Total Posts : 1068
- Scores: 173
- Reward points: 5586
- Joined: 2013/03/06 22:31:01
- Status: offline
Re: Mk2 heater core replacement
2015/07/25 13:39:39
(permalink)
From memory the earlier mk2's (late 75 - 76) had the steel type heater box and the 77 on the plastic type..... Good to here you got it all back together and the 'adapt and overcome' spirit is still alive and well  Cheers Drew.....
GT Cortina Project "The Ugly Duckling"
|
troppo
Aficionado
- Total Posts : 376
- Scores: 8
- Reward points: 4348
- Joined: 2014/01/05 13:45:37
- Status: offline
Re: Mk2 heater core replacement
2015/07/25 15:52:13
(permalink)
Y Drewdog
From memory the earlier mk2's (late 75 - 76) had the steel type heater box and the 77 on the plastic type..... Good to here you got it all back together and the 'adapt and overcome' spirit is still alive and well
Cheers Drew.....
Well my 78 has the plastic heater box
|
Nukem
Aficionado
- Total Posts : 91
- Scores: 6
- Reward points: 1730
- Joined: 2013/11/10 01:07:29
- Location: Liverpool NSW
- Status: offline
Re: Mk2 heater core replacement
2015/07/25 19:56:12
(permalink)
Imported mine from England a great quality product but a little costly.
post edited by Nukem - 2015/07/25 20:06:47
Attached Image(s) 
|