troppo
Aficionado

- Total Posts : 376
- Scores: 8
- Reward points: 4348
- Joined: 2014/01/05 13:45:37
- Status: offline

Re: Preserve your door trims
2015/04/25 08:11:38
(permalink)
Thet turned out pretty good Len, where the hell did you find good rear door cards? The only time i`ve seen good ones are the high dollar repro`s
|
NQRS
Deity

- Total Posts : 897
- Scores: 58
- Reward points: 6931
- Joined: 2011/08/01 11:02:49
- Location: Townsville QLD Australia
- Status: offline
Re: Preserve your door trims
2015/04/25 12:29:30
(permalink)
Hi Troppo,
Got lucky and bought an interior advertised on gumtree over in WA. Drewdog lived just down the road from where the gear was and he very generously offered to eyeball the gear for me and let me know if it was any good, which fortunately it was, the front door cards being the ones I've refurbished on this thread. he even organized the freight for me, for which I'm very grateful. The vinyl is a bit knocked around but not so noticeable with now being black. As regards reproduction stuff, I have seen good looking fiberglass ones available on Ebay , which were $175 a pair, if you have good vinyl you can always glue them on and no one would know any different .
Cheers,
Len
|
Flighter
Deity
- Total Posts : 1107
- Scores: 43
- Reward points: 5151
- Joined: 2011/10/17 14:55:59
- Status: offline
Re: Preserve your door trims
2015/04/25 13:32:38
(permalink)
NQRS
used the bags of sand again to keep pressure on the curves in the recess
Reminds me of that line in "The 40 Year Old Virgin".
WTB: Recaro seat - any condition considered
|
NQRS
Deity
- Total Posts : 897
- Scores: 58
- Reward points: 6931
- Joined: 2011/08/01 11:02:49
- Location: Townsville QLD Australia
- Status: offline
Re: Preserve your door trims
2015/04/25 22:00:27
(permalink)
Hi Flighter,
Never did get to see that movie... how did bags of sand come into it??
|
Flighter
Deity
- Total Posts : 1107
- Scores: 43
- Reward points: 5151
- Joined: 2011/10/17 14:55:59
- Status: offline
Re: Preserve your door trims
2015/04/26 10:11:50
(permalink)
I don't want to spoil it for you, so recommend you see it and have a good laugh!
WTB: Recaro seat - any condition considered
|
NQRS
Deity
- Total Posts : 897
- Scores: 58
- Reward points: 6931
- Joined: 2011/08/01 11:02:49
- Location: Townsville QLD Australia
- Status: offline
Re: Preserve your door trims
2015/05/04 15:52:05
(permalink)
Hi All, Second panel finished today. Found fitting from the top allowed more stretch to the material so ended up with reasonable sized edges to finish with. Vinyl followed the contours fairly well, wouldn't be show standard but better than what I had. Finished with alloy strip on top to match the front door trims and silver trim around the ashtrays to breakup the solid black and in keeping with the black/silver theme in the cabin. Next job is the chrome gutter trim - anyone done this job-any hints, please. Got the plastic chrome stuff which will need heating/ softening to fit the curves. Len
Attached Image(s)
|
troppo
Aficionado
- Total Posts : 376
- Scores: 8
- Reward points: 4348
- Joined: 2014/01/05 13:45:37
- Status: offline
Re: Preserve your door trims
2015/05/04 17:43:31
(permalink)
Those rear cards turned out a treat mate, as good as the original ones from the looks
|
NQRS
Deity
- Total Posts : 897
- Scores: 58
- Reward points: 6931
- Joined: 2011/08/01 11:02:49
- Location: Townsville QLD Australia
- Status: offline
Re: Preserve your door trims
2015/05/07 12:46:39
(permalink)
Thanks,
Pulled out the whole rear seat assembly yesterday so I could refit them with all the locating plugs to make it a snug fit. Also gave me the opportunity to give it a bit of a cleanup and take some more pics for my RS build which I didn't take while putting the car together initially. All I have left to do inside now is to get my instruments working properly and/or fit aftermarket gauges and get the fan switch assy working.
Cheers,
Len
|
Drewdog
Deity
- Total Posts : 1073
- Scores: 177
- Reward points: 5652
- Joined: 2013/03/06 22:31:01
- Status: offline
Re: Preserve your door trims
2015/06/21 13:07:58
(permalink)
Went looking for some interior door belts to do mine this week, Scotts was out and most of the sets I found were for the steel top doors. Ended up working out the roll top ones are the same as the outer belts  Used a bit of tie wire to secure them instead of staples.... Freshened the doors up nicely... Cheers Drew.... 
Attached Image(s)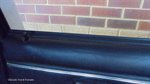
GT Cortina Project "The Ugly Duckling"
|
troppo
Aficionado
- Total Posts : 376
- Scores: 8
- Reward points: 4348
- Joined: 2014/01/05 13:45:37
- Status: offline
Re: Preserve your door trims
2015/06/21 13:17:24
(permalink)
Keeps looking better and better, wish mine was progressing as well lol
|
NQRS
Deity
- Total Posts : 897
- Scores: 58
- Reward points: 6931
- Joined: 2011/08/01 11:02:49
- Location: Townsville QLD Australia
- Status: offline
Re: Preserve your door trims
2015/06/21 13:32:26
(permalink)
Hi Drew,
Are you saying that you used the outer window strips on the inside as well, instead of the metal strip with the felt on it that you would normally staple on to the end of the curve top which fits into the window section?
Len
|
Drewdog
Deity
- Total Posts : 1073
- Scores: 177
- Reward points: 5652
- Joined: 2013/03/06 22:31:01
- Status: offline
Re: Preserve your door trims
2015/06/21 14:04:21
(permalink)
Yeah thats the one Len, they have the metal strip and the felt aswell. There is a slight difference in the angle of the rubber lip that sits on top of the roll but being soft rubber it moulds itself no worries. I needed to drill some 1mm holes in the steel band to get the wire through to secure them. A couple of the roll tops had some 'wobbles' in them but with the help of the steel band and some strategically places ties it straightened and stiffened the whole lot nicely.... Cheers Drew.....
post edited by Drewdog - 2015/06/21 14:20:23
GT Cortina Project "The Ugly Duckling"
|
NQRS
Deity
- Total Posts : 897
- Scores: 58
- Reward points: 6931
- Joined: 2011/08/01 11:02:49
- Location: Townsville QLD Australia
- Status: offline
Re: Preserve your door trims
2015/06/22 14:00:00
(permalink)
Thanks for that Drew, I was thinking of giving you a buzz, the other question was - did you fit the strip into those spring clips that are fitted into the inside of the window frame at the bottom, just like the outer ones are, or are the rolltops too thick. Nice idea as I stapled my strips on and they're not holding up that well so sounds like this might be more secure. I was also thinking of getting plastic strips with felt glued on as they would be easier to staple but your suggestion sounds better.
Cheers,
Len
|
NQRS
Deity
- Total Posts : 897
- Scores: 58
- Reward points: 6931
- Joined: 2011/08/01 11:02:49
- Location: Townsville QLD Australia
- Status: offline
Re: Preserve your door trims
2015/09/01 18:02:29
(permalink)
Hi Drew,
Had to pull my door trim off to fix the armrest mounting clip so decided to redo the inner trim seal the same way as you said in your previous post. The seal is nice and firmly fixed and provides a good seal against the window and looks a lot neater too. Will now redo the other side. Nice bit of innovation!!
Cheers,
Len
|
Drewdog
Deity
- Total Posts : 1073
- Scores: 177
- Reward points: 5652
- Joined: 2013/03/06 22:31:01
- Status: offline
Re: Preserve your door trims
2017/12/29 19:26:24
(permalink)
Had a go at the chrome beading on my door cards today. Picked up a roll of 12mm chrome pinstripe foil from my local parts shop for around fifteen bucks. Plenty enough to do all four doors. Spent a fair bit of time cleaning them with soapy water then wax and grease remover and the foil seems to have stuck alright. I guess time will tell when it heats and contracts in the weather but pretty happy with it for now. 
Attached Image(s)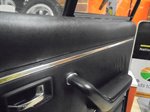
GT Cortina Project "The Ugly Duckling"
|