Phil
Supporter

- Total Posts : 1786
- Scores: 35
- Reward points: 4581
- Joined: 2011/08/01 11:02:49
- Location: Sydney NSW Australia
- Status: offline

RE: Sean's Coilover Conversion
2006/08/29 22:47:12
(permalink)
quote:
Originally posted by Sean
[br]quote:
Originally posted by Phil
[br]A new set of wheels will have to follow soon[:p][%]so you can show off the brakes and struts[;^)]
Do you know what the approximate lead time is on new wheels?
I would say allow 6 weeks,maybe less...but it all depends on who is making them[;^)]
|
BLOWNMK12L
Supporter

- Total Posts : 273
- Scores: 4
- Reward points: 1377
- Joined: 2011/08/01 11:02:49
- Location: Tamworth NSW Australia
- Status: offline
RE: Sean's Coilover Conversion
2006/08/30 01:46:36
(permalink)
What wheels you going for Sean ?
|
Sean
Supporter

- Total Posts : 458
- Scores: 10
- Reward points: 5482
- Joined: 2011/08/01 11:02:49
- Location: Sydney NSW Australia
- Status: offline
RE: Sean's Coilover Conversion
2006/01/09 23:13:22
(permalink)
quote:
Originally posted by BLOWNMK12L
[br]What wheels you going for Sean ?
Still to be confirmed.
|
Sean
Supporter
- Total Posts : 458
- Scores: 10
- Reward points: 5482
- Joined: 2011/08/01 11:02:49
- Location: Sydney NSW Australia
- Status: offline
|
Phil
Supporter
- Total Posts : 1786
- Scores: 35
- Reward points: 4581
- Joined: 2011/08/01 11:02:49
- Location: Sydney NSW Australia
- Status: offline
RE: Sean's Coilover Conversion
2006/02/09 08:47:41
(permalink)
Awsome Progress!!! 
|
Sean
Supporter
- Total Posts : 458
- Scores: 10
- Reward points: 5482
- Joined: 2011/08/01 11:02:49
- Location: Sydney NSW Australia
- Status: offline
RE: Sean's Coilover Conversion
2006/04/09 00:00:42
(permalink)
More progress...
Saturday was painting day
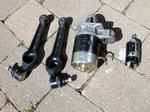
Along with the new struts I also had some other components to paint... I recently bought some new lower control arms and starter motor so they went onto the list of things to paint aswell. The following pic shows these items prior to stripping them back to bare metal ready for primer.
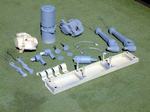
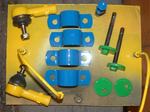
Most other items for the coilover conversion had previously been taken back to bare metal and prepared for priming. All that was left to do now was give everything a wipe over with Wax & Grease Remover and then onto priming. Pic below shows steerings arms, calipers, tie rod ends, lower control arms, starter motor, adjustable camber pins, front brake lines and anti dive kit, which I also recently purcased from SPEAD Design.
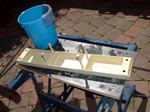
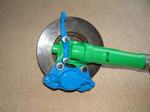
The strut legs and hubs were primed previously, so now everything was ready for the next stage. With the great weather we had on Saturday the primer dried quickly so I was able to start rubbing all the parts back with 1200 grade wet & dry paper to give a smooth finish. This pic shows the anti dive support being rubbed back ready for painting. The bolts in the support are just old ones to keep it elevated when painting.
I try to keep the primer coat quite thin because if there is too much paint and primer on the parts they can chip more easily when reassembling on the car. The only draw back is when rubbing back primed parts you can somtimes go through to the bare metal, but this is easily fixed with a few quick touch ups and another light rub with the wet & dry paper.
After finalising preparation of all the primed parts they again received a wipe over with the Wax & Grease Remover and were ready for painting. As I was using various colours for painting different components I kept a list of what colour each part was to be to help calculate how much of each colour had to be mixed and also to ensure no part was forgotten before moving on to the next colour. For mixing the 2-pak I use glass jars and measure out the ratios beforehand using water and then marking the levels on the side of the jar with a marker. For the 2-pak the ratio was 4 parts paint, 1 part thinner and 1 part hardener.
Just before painting the parts are given a quick wipe over with a tack cloth to ensure not dust particles are present and then painting begins. Care has to be taken to only apply thin coats to avoid paint runs. Its very easy for the paint to run on car parts as they are often quite intricate with lots of corners and there is the temptation to get paint into all the nooks and crannys on the first coat. Generally 3 light coats should cover it, with close inspection to see if any areas need another quick blast of paint.
A small touch-up paint gun is used for these smaller car parts and it is very importaant to clean it thoroughly before moving on to the next colour.
Well, enough rambling... here are some pics of the majority of painted parts the day after painting...
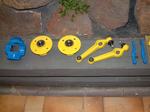
One of the lower control arms fell from its hanger just after being painted so it will probably have to be repainted and the starter motor being half blue, half yellow will have to get its yellow half painted once its safe to mask off the blue section.
|
jds
Enthusiast
- Total Posts : 66
- Scores: 0
- Reward points: 0
- Joined: 2011/08/01 11:02:49
- Location: Melbourne Australia
- Status: offline
RE: Sean's Coilover Conversion
2006/04/09 00:36:37
(permalink)
Top work Sean.
Never knew you could get adjustable camber pins for MK2 Escort. Where from and how much please? These obviously go through the bottom control arm and the engine X member.. but I'm not sure on how it works.
|
Paul Dunstan
Supporter
- Total Posts : 1378
- Scores: 35
- Reward points: 4790
- Joined: 2011/08/01 11:02:49
- Location: Adelaide SA Australia
- Status: offline
RE: Sean's Coilover Conversion
2006/04/09 07:41:25
(permalink)
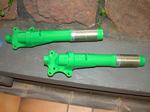
I was curious about the camber kit also.........the green bolts? Basically you need to elongate the original lower control arm mount in the cross member to allow the required movement when adjusting. 2 stops are added to the cross member which suits the diameter of the eccentric disc attached to the bolt so when turning the bolt the offset of the disc moves the bolt along the path of the slotted mounting hole. This effectively moves the mounting point of the control arm in or out depending on the position of the disc in relation to the bolt location. Hope that makes sense - a picture would be a thousand words right now [:I] Early Falcons (XA,XB etc) used the same principle to adjust camber..... Sean, GREAT JOB!!!![:u] Thanks for colour coding as it makes it easier to point out the relavent component 
|
2lt_Scort
Supporter

- Total Posts : 1285
- Scores: 23
- Reward points: 5188
- Joined: 2011/08/01 11:02:49
- Location: Adelaide Australia
- Status: offline
RE: Sean's Coilover Conversion
2006/04/09 08:31:03
(permalink)
Looks like its all come up well. What first triggered the colour scheme or your car?
Also interest about these bolts.
Rhys
|
Sean
Supporter
- Total Posts : 458
- Scores: 10
- Reward points: 5482
- Joined: 2011/08/01 11:02:49
- Location: Sydney NSW Australia
- Status: offline
RE: Sean's Coilover Conversion
2006/04/09 09:34:48
(permalink)
Paul pretty much summed up how the camber pins work. I will take a picture of them in the crossmember when they go back in.
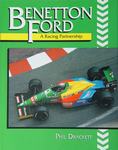
With the colour scheme... When I originally detailed the car I knew I wanted a high quality finish on everything so figured there was not much point painting everything black or grey as it wouldn't show off the countless hours spent to achieve the finish. It was then a Matter of finding a colour scheme which complimented the red and stood out like dogs balls [:p] I thought you couldn't get something that stands out much more than the old F1 Benetton Ford...
|
Paul Dunstan
Supporter
- Total Posts : 1378
- Scores: 35
- Reward points: 4790
- Joined: 2011/08/01 11:02:49
- Location: Adelaide SA Australia
- Status: offline
RE: Sean's Coilover Conversion
2006/04/09 10:17:47
(permalink)
Sean
Have you used the genuine Ford camber pins used on the Falcon? If not, what have you used to suit the inside diam of the TCA bush? What amount of variation (degrees) could you get with just the lower adjustment?
Combined with the adjustable top mounts you should get PLENTY of negative camber!
|
Sean
Supporter
- Total Posts : 458
- Scores: 10
- Reward points: 5482
- Joined: 2011/08/01 11:02:49
- Location: Sydney NSW Australia
- Status: offline
RE: Sean's Coilover Conversion
2006/06/09 18:17:12
(permalink)
quote:
Originally posted by Paul Dunstan
[br]Sean
Have you used the genuine Ford camber pins used on the Falcon? If not, what have you used to suit the inside diam of the TCA bush? What amount of variation (degrees) could you get with just the lower adjustment?
Combined with the adjustable top mounts you should get PLENTY of negative camber!
The camber pins are old K-Mac items, however they are no longer made. They probably wouldn't be too hard to make yourself
I am not exactly sure how many degrees of camber they give, but from memory the slot in the crossmember is about 20mm long.
|
Timmeh
Enthusiast
- Total Posts : 287
- Scores: 0
- Reward points: 0
- Joined: 2011/08/01 11:02:49
- Location: Australia
- Status: offline
RE: Sean's Coilover Conversion
2006/09/19 12:52:30
(permalink)
Wow - what a paint job! Really good thread, Sean, lots of information! I've just completed a similar conversion only I used Escort struts, and my paint scheme was alot more timid! I used clamps to hold the threaded tube in place to set and check the height of the threaded tube before welding them. I won't hijack your thread with the life story of mine, I've put them in my rally car thread in the showroom (which should ideally be in this Projects folder), but here is how mine turned out:  Looking forward to seeing yours all together! Tim
|
Sean
Supporter
- Total Posts : 458
- Scores: 10
- Reward points: 5482
- Joined: 2011/08/01 11:02:49
- Location: Sydney NSW Australia
- Status: offline
RE: Sean's Coilover Conversion
2006/03/11 23:09:05
(permalink)
Well, its been a while, so I thought I better post another update...
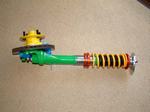
The struts are almost completely assembled now.
The discs were given a bit of a clean up and the centres painted with heat proof paint. New wheel bearings and seals were fitted to the hubs before they were re-greased and fitted to the stub axles. The new wheel studs were also fitted to the hubs.
The calipers were fitted to the struts using new 7/16" UNF bolts and washers. Steering arms were also fitted using new bolts, Nylock nuts and washers.
Before fitting the Bilstein inserts into the strut tubes, 3mm spacers were used to ensure the inserts sat at the right height at the top of the strut tubes. This modification is only required as a result of using Escort inserts in Capri strut legs, with the Capri tubes being 3mm longer internally. New seals were also fitted to the insert retaining collars before they were screwed into place.
Some pics of semi-assembled struts...
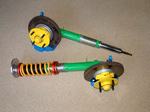
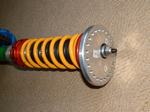
The adjustable top plates will have to be spaced up it seems as they will sit below the threaded section at the top of the insert shaft otherwise. As you can see in pics I just trial fitted one top to work out how much they will need to be packed up.
I also was trialing a dust shield which was made from a steering rack boot. The fit was reasonably good with there outer diameter being only a little large meaning they would rub on the springs. Anyway, after speaking to various people it seems the dust shields aren't really needed when using Bilstein inserts, so I will probably go without them.
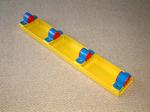
Here is a pic of the anti dive kit, all painted and ready to go into the car...
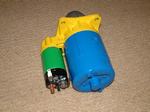
Finally, a pic of the new starter motor, which also jumped into the painting pool while I was at it...
|
Mickas 
Aficionado

- Total Posts : 624
- Scores: -38
- Reward points: 757
- Joined: 2011/08/01 11:02:49
- Location: Gold Coast Queensland Australia
- Status: offline
RE: Sean's Coilover Conversion
2006/03/11 23:16:54
(permalink)
Are you calling the car a box of M and M's
so many colours...technicolours[88]
|