sniffy
Enthusiast

- Total Posts : 17
- Scores: 0
- Reward points: 493
- Joined: 2013/09/02 08:03:28
- Status: offline
Mk1 project
This is my Mk1 project. Its just a hobby really, something I've always wanted to do, something hands-on to distract me from my day job. I've been doing bits and pieces over the last 3 years, but decided to have a proper crack at it, so decided to build my own rotisserie. Built from 30m of RHS of differing sizes, 6 castor wheels, 2 x 8tonne jacks, 60 bolts, 4 cans of spray paint and a few other bits and pieces.  
post edited by sniffy - 2013/09/05 18:10:18
Attached Image(s)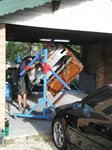 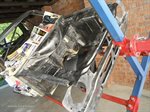
|
MK1_Oz
Aficionado

- Total Posts : 466
- Scores: 9
- Reward points: 4285
- Joined: 2011/08/01 11:02:49
- Location: South Australia
- Status: offline

Re: Mk1 project
2013/09/05 19:37:50
(permalink)
Looks like a nice one.
So what are the plans for the car?
|
2lt_Scort
Supporter

- Total Posts : 1285
- Scores: 23
- Reward points: 5188
- Joined: 2011/08/01 11:02:49
- Location: Adelaide Australia
- Status: offline
Re: Mk1 project
2013/09/06 07:38:27
(permalink)
Good work on the rotisserie. Looks more like what I 'should' have built with the jacks built in.
Rhys
|
sniffy
Enthusiast
- Total Posts : 17
- Scores: 0
- Reward points: 493
- Joined: 2013/09/02 08:03:28
- Status: offline
Re: Mk1 project
2013/09/06 13:39:40
(permalink)
|
sniffy
Enthusiast
- Total Posts : 17
- Scores: 0
- Reward points: 493
- Joined: 2013/09/02 08:03:28
- Status: offline
Re: Mk1 project
2013/09/06 13:50:56
(permalink)
With a more powerfull engine, I thought the front crossmember to chassis rail connection needed beefing up. I've seen it done on other escorts, so bought some bolts & tube, then drilled holes through the chassis.   All welded up with some 3mm plate under the rail for extra support. 
|
sniffy
Enthusiast
- Total Posts : 17
- Scores: 0
- Reward points: 493
- Joined: 2013/09/02 08:03:28
- Status: offline
Re: Mk1 project
2013/09/06 14:14:50
(permalink)
I bought a roll cage kit from Rod Andrews Race Cars. It came with the main hoop, front pillar legs & roof bar already bent and enough straight bar to cut & weld the rest. I am 6'4, so wanted the main hoop as far back as possible. Rear floor boxes:  And fronts, extended forward because I didn't like the idea of have a sharp corner of the box right next to my ankle.  Cage getting tacked in:  
|
sniffy
Enthusiast
- Total Posts : 17
- Scores: 0
- Reward points: 493
- Joined: 2013/09/02 08:03:28
- Status: offline
Re: Mk1 project
2013/09/06 14:26:46
(permalink)
Boxes out and dropped down to weld around the tops.   Then back up into its final position.  Time for some diagonals. This is where I wished we had a rotisserie. My mate Craig doing the welding.   Roll cage tied into the 4-link boxes and trans tunnel.
|
sniffy
Enthusiast
- Total Posts : 17
- Scores: 0
- Reward points: 493
- Joined: 2013/09/02 08:03:28
- Status: offline
Re: Mk1 project
2013/09/06 14:34:16
(permalink)
|
72mk1
Enthusiast
- Total Posts : 4
- Scores: 1
- Reward points: 4
- Joined: 2013/09/01 16:20:24
- Status: offline
Re: Mk1 project
2013/09/07 15:18:44
(permalink)
Nice work sniff,
she'll be real stiff shell!...nice work
Are you from Brizzy?
|
72mk1
Enthusiast
- Total Posts : 4
- Scores: 1
- Reward points: 4
- Joined: 2013/09/01 16:20:24
- Status: offline
Re: Mk1 project
2013/09/07 15:20:09
(permalink)
We'll you be using bubble arches at all?
|
sniffy
Enthusiast
- Total Posts : 17
- Scores: 0
- Reward points: 493
- Joined: 2013/09/02 08:03:28
- Status: offline
Re: Mk1 project
2013/09/09 09:00:43
(permalink)
72mk1
We'll you be using bubble arches at all?
Yes mate, bubble arches are going on soon, and no, not from Brizzy, although I did live there about 5yr ago. I have some ADR compliant bucket seats, made these brackets to mount them as low and far back as possible. Made from 35 x 35 x 3mm and 75 x 75 x 4mm RHS, with 3mm end plates. 
Attached Image(s)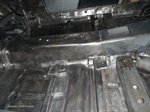
|
ESCORTWIL145
Enthusiast
- Total Posts : 54
- Scores: 0
- Reward points: 1016
- Joined: 2012/03/07 13:55:14
- Status: offline
Re: Mk1 project
2013/09/11 13:47:10
(permalink)
Looks great, keep up the good work.....
|
sniffy
Enthusiast
- Total Posts : 17
- Scores: 0
- Reward points: 493
- Joined: 2013/09/02 08:03:28
- Status: offline
Re: Mk1 project
2013/09/17 14:03:36
(permalink)
I decided an SR20DET was the best option for me. Low cost, decent power, heaps of upgrade options, good local support to tune, generally a good bang for buck motor. So I bought a front cut, nearly 4 yrs ago  . The engineer said it should be pretty straight forward to certify if I use the factory computer, turbo and all polution gear. This is the plan, to start with, with plans for an upgrade once going. The front cut:  Engine out and mounted:  This is mounted over a standard world cup crossmember, with stearing rack at standard height. I had to modify the sump to get it to sit this low. You can see the bottom of the sump hangs low, it is equal hieght to the bottom of the cross member. I will make up a sump guard just to be sure.  The turbo has just enough clarence over the engine mount. I will trim the mount a bit before getting it powder coated, to allow for a bigger turbo in the future. I just got the sump back from the aluminium welders, will post some pics later.
|
sniffy
Enthusiast
- Total Posts : 17
- Scores: 0
- Reward points: 493
- Joined: 2013/09/02 08:03:28
- Status: offline
Re: Mk1 project
2013/09/17 14:22:35
(permalink)
A couple of helpers for the intercooler install:  I bought a 2.5" universal intercooler pipe kit from ebay, along with a few extra silicon bends / reducers etc.  Headlights in to show clearence:  
|
sniffy
Enthusiast
- Total Posts : 17
- Scores: 0
- Reward points: 493
- Joined: 2013/09/02 08:03:28
- Status: offline
Re: Mk1 project
2013/09/17 14:35:37
(permalink)
Some of you may have seen this trick before, I stole the idea from the internet somewhere. When you cut intercooler pipes for a custom install you cut off the factory bead roll end. This is a $12 tool to reinstate the bead roll, so your silicon hoses don't blow off  Get an old pair of vise grips (and buy yourself a new pair), an exhaust clamp the same size as your intercooler pipes, an appropriate size washer and your welder. The pictures show how it works:   
|