Drewdog
Deity

- Total Posts : 1073
- Scores: 177
- Reward points: 5652
- Joined: 2013/03/06 22:31:01
- Status: offline

Re: Yellow RS project
2013/12/08 15:17:44
(permalink)
Moving house next week so at the moment the RS is resembling a trailer, the first bit a packing I did was the car, haha gotta get the priorities right  The new place only has a single garage, but an enormous powered and lit workshop, maybe not such a good thing, I can see some all nighters on the cards.... The new engine is on the stand and being stripped before a trip to the machine shop to be checked before building.... Times at a premium at the moment, looking forward to a break over Christmas to get in and tidy up some loose ends in the car....
Attached Image(s)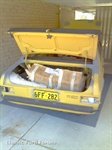 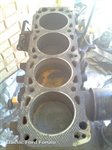
GT Cortina Project "The Ugly Duckling"
|
Drewdog
Deity
- Total Posts : 1073
- Scores: 177
- Reward points: 5652
- Joined: 2013/03/06 22:31:01
- Status: offline
Re: Yellow RS project
2014/01/18 18:56:56
(permalink)
 Well the cars taught an old dog a few more tricks, I've done a bit of painting before but not to this extent, I've borrowed a compressor and spray gun from a mate, boothed off the garage and started prepping, priming and spraying sundry parts. Bit of a learning curve, first time I've used 2pak. Alls going well although I did make a mess of the cam cover and had to start again. The pedal box is back together with new nolathane bushes and pedal rubbers. Had to make new rubbers for the splash guards secured with stainless wire and new stainless screws. Starter was re-bushed and re assembled. Test fire went well, all works fine  Got the headlight assembly back together with help from a diagram on the site, stainless screws once again. I've fitted modern 'angel eye' headlamps with ultra white globes. Really in two minds about this, I think they look a bit modern but I've always wanted decent lighting on the car. Still to decide whether they stay as I 've got a nice set of original lights aswell. Will post a pic of the test fit and them working. Next is to rebuild the vacumn booster for the brakes and box all the other bits .....anyway thats next weekend.............
post edited by Drewdog - 2014/01/18 19:00:05
GT Cortina Project "The Ugly Duckling"
|
The Other Half
Enthusiast

- Total Posts : 294
- Scores: 1
- Reward points: 3800
- Joined: 2011/08/01 11:02:49
- Location: Perth, W.A. Australia
- Status: offline
Re: Yellow RS project
2014/01/18 19:47:07
(permalink)
Post details of how you do the vacumn booster mate. I'd like to do this one day too. Cheers
|
79Escort
Aficionado

- Total Posts : 208
- Scores: 10
- Reward points: 4238
- Joined: 2011/08/01 11:02:49
- Location: Adelaide
- Status: offline
Re: Yellow RS project
2014/01/18 19:54:16
(permalink)
Looking good Drewdog!
Was the pedal box straight forward? I'm about to do mine in the next week. Also noticed your accelerator pedal arm is grey, was it like that originally or did you choose to paint it a different colour? I really like it grey. Mine is black with the rest of the box so thats why it caught my eye.
Cheers,
Ryan
|
Drewdog
Deity
- Total Posts : 1073
- Scores: 177
- Reward points: 5652
- Joined: 2013/03/06 22:31:01
- Status: offline
Re: Yellow RS project
2014/01/19 12:02:11
(permalink)
Thanks guys, I'll get a few pics of the booster as I'm going, it should be the same as the one I did on the Cortina a while back, from memory the hardest bit was getting it open as it's pressed together. Most of the recon guys cut them open and use a clamping band to get it back together which I'm not real keen on.... Ryan, I'm pretty sure it was originally silver or at least mine was, I almost painted it black, but I'm glad I didn't now. It was an easy job just make sure you write down the sequence of the washers and spacers to save a heap of head scratching The nolathanes are heaps fatter than the originals and it was a two person job to get it all squeezed back together and the last clip put back in. Cheers Drew.........
GT Cortina Project "The Ugly Duckling"
|
Flighter
Deity
- Total Posts : 1107
- Scores: 43
- Reward points: 5151
- Joined: 2011/10/17 14:55:59
- Status: offline
Re: Yellow RS project
2014/01/23 20:07:51
(permalink)
Accelerator rod was unpainted (or silver) when new.
WTB: Recaro seat - any condition considered
|
79Escort
Aficionado
- Total Posts : 208
- Scores: 10
- Reward points: 4238
- Joined: 2011/08/01 11:02:49
- Location: Adelaide
- Status: offline
Re: Yellow RS project
2014/01/28 00:00:45
(permalink)
Ok cheers guys, and thanks for the heads up Drew much appreciated.
Keep the pics coming, will be a very nice car once complete
Ryan
|
Drewdog
Deity
- Total Posts : 1073
- Scores: 177
- Reward points: 5652
- Joined: 2013/03/06 22:31:01
- Status: offline
Re: Yellow RS project
2014/02/01 15:46:04
(permalink)
A TRIP TO THE CHROME SHOP..... Well I wasn't happy with the headlight bezels so I bit the bullet and had them re-finished. Theres only one chrome shop I'll use here in perth, his work is second to none, so are his prices though. I went to drop them off and get a price, he pulled out the calculator, hit a few buttons, smiled and took a whole weeks car budget off me. I honestly think he just typed in 'B00BIES' then pulled a number out of his head I'm not knocking him, they are perfect. Spent the rest of my Saturday cleaning glass, I've got a full set of factory tint which came up great with some CLR and a heap of elbow grease. I've also started smoothing the cast marks out of the mirrors, the one on the left of the pic is finished. Its always bothered me so I'm happy to do them. They'll be painted at the same time as the car........ That's it for another week..... Drew.....
GT Cortina Project "The Ugly Duckling"
|
Drewdog
Deity
- Total Posts : 1073
- Scores: 177
- Reward points: 5652
- Joined: 2013/03/06 22:31:01
- Status: offline
Re: Yellow RS project
2014/02/14 20:17:32
(permalink)
We're getting close now, after doing a heap of extra hours at work and a lot of searching, I've found a painter and have the money to pay him....... The car goes in the week after next..... Woohoo!!!!!! It's all bar a shell now, this was the first time the nosecones been off, it complied really well and only took a bit of crc, I was quite surprised. Engine comes out tomorrow then I've just got a bit of tidying up and I need to por15 the inside of the doors, theres not going to be much sleep tonight I'll be out there at the crack of dawn tomorrow
Attached Image(s)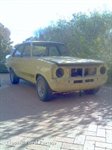 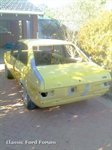
GT Cortina Project "The Ugly Duckling"
|
Flighter
Deity
- Total Posts : 1107
- Scores: 43
- Reward points: 5151
- Joined: 2011/10/17 14:55:59
- Status: offline
Re: Yellow RS project
2014/02/15 11:10:42
(permalink)
Congrats! Let me know when the painting is done, as I'd love to come see it sometime.
WTB: Recaro seat - any condition considered
|
war
Enthusiast
- Total Posts : 106
- Scores: 1
- Reward points: 3960
- Joined: 2011/08/01 11:02:49
- Location: Perth
- Status: offline
Re: Yellow RS project
2014/02/15 11:38:23
(permalink)
exciting cant wait for the pics.
have you built the engine yet
|
Drewdog
Deity
- Total Posts : 1073
- Scores: 177
- Reward points: 5652
- Joined: 2013/03/06 22:31:01
- Status: offline
Re: Yellow RS project
2014/03/24 16:20:34
(permalink)
Well folks its back................. Very happy with the outcome the painter did a great job. It's eye stinging yellow at the moment but should settle down with some trim fitted. There are a couple of little blemishes that only I'm going to notice (haha spent an hour just staring at it) The only other thing is the mirrors have been sprayed yellow by mistake, not a drama we can change that but they're sort of growing on me so might stay that way..... I'm not going to touch it today, waiting for the weekend to start when I have more time and the excitement has worn off a bit. In the mean time I'll be doing plenty more staring with a coopers vintage homebrew I did especially for this day, haha might even splash a bit on the car, cleaning it off straight away
GT Cortina Project "The Ugly Duckling"
|
Drewdog
Deity
- Total Posts : 1073
- Scores: 177
- Reward points: 5652
- Joined: 2013/03/06 22:31:01
- Status: offline
Re: Yellow RS project
2014/03/30 14:04:17
(permalink)
It's starting to look a bit more of a car now as opposed to a bare shell....... Got the rear wiring, lights, headlight mounts and quarter windows in. Its slow going but nice to be fitting new parts to a clean shell. All the panel prep has paid off, its dead straight now, very happy with it.......... another Saturday well spent................
GT Cortina Project "The Ugly Duckling"
|
Drewdog
Deity
- Total Posts : 1073
- Scores: 177
- Reward points: 5652
- Joined: 2013/03/06 22:31:01
- Status: offline
Re: Yellow RS project
2014/04/05 16:02:48
(permalink)
It's starting to look like an RS2000 again..... Got up at sparrows fart and started hanging the nosecone. Slow going, it took a fair bit of fitting and adjusting to get the panel gaps right, they came up a treat in the end. I'll be fitting the headlight surrounds after the engine goes in so I can get the headlights adjusted when the cars at driving height..... The colour coded mirrors, although a **** up by the painter, are growing on me so I think they'll stay.... Cheers Drewdog..............
post edited by Drewdog - 2014/04/05 16:06:04
GT Cortina Project "The Ugly Duckling"
|
Drewdog
Deity
- Total Posts : 1073
- Scores: 177
- Reward points: 5652
- Joined: 2013/03/06 22:31:01
- Status: offline
Re: Yellow RS project
2014/05/17 13:52:41
(permalink)
Feel like I'm just chipping away at the moment but things are coming along nicely. Got the rear bumper and numberplate mount on, the bumper took a whole arvo to get it gapped and hung straight, slowly tightening one bolt, loosening another etc.... The battery box and electrical cut off went in then came straight out again, the bolts are visible from the outside and while they were nice stainless they screamed 'gutter bolt' I ended up using round headed stud types, much better Some of the underdash has gone in along with the aerial and windscreen wipers, I couldn't find the plastic washers for the wipers so ended up using nylon tap washers, you'd never know.... Under the bonnet I've polished the vin plates, put on some decals (thanks Spanner they're perfect) and painted the vin number silver as it should be. Finished riveting the nosecone and chrome strips on the doors, It's getting expensive using marine stainless nuts, bolts and rivets but I'm glad I'm doing it. Windows were going to be this weekend but I've had the run around from rare spares with the bailey channel, they sold me the wrong kit then only had enough for one door on the shelf, two week wait for the others, bummer..... Anyway that's it for now, heading out to the shed to finish buffing the sill trims.... Cheers Drew......
post edited by Drewdog - 2014/05/17 14:01:03
GT Cortina Project "The Ugly Duckling"
|