blue74
Master

- Total Posts : 301
- Scores: 28
- Reward points: 4184
- Joined: 2015/04/16 12:54:53
- Status: offline

Re: CAPRI ON EBAY
2016/12/13 22:41:46
(permalink)
I had issues fitting fibreglass guards as well, I ended up having to cut the web that runs down the rear edge of the guard to get it to fit properly.
I had wondered whether it was because I didn't fit the guards to the car when I first got them and they cured over time the way they were stored.
Next time I need to use fibreglass guards I will make sure I can fit them to the body sooner.
|
spud15
Supporter

- Total Posts : 1237
- Scores: 36
- Reward points: 5597
- Joined: 2011/08/01 11:02:49
- Location: Melbourne
- Status: offline
Re: CAPRI ON EBAY
2017/02/11 16:54:55
(permalink)
The panel beater is a bit fussy - we pulled the scuttle off - to clean up underneath. We'll replace it - ive prepared the new one - except ill coat the underside before we install  the vent opening is quite clean but did have paint build up - years of re-sprays  he stripped the whole car back - again - getting it ready for epoxy   
post edited by spud15 - 2017/02/11 16:59:16
|
spud15
Supporter
- Total Posts : 1237
- Scores: 36
- Reward points: 5597
- Joined: 2011/08/01 11:02:49
- Location: Melbourne
- Status: offline
Re: CAPRI ON EBAY
2017/02/11 16:57:54
(permalink)
|
spud15
Supporter
- Total Posts : 1237
- Scores: 36
- Reward points: 5597
- Joined: 2011/08/01 11:02:49
- Location: Melbourne
- Status: offline
Re: CAPRI ON EBAY
2017/02/11 17:03:58
(permalink)
and he wants steel - all round - so we tackled the original bonnet first. It still has the original paint on it - underneath a coat of red. Its been smacked and has rust in the front. Ive sliced the internal frame off - makes the repair easier. Ill repair the rusted frame before I reinstall. First - lashings of paint stripper, then wrap it in plastic to bake over night (comes off easier)    its the longest resto ive done - keep getting side tracked - and each time I re-start - end up replacing more panels. But it is a very nice shell with all of the lines there..
|
in rod we trust
Aficionado

- Total Posts : 447
- Scores: 4
- Reward points: 1985
- Joined: 2016/02/27 17:13:04
- Status: offline
Re: CAPRI ON EBAY
2017/02/12 13:59:08
(permalink)
good stuff spud looks good so far
|
spud15
Supporter
- Total Posts : 1237
- Scores: 36
- Reward points: 5597
- Joined: 2011/08/01 11:02:49
- Location: Melbourne
- Status: offline
Re: CAPRI ON EBAY
2017/02/15 19:42:46
(permalink)
 Thanks for the comment - im really happy I took the panel beater on - I get a bit impatient and rush it sometimes -he is making the end result very worthwhile. the bonnet was very gungy - cleaned it up with a scotchbrite disc   the front edge had rolled under - reefed it back - only 3 appreciable dents in the snout - will let the beater fix them  some major work needed to the frame  beaters been working on the scuttle area
|
spud15
Supporter
- Total Posts : 1237
- Scores: 36
- Reward points: 5597
- Joined: 2011/08/01 11:02:49
- Location: Melbourne
- Status: offline
Re: CAPRI ON EBAY
2017/03/02 17:45:42
(permalink)
finished some repairs to pass guard   set up the repair sections using these little clamps I scored off flea bay - hold the panels and allow for good weld intrusion   I folded a new repair panel up - the beater had to camber the top face a little in order to follow the original plane - we blew compressed air over the weld as we went to stop distortion  welded in a little return to btn the guard and scuttle
|
spud15
Supporter
- Total Posts : 1237
- Scores: 36
- Reward points: 5597
- Joined: 2011/08/01 11:02:49
- Location: Melbourne
- Status: offline
Re: CAPRI ON EBAY
2017/03/02 17:59:23
(permalink)
|
in rod we trust
Aficionado
- Total Posts : 447
- Scores: 4
- Reward points: 1985
- Joined: 2016/02/27 17:13:04
- Status: offline
Re: CAPRI ON EBAY
2017/03/02 18:58:13
(permalink)
its good to see the end result after welding and repairing them ..
nice work
just a tip if some of those holes aren't that big you could place copper coin's or pennys or strips , just make sure its at least 3mm thinkmess copper under them to fill in the holes or copper strip also helps keep the heat on the copper instead of the panel
its comming along well spud
|
deano
Deity
- Total Posts : 1612
- Scores: 432
- Reward points: 3732
- Joined: 2015/08/19 10:49:10
- Status: offline
Re: CAPRI ON EBAY
2017/03/03 11:44:01
(permalink)
looks cool spud. I bought some of those clamps also after the suggestion on the garage tools thread but are yet to try them.
Can I ask, with the guard repair, did you just fold up the top of the repair section up straight, or did you have to do a slight compound curve? I imagined over that length it would have had a bit of a curve?
Taking a guard that buggered and making it useable again would be pretty rewarding I expect.
|
spud15
Supporter
- Total Posts : 1237
- Scores: 36
- Reward points: 5597
- Joined: 2011/08/01 11:02:49
- Location: Melbourne
- Status: offline
Re: CAPRI ON EBAY
2017/03/03 13:10:24
(permalink)
Just flat surfaces when folding - the beater put a little curvature in the top face - but it was v mild.
Yes that's the joy of restoring - that car - 2 a pillars, 2 floor sections, 2 sills, vent panel front and rear, tail light panel, repairs to quarters, "new" guards, front sub frame, boot floor repair etc etc - but it's turned out t b a straight shell with v little bog. He measured it all up - no distortion worth speaking of - another one salvaged. V satisfying ...
|
Wiggy333
Deity
- Total Posts : 1012
- Scores: 42
- Reward points: 3744
- Joined: 2014/12/01 13:28:20
- Location: Sydney
- Status: offline
Re: CAPRI ON EBAY
2017/03/04 08:09:46
(permalink)
Very well done Spud you have certainly been busy on it.
|
spud15
Supporter
- Total Posts : 1237
- Scores: 36
- Reward points: 5597
- Joined: 2011/08/01 11:02:49
- Location: Melbourne
- Status: offline
Re: CAPRI ON EBAY
2017/03/04 08:36:11
(permalink)
in rod we trust
its good to see the end result after welding and repairing them ..
nice work
just a tip if some of those holes aren't that big you could place copper coin's or pennys or strips , just make sure its at least 3mm thinkmess copper under them to fill in the holes or copper strip also helps keep the heat on the copper instead of the panel
its comming along well spud
Yes the beater has a little copper strip he uses on the small stuff - we replaced more rather than less on the big repairs
|
Wiggy333
Deity
- Total Posts : 1012
- Scores: 42
- Reward points: 3744
- Joined: 2014/12/01 13:28:20
- Location: Sydney
- Status: offline
Re: CAPRI ON EBAY
2017/03/04 17:55:52
(permalink)
I'd be interested to know what spot weld drilling you have. Nice clean holes and some really close to the edge and with no break through. Nice work. I seem to find 1 and 2 cent pieces in my cars when I pull them apart. Funny how they can help you put one back together.
|
spud15
Supporter
- Total Posts : 1237
- Scores: 36
- Reward points: 5597
- Joined: 2011/08/01 11:02:49
- Location: Melbourne
- Status: offline
Re: CAPRI ON EBAY
2017/03/04 18:22:52
(permalink)
☄ Helpfulby accapmad 2017/03/05 16:48:04
Drill a pilot hole with the normal drill bit. Then carefully drill thru top sheet metal with the cutting bit
Attached Image(s)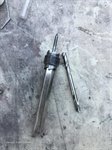
|