Go back to home

2009/10/30 23:44:35
kingcosworth

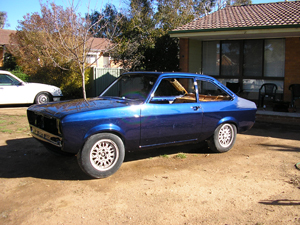
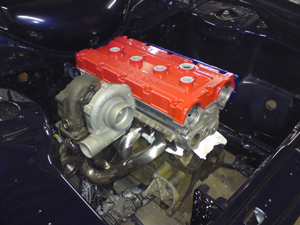
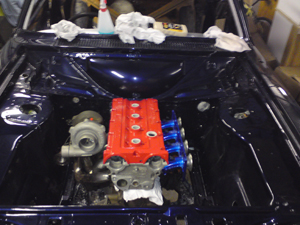
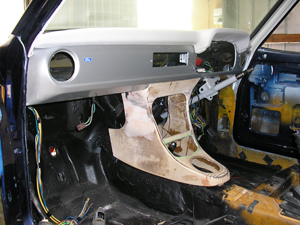
Cosworth Mk2 Escort build

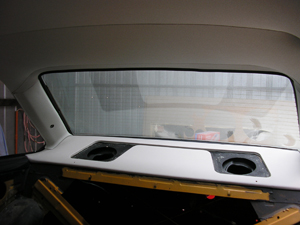
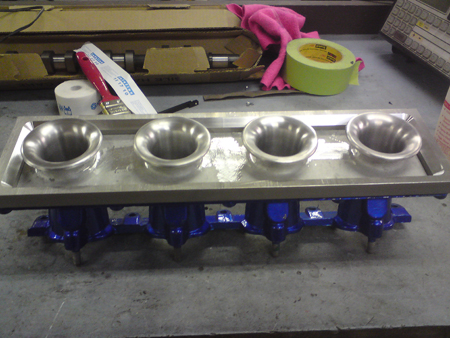
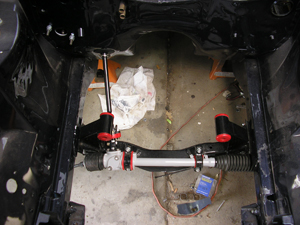
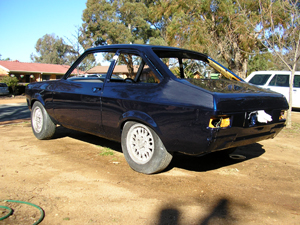
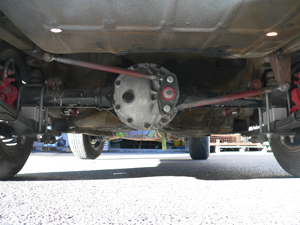
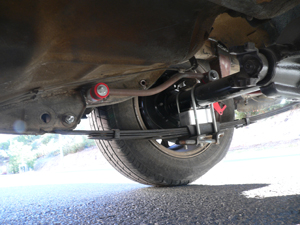
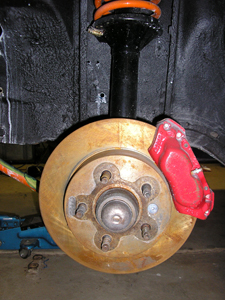
How's it all going, thought some people might be interested in my escort that should be up and running very shortly!!! It's running a YB Cosworth, mountune cams, Mahle pistons, Haltech E8, Custom plenum, extensive head work, custom exhaust manifold, 42mm external wastegate, T3/4 turbo (to begin with). Interior will be full leather, Focal stereo, Jarrah high lights, so on, so on! It's on the home stretch now, some of these photos are a bit aged, it's a bit further on than what the pictures indicate, hope you guys like it!!!


28 comments Leave a comment
Steviestar
Daaaamn, will have to keep an eye on this beast
2009/10/31 00:46:20
Phil
Hi Chris,

It looks great,and should go well too
2009/10/31 07:46:38
escortinadriver
Nice first post....


Welcome to the forum.

Show us more..

Shaun
2009/10/31 10:01:07
kingcosworth
Thanks for all the good words!!! The front struts consist of capri struts, XF ventilated rear discs over hubs made from P76 rotors, the calipers are volvo steel 4 spots on some adapter brackets I milled out of 25mm stock. sorry about all the ugliness of the parts, they were in there when the body got sprayed, it's all been cleaned up and made pretty again now!!! Just haven't got any new new photos.


2009/10/31 10:31:15
Mk2_2dr_2L
Not bad

What gearbox are you running ? And what are you doing Intercooler, radiator and fan wise ?

Cheers,

Damion
2009/10/31 10:42:45
kingcosworth
I sourced a core, and built the tanks for the intercooler. I had to cut out part of the front sheet metal and make some sheet metal boxes to seal everything up nicely, the intercooler is 50mm thick, and it all fits behind the grill. I will be using an alloy aussie desert cooler radiator, electric waterpump, as for the fan, not sure just yet, I'll work it out when I drop the motor in, because as you know, theres bugger all room down there, but the electric water pump should free up some room!!

2009/10/31 11:03:12
kingcosworth
Sorry forgot to mention, I've got a steel case celica box, still haven't rebuilt it, but i'll get around to it, i'll fit it with that beefed up input bearing. I have a dellow bellhousing, i've had to put it on the lathe and clearence it out a fraction to clear the cosworth flywheel, but I still have starter motor issues, I'm thinking of a plate to offset it out and bring it back, but i'm not at that stage just yet.
2009/10/31 11:07:25
Mark
quote:
Originally posted by kingcosworth

Sorry forgot to mention, I've got a steel case celica box, still haven't rebuilt it, but i'll get around to it, i'll fit it with that beefed up input bearing. I have a dellow bellhousing, i've had to put it on the lathe and clearence it out a fraction to clear the cosworth flywheel, but I still have starter motor issues, I'm thinking of a plate to offset it out and bring it back, but i'm not at that stage just yet.

...For sure you will end up with the need to change the gears in the celica steel case box to wider and stronger gears, straight cut is an option. I blew 2-off gearboxes from torque, no burn outs etc, just coming on boost and the cluster just could not take it. My new custom ratio straight cut gears are magic and not as noisy as people think due to the modern machining capabilities, grinding shape and accuracy.
One way that you can solve the flywheel issue is by changing the ring gear to a pinto item and then the dellow bell housing will fit, use a 4x4 cosworth starter motor (nice little compact one they are) and an adaptor spigot ring. Else just move the starter out further, the only drama there is how to get the gear mesh spot on.
2009/10/31 17:18:03
kingcosworth
Thanks for the advice, it's good to hear from someone who has gone through these headaches, I just want to clarify some points. Who machined up your gearset for you, and how were the old ones failing, stripped teeth?? How did you go about put the pinto ring gear on it, admitingly it has been a while since I played with the flywheel, but it looked that the pinto gear couldn't go on the front in the stock pinto spot becuase of the bigger pressure plate, it could go on the back but there would be a flange created infront of the ring gear! Which set up are you running??? The other problem I have is I have machined off the inside of the flywheel weight, so I can't knock that diameter down anymore
2009/10/31 19:00:34
LINCOLN
Nice.

I have a standard 2wd cos flywheel taking up space here.

Yours for nix if you need it - it has got no ring gear though. Melbourne
2009/10/31 21:59:54
Mk2_2dr_2L
Yeah it is very tight in there, I have just gone and modified my engine mounts and trimmed the lip on my firewall to get everything 25mm further back for a bit more room for better fans, fingers crossed it will be worth the effort. I looked into an electric water pump about a year ago and it would definately make way for fan space.. I think the alternator is the only major thing in your road then. I was worried about the reliability of the EWP as a lot of people seem to have trouble with them.

There are a couple of guys up here that have run some fairly serious cosworth powered IP cars with steel cases (obviously power limited by the restrictor) and they have survived. I guess try it with a better input bearing and see how you go. I was told that there are two types of W50 box one of which came out of the twin cam and has a better input bearing. I am not sure of the spec of your turbo or what cams you are running ?

Try to avoid running a smaller clutch, I am not exactly sure what trickery Mark has done to use the cosworth clutch but from my measurements the mounting PCD for the cossie clutch would be bolting into the pinto ring gear rather than the flyweel. I use a custom flywheel with a pinto ring gear/starter etc and I wouldn't recommend it unless you go to a twin plate clutch straight up.. I have had untold trouble with clutches.

Cheers.
2009/01/11 09:29:37
kingcosworth
Yeh thats what I found as well regarding the PCD and ring gear. I'll look into the 4x4 starter and I guess even the possibility of putting a new stater flange on the bellhousing. Yeh i'll definattly stick with the 11in plate. I'm looking at about 500hp from the motor, the mountune cams are 9mm ex 12mm in for the lift, but I haven't dialled them yet for duration numbers, I've got ARP head and main studs all through it. You guys will cringe at this but i'm using a pinto block, I've got an early one from a TC cortina HC motor, and it actually has extra bracing cast into the side of it???? I know the bores are a fraction thinner, but i'm only running 20thou over pistons and I figure when cosworth designed the block, it was expect to produce 500-600hp for 8,9,10 hours at a time, If I try this, I would lose my licence in the first hour! I am how ever looking into get the block cryoed before I bolt the lot together.
2009/01/11 11:44:41
kingcosworth
What sort of cash did you want for that flywheel lincoln?
2009/01/11 11:45:45
maxrs
Welcome MR King.
I have been a fan of the Cortina 2l blocks, but i would be grout filling the block if you want it stay together with 2 bars of boost up its bum.
Looking great anyway dude, looking forward to more updates on this project.
2009/01/11 12:06:38
LINCOLN
Nix means nothing mate.

You have to freight though.
2009/02/11 07:16:37
Mark
quote:
Originally posted by kingcosworth

Thanks for the advice, it's good to hear from someone who has gone through these headaches, I just want to clarify some points. Who machined up your gearset for you, and how were the old ones failing, stripped teeth?? How did you go about put the pinto ring gear on it, admitingly it has been a while since I played with the flywheel, but it looked that the pinto gear couldn't go on the front in the stock pinto spot becuase of the bigger pressure plate, it could go on the back but there would be a flange created infront of the ring gear! Which set up are you running??? The other problem I have is I have machined off the inside of the flywheel weight, so I can't knock that diameter down anymore

...One of my machinist I use at work who happens to be a rally driver machined the standard cossie flywheel. We heated the ring gear and dropped it on the same place as the original. It is only a few mm off the outside to be removed.
Send me an email with specifics, I can answer from there...Might take a phone call. Would not agree to the use of a pinto block for big boost.
2009/02/11 09:49:25
kingcosworth
Thanks Lincoln, sounds good, can we email or something (I'm new to all this) and work out the details. Does anyone know if the 4x4 starter has the same bolt pattern as a standard pinto. It seems the pinto blocks cortina, escort, 205 are basically the same and can crack bores under high combustion pressures, the long stud conversion on the 200 blocks would be to take the tensile force off the bores, minimising the fatigue. This is what they ended up doing on the bathurst sierras to keep them hanging together for the race, but even then they where custom blocks from ford with massive bore thickness and solid iron from the bottom of the water pump hole to the mains.
2009/03/11 09:29:48
Mark
Yes bolt pattern is the same for pinto and 4x4 cossie starter. Long studs are not necessarily the beez neez to holding the block together. There is more to consider than that...I know many examples without it and not trouble, it helps if the block chosen is a good one...
2009/03/11 13:17:27
kingcosworth
oh yeh sorry, I didn't mean to imply that I was going to long stud it, I agree, it's not needed for my application. Thanks for the info on the starters, I'll do some scrounging and sort something out. I got all my window trims back from the anodizers finally, that was a two and a half month wait, but there not to bad, got all my door handles and locks back from the chrome platers to, heres a photo just after I bonded them in. sorry about the fuzziness!

2009/04/11 17:50:45
kingcosworth
Here is the centre console I have been making, the wood is Jarrah and will be clear coated. The woods only roughed out at this stage. Headunit is going under the gauges and the hole below will have another jarrah panel with 4 shiny push buttons, and a clock


2009/11/15 20:11:33
DRS 02L
love the clour mate. its sexy
2009/11/15 20:24:01
kingcosworth
Thankyou, yeh I'm really happy with the leathers colour, The console is trimmed with a single piece of leather, what a unpleasant individual to do, lots of water and swearing to get it trimmed up. I decided I didn't want any stitches so went this route, I seem to create a lot of work for myself [x2x]
2009/11/16 15:51:48
kingcosworth
I've finally finished that jarrah panel, plus i'm getting some vinyl stickers made up for the speedo and tacho, also just measured up my mountune cams because you can't get the figures out of mountune!?! By the way, I'm looking for some decent door glass for the car as mine have some vertical scratches that are to deep to buff out, anybody got some good glass lurking about that they would be willing to sell???

2009/12/29 16:26:52
550hp mk2 cortina
Really nice work there king cossie. I like the jarrah panel. gives it some class. It come up looking the goods too with the clear coat etc.

Looking forward to the progress.
2009/12/30 00:04:29
kingcosworth
Thanks Mr 550, yeh i'm trying to get a classy kind of look instead of the racer type of interior, hopefully it turns out the way I picture it in my head, fingers crossed. The clear on the Jarrah is the same PPG clear that the car is painted with, bit of a gamble on how it would show up the grain and colour, but i'm quite happy with how it turned out. I still have a lot of work to do on the car, but I'll keep plugging away, I basically have all the purchasable parts I need, it's just a matter of making the custom bits and pieces I need to as I'm going through, but I will keep updating as I go, and thanks again for the interest!!
2010/02/01 21:03:49
JordyCharlieBoz
How did you go about makeing that console? Looks sweet.
2010/02/01 22:02:05
kingcosworth
The main console was made from 2 pieces of 6mm MDF, reinforced with fibreglass. Where the curves are in the wood I cut multiple slits 4mm deep and about 7mm apart, wet the wood, then bend into shape, I had to make a temporary frame to hold it in shape whilst it dried. Once dried I put on a single layer of fibreglass to keep it strong where the slits where cut. Once the basic shape had been made, just used bog to get the finer details right. The leather required heavy wetting with water and shaping, and had to be glued down bit by bit. The Jarrah panel was made by getting a block of wood and making the basic shape with a chisel, then used the dremel with a HSS cutting tip, then finish by hand with sandpaper. A couple of cracks where present in the wood, so I made the crack edges parallel with themselves, made some thin wedges out of some of the offcuts with a simiiiar colour, wet the wood and tapped them in with no glue, did this before sanding with 120. last sanding should be done with 800 with the wood wet. Then I sprayed it with a 2 pack clear, sanded out the peel with 1200 then 2000 and polished. Hope this is some help

2010/02/01 23:02:57
JordyCharlieBoz
Thats awesome. Thanks for the info mate =)
Has given me idea's lol. Really want a 2din head unit and get rid of the ash tray and have the gearstick thing further back. And making my own console didn't occur to me.

The car will be awesome when your finished mate. Kudos
2010/03/01 01:29:12

Comments are closed.

© 2025 APG vNext Trial Version 5.1