martymexico
Deity

- Total Posts : 2765
- Scores: 456
- Reward points: 6177
- Joined: 2011/08/01 11:02:49
- Location: Adelaide Sth Aust Australia
- Status: offline

Re: Rusted mk1 Escort coup resto
2024/09/25 11:41:00
(permalink)
There, one door in undercoat   Now it's the other door which only has a few ball pean hammer type dents, nowhere as bad. First thick is seal the return folded edge, even tho not necessary I thought it should be fine as they've been grit blasted and most sealer is gone. I will spray stone chip inside the door cavities to proper seal the door, also sealed around the hinges plates as they were cleaned out too.  I'm going to make a (or two) of those panel hangers, online they are upwards of $150ea , I think I've enough tube and rod to make my versions. They have a centre pole about 6ft high with 6 adjustable height/swing rods that have hooks to hang doors or bonnets etc. Something like this contraption... Obviously not as pretty but I go for function over looks.. https://www.ebay.com.au/i...ver=artemis&media=COPY
|
deano
Deity
- Total Posts : 1627
- Scores: 440
- Reward points: 4006
- Joined: 2015/08/19 10:49:10
- Status: offline
Re: Rusted mk1 Escort coup resto
2024/09/25 12:58:31
(permalink)
|
martymexico
Deity
- Total Posts : 2765
- Scores: 456
- Reward points: 6177
- Joined: 2011/08/01 11:02:49
- Location: Adelaide Sth Aust Australia
- Status: offline
Re: Rusted mk1 Escort coup resto
2024/09/25 14:26:04
(permalink)
I did see that one and one on sale at Woolies of all places, same price.
Just about half way thru cutting the steel , got a couple of nice solid galv poles too for the uprights. At least mine will be rugged enough . Now it's design the base so it's not going to tip up, going to fill the tube with sand for added centre stability.
Total cost for both will be about $50 not Inc wheels..
|
martymexico
Deity
- Total Posts : 2765
- Scores: 456
- Reward points: 6177
- Joined: 2011/08/01 11:02:49
- Location: Adelaide Sth Aust Australia
- Status: offline
Re: Rusted mk1 Escort coup resto
2024/09/25 19:43:05
(permalink)
I'm using a couple of galv poles I stole from the back yard, they were cut down to about 1700mm for now.  Cutting the outer tube with bandsaw at 100mm , made 14 off but will use 12, 6 for each pole  The stack all cut and will be stripped of the white paint  Cause I'm cheap the pipe I cut wasn't big enough diameter so I cut and widened then  Next was to cut the remaining 2 tubes into 12 slices, these will just be welded on the other tubes so it's a full tube again  I wasn't after a neat butt joint, just want then joined together, the weld will be smoothed down. Next is to go to a steel shop for smaller tube and rod that'll slide nice thru it, I didn't have anything laying around suitable to use.
post edited by martymexico - 2024/09/26 22:33:41
|
martymexico
Deity
- Total Posts : 2765
- Scores: 456
- Reward points: 6177
- Joined: 2011/08/01 11:02:49
- Location: Adelaide Sth Aust Australia
- Status: offline
Re: Rusted mk1 Escort coup resto
2024/09/26 22:46:59
(permalink)
|
MarkA
Deity
- Total Posts : 248
- Scores: 168
- Reward points: 1378
- Joined: 2022/11/26 09:07:52
- Status: offline
Re: Rusted mk1 Escort coup resto
2024/09/27 15:58:06
(permalink)
Looks good Marty. I reckon 3 long feet should prevent it wanting to tip. Say to the extremity of the items you hang from it?
Making the tools is probably more fun that the job their intended for.
|
martymexico
Deity
- Total Posts : 2765
- Scores: 456
- Reward points: 6177
- Joined: 2011/08/01 11:02:49
- Location: Adelaide Sth Aust Australia
- Status: offline
Re: Rusted mk1 Escort coup resto
2024/09/28 21:22:14
(permalink)
Yes Mark I think I made them 450mm each leg so it's about 3ft as you said. The base mount design is simple to make, I had the tube as a gauge and used magnet angles to square it up. Welded it all together, then the metal shrank just enough to do the tube sliding thru, needing it to be die grinded loose again !  A bunch of wheels, some are oddball but all the same height in their groups of 4  Next was to buy some small tube with a 12mm inside dia and cut 12 of them, 6 each post.  These are the tubes from earlier all welded and marked for drilling to have the nut welded, same is done for the small pipes. I should have them both done tomorrow 
|
martymexico
Deity
- Total Posts : 2765
- Scores: 456
- Reward points: 6177
- Joined: 2011/08/01 11:02:49
- Location: Adelaide Sth Aust Australia
- Status: offline
Re: Rusted mk1 Escort coup resto
2024/10/01 09:10:16
(permalink)
Bending the hooks in 2x types so they can be altered to suit the application, rod is made a medium grade stainless steel that's still magnetic which means mig welding will work fine  The rods are 450mm long as you never know what length needed , this is the hooks welded on  Plates for the wheels plasma cut and welded on, also brushed some orange on the stands so safety man Adam doesn't jab a toe walking past them  These are the bigger tubes with the smaller tubes welded at 90deg, with nuts also welded on, I thought the black was gloss but dried a nice satin  And the finished product except for the twist knobs I'm 3d printing for the bolts  Back to the regular programme now, working on the escort mk1 door which is a easy one compared to the last one.
|
martymexico
Deity
- Total Posts : 2765
- Scores: 456
- Reward points: 6177
- Joined: 2011/08/01 11:02:49
- Location: Adelaide Sth Aust Australia
- Status: offline
Re: Rusted mk1 Escort coup resto
2024/10/02 19:37:49
(permalink)
Got printing 24 handles for the panel racks  I did them in bunches of 8x so the time being made wouldn't take forever, as it was each bunch was about 8hrs long. This is them on the racks  Moving back to the car door I spent 2x days so far pulling out the simple dents which was nail welded and pulled but one dent was giving grief but managed to lift it a little. Here's where am at so far, the top part of the door will get the mirror holes and brightwork holes filled with welds, I will fill the door lock hole as well since it'll have remote centre locking installed, the driver door still has the lock hole but will get a solex key lock 
|
martymexico
Deity
- Total Posts : 2765
- Scores: 456
- Reward points: 6177
- Joined: 2011/08/01 11:02:49
- Location: Adelaide Sth Aust Australia
- Status: offline
Re: Rusted mk1 Escort coup resto
2024/10/04 09:48:11
(permalink)
The door is in primer now, there was a few odd dents on the inside frame to do they were adjusted back flat.  Today I'm going to the local upullit wreckers to see what's there, I need a few modern car things, might be lucky and find Volvo 4spot calipers !
Attached Image(s)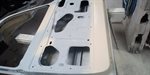
|
martymexico
Deity
- Total Posts : 2765
- Scores: 456
- Reward points: 6177
- Joined: 2011/08/01 11:02:49
- Location: Adelaide Sth Aust Australia
- Status: offline
Re: Rusted mk1 Escort coup resto
2024/10/04 23:12:16
(permalink)
The wrecker run was interesting, some cars of forgot had existed like a mk1 Vauxhall Viva, Nissan NX coup , even a mk1 Ford Mondeo. I went there for the sole purpose to get a navara d40 tailsharft and to my luck there was one already unbolted and sitting under the ute waiting for me. I wanted the front shaft but it proved to hard without the correct leverage tools. The tailsharft is all alloy and weighs nothing and for $63 it's a bargain.
No Volvo calipers to be seen unfortunately.
|
martymexico
Deity
- Total Posts : 2765
- Scores: 456
- Reward points: 6177
- Joined: 2011/08/01 11:02:49
- Location: Adelaide Sth Aust Australia
- Status: offline
Re: Rusted mk1 Escort coup resto
2024/10/10 15:22:31
(permalink)
Made use of the panel stand with the door on 1 side and the mk2 Escort bonnet on the other as both were ready for a shot of primer, handy having the stand on wheels so it can be moved about the shed after painted !  This little bracket is what's going to hold the spare wheel down to the boot floor, I have offset the position to the right more so there's going to be pockets on the left side for whatever stuff they're might be. The jack and handle will be pulled straight from a mk1 Focus as it's neat and tidy that fits inside the rim.  Decided to mount it here like this but won't weld in place until the wheel lock cones from Ebay . I suppose I could weld it in and have a pilot hole drilled and then use a metal nutsert , should hold fine but would rather weld a captive nut for strength  The wheel is from my Focus zetec mk1 which has the same stud pattern as Escort, offset is a little questionable but fits ok. This is lined up what's it'll be seated.  
|
deano
Deity
- Total Posts : 1627
- Scores: 440
- Reward points: 4006
- Joined: 2015/08/19 10:49:10
- Status: offline
Re: Rusted mk1 Escort coup resto
2024/10/10 16:54:01
(permalink)
RWC requirement is that any spacesaver needs to be yellow....
......... only kidding, but it would not suprise me in Vic at least.
I bet that idea will be on Dave's next week, although I think his boot is all topcoated already. Happy days.
|
martymexico
Deity
- Total Posts : 2765
- Scores: 456
- Reward points: 6177
- Joined: 2011/08/01 11:02:49
- Location: Adelaide Sth Aust Australia
- Status: offline
Re: Rusted mk1 Escort coup resto
2024/10/10 20:07:25
(permalink)
Gawd, in Vic if your headlight is pointing half degree out, your done for ! Big decision was to just weld it in, it's got a M8 on the right side and a M6 on the other side for mounting the jack and handle etc .  Plug welded and sealed  Another small job off the list. Getting late in the day I was thinking about the battery tray placement, first is to measure a battery. The battery I'll use is a optima D51 yellow top dry cell, they last for ever and I've had one since the blue mk1 van was built 11 yrs ago, that battery is in the ute now and still good as gold. With the measurements and added about 5mm overall, I found a plank of ally sheet of about 2.0mm, then designed a plan to create it. My first design was a cross shape in which the 4 sides are folded up but I binned that plan as it uses a big piece of ally. Next design was to do the wider sides and base in 1 part but adding mounts at the base and wings at the top for the t bolt down brace . This is it so far after folding.  Checking the fit in the old wheel pocket, I did remove the spare wheel strap bracket as that's not used now  The ends still need making and once done I'm going to do a lot of Tig practice on the ally offcuts until I'm happy.
|
martymexico
Deity
- Total Posts : 2765
- Scores: 456
- Reward points: 6177
- Joined: 2011/08/01 11:02:49
- Location: Adelaide Sth Aust Australia
- Status: offline
Re: Rusted mk1 Escort coup resto
2024/10/11 20:52:51
(permalink)
Carrying on with the battery tray/box , after setting up the Tig welder and test strips welding till happy with how it welds I moved onto the battery box and got stacking dimes as they say. I reckon I had the settings just about right, played a bit with frequency which I need to learn about more on. Everything went well however my welds weren't up to show spec, having said that there was some good beads that I thought could stay visible but all were sanded back flat  Welded blocks under the top return which will be drilled and tapped for a couple of 6mm cap/button head screws  Out came the hyd hole punch machine, kinda silly having to drill a 20mm hole for the hyd ram rod to go thru, anyway the holes are 50mm, 32mm and 40mm no specific reason on size, just for looks !  This is it almost complete with the top lock bar in place. I will still DA sand the outside and leave in ally finish but will clear-coat it so it doesn't go manky 
|