martymexico
Deity

- Total Posts : 2760
- Scores: 454
- Reward points: 6169
- Joined: 2011/08/01 11:02:49
- Location: Adelaide Sth Aust Australia
- Status: offline

Re: Another Escort Van Project: 77 Mk2
2021/09/16 21:55:47
(permalink)
This is the undercarriage of my blue van before it was reassembled. It's the only pic I've got with the rear shock mounts, hardly see them ! 
Attached Image(s)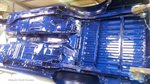
|
martymexico
Deity
- Total Posts : 2760
- Scores: 454
- Reward points: 6169
- Joined: 2011/08/01 11:02:49
- Location: Adelaide Sth Aust Australia
- Status: offline
Re: Another Escort Van Project: 77 Mk2
2021/09/26 19:58:30
(permalink)
Deano, it doesn't matter where you chop the inner arches at, I found a set of mk2 arch cuts I kept for some odd reason, the guy wanted tarmacs installed and I thort the stock arches will come in handy as they are rot free .
|
deano
Deity
- Total Posts : 1620
- Scores: 436
- Reward points: 3732
- Joined: 2015/08/19 10:49:10
- Status: offline
Re: Another Escort Van Project: 77 Mk2
2021/09/26 21:11:22
(permalink)
Hi Marty, I started cutting one out this afternoon actually.
After 3 days of further lockdown, I got the passenger floor mostly done, inner and outter sill, and the arch was next.
It takes so long , well it take me so long. As well as the spot welds, I did run some stitches along the edges of the floor rails. Seam sealer will cover all of it anyhow.
After I started cutting though the outer skin, I wimped out, and thought the van needed more stiffening before cutting the inner tub, which was the only thick bit of metal. No wonder escort weigh nothing, the steel is so thin. At least I've learnt that its virtually impossible to butt weld any original panel skin, it's simply too thin. Overlapping panels and spot welding only.
So one step forward, 2 back.
No photos, as I wasnt happy with this weeks work.
|
martymexico
Deity
- Total Posts : 2760
- Scores: 454
- Reward points: 6169
- Joined: 2011/08/01 11:02:49
- Location: Adelaide Sth Aust Australia
- Status: offline
Re: Another Escort Van Project: 77 Mk2
2021/09/27 10:50:29
(permalink)
Toughen up young man lol , the panel will be wobbly until you got the bubble and the filler to connect it back up. Don't panic over it as the panel usually rests where it's meant to anyway...and your installing bubbles which will cover a vast amount of panel to hide imperfections..
Keep up the good work👍
|
deano
Deity
- Total Posts : 1620
- Scores: 436
- Reward points: 3732
- Joined: 2015/08/19 10:49:10
- Status: offline
Re: Another Escort Van Project: 77 Mk2
2021/09/28 13:40:24
(permalink)
Help needed please.. (yes again Fellas)
I've overthought how best to put the rear bubbles on, and watched a few youtubes again, and even reread my own thread and keep doing circles.
So, in short:do I tack the bubbles ontop of existing panel, or under it?
It sounds simple, but there are advantages/disadvantages to each, and it effects what happens where the existing panel skin meets the wheel tub.
The front guard was easy, the rear is doing my head in a little due to the inner skin.
If you used alloy arches, you pop rivet over the top, and the existing skin goes down to the tub and gets trimmed flush:in inner extension. Apparently rally boys like this as when the arch is thumped, you dont damaged your inner tub and shock mounts.
If you spotweld mount the bubble underneath the existing skin, you automatically have cut away the existing panel right up to the mount flange for the bubble, and extend the wheel tub out, as described in previous posts. So from inside the van, you'd be seeing into the larger tubbed bubble.
Gartrac vids show double rows of spotwelds, with the bubble behind the existing bodyskin. This lets you fair in easier I think, but once you cut up so high, you are committed to this method.
Pics would have helped, but I think you all may familiar enough.
I'll post some once its cut, following the group response.
And for prosperity.
Thanks again, and again.
|
martymexico
Deity
- Total Posts : 2760
- Scores: 454
- Reward points: 6169
- Joined: 2011/08/01 11:02:49
- Location: Adelaide Sth Aust Australia
- Status: offline
Re: Another Escort Van Project: 77 Mk2
2021/09/29 09:52:20
(permalink)
I would weld them on top of the existing panel , and since it's going to become the new outer skin I would cut the old skin about 15mm below the weld line and lightly form it to match the new arch , add sealer etc to stop rusting then do the infill as usual . I've only install fglass flares but steel is very similar. Do you still have my number? Can call this eve or send a PM if you get stuck..
post edited by martymexico - 2021/09/29 11:48:53
|
deano
Deity
- Total Posts : 1620
- Scores: 436
- Reward points: 3732
- Joined: 2015/08/19 10:49:10
- Status: offline
Re: Another Escort Van Project: 77 Mk2
2021/09/29 13:33:23
(permalink)
thanks Marty. I'll put my big boy pants on and just toughen up and do it. I do have your number still, but wont get into it until the weekend again. Thanks for the offer though. I've just about burned through my first roll of Mig wire (woo-hoo!) and went to the welding shop. They game me some pointers on the machine setup again (looks like I need lower voltage 16v drop to 14, but more wirespeed). More likely to be my lack of technique also. I get a new switchable welding magnet to have a play with like below. We are meant to get smashed with rain this weekend, which will be good for shed time. 
|
Guest
Enthusiast

- Total Posts : 37
- Scores: 1
- Reward points: 0
- Joined: 2011/08/01 00:00:00
- Status: online
Re: Another Escort Van Project: 77 Mk2
2021/09/29 15:49:21
(permalink)
Yep Deano those magnets are great. I have been using them for a while now. The only time I switch over to a clamp is on a Stainless job or really small things where the magnet is too cumbersome.
On your settings, distance from electrode to weld etc etc, just practice on some spare pieces trying to replicate the welding position of the actual job and see how it looks and more importantly if your getting decent penetration.
You did end up changing over to argoshield?
|
martymexico
Deity
- Total Posts : 2760
- Scores: 454
- Reward points: 6169
- Joined: 2011/08/01 11:02:49
- Location: Adelaide Sth Aust Australia
- Status: offline
Re: Another Escort Van Project: 77 Mk2
2021/09/29 16:17:09
(permalink)
Hope you didn't get inner shield wire, that stuff does not work nice on thin metal. It was made for thick stuff mostly.
Argoshield is the way to go and use 0.6mm wire, 0.8mm gives of more heat and distorts metal.
Practice until the the weld sounds like fast cooking bacon , but don't do more than 5mm at any 1 time, spot weld and let things cool down... Patience is the key
|
deano
Deity
- Total Posts : 1620
- Scores: 436
- Reward points: 3732
- Joined: 2015/08/19 10:49:10
- Status: offline
Re: Another Escort Van Project: 77 Mk2
2021/09/29 16:49:14
(permalink)
ha, yes of course I got flux core again. That's all i've used from day 1, when it works, its magic, and so far its been ok, albeit with more splatter, and poorer looking welds. As soon as the metal has some thickness, my skill level lets it join, just like a hot glue gun.
I really don't want to use gas. I dont have it in my boat either, despite it coming with an new unused gas cooker
There's nothing worse than when someone doesnt take your advice, so apologies to you both.
Given thats the case, i'll stop winging.
The bacon splatter sizzle temp is getting close to sounding ok, and I even got some wicked amounts of smell coming off once things started cooking along with the floorpans. I didn't notice until my daughter came in and nearly choked.
Might need a decent mask.
Migomag said that 0.8 flux behaved like 0.6, which would make sense allowing for the core infill of shielding gunge.
Its addictive, just frustrating as well.
|
martymexico
Deity
- Total Posts : 2760
- Scores: 454
- Reward points: 6169
- Joined: 2011/08/01 11:02:49
- Location: Adelaide Sth Aust Australia
- Status: offline
Re: Another Escort Van Project: 77 Mk2
2021/09/29 17:11:36
(permalink)
Hehe, the gas for the welder is inert, non combustible, if you want the non rent bottles can be bought from Bunnings but will need the std wire and regulator.. Maybe next time your wire runs out give it a go..
Speaking of the weather, it was meant to be a bad one here in Adel, but it went below the city it's still in the hills from what I can see here. Meant to get rain for the next few days here but the weather man has not been right for years !!! When you see magpies sandbagging their nests you know it'll be torrential..
|
deano
Deity
- Total Posts : 1620
- Scores: 436
- Reward points: 3732
- Joined: 2015/08/19 10:49:10
- Status: offline
Re: Another Escort Van Project: 77 Mk2
2021/10/05 13:07:21
(permalink)
I found my big boy pants (Behind the 'Ultimate Kylie" greatest hits CD box set), and grabbed the grinder and just ripped into it. Actually after a lot more thinking, I decided the best way was to insert the bubble arch behind the current rear skin, then spotweld through. It was much fiddlier, but meant the mounting face flange would definitely fair in better: something to do with trying to fit 3rd party repro pressings designed for a coupe onto a 44 year old van. I just could not get the fit good enough to ensure you were not going to see the arches did not look like they were simply welded ontop. Now any deviation is hidden behind the front panel. Plus, it means I can work on both sides to hammer the welds out The van wheelarch tubs have a bracket that mounts to the ring frame going up under the roof. This of course is ending up 3/4 of the way into the new tub, so will need cutting or modify to bring it to the new outer edge. Currently doing that now, and making cardboard patterns for the inners, then will get welding agin. Marty, sorry about the chopout where the brace is, but if the arch wedge is still of use, it yours. Glad daylight savings is here. Happy snaps:
|
deano
Deity
- Total Posts : 1620
- Scores: 436
- Reward points: 3732
- Joined: 2015/08/19 10:49:10
- Status: offline
Re: Another Escort Van Project: 77 Mk2
2021/10/05 13:08:27
(permalink)
she's got hips.
Attached Image(s)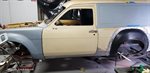 
|
Guest
Enthusiast
- Total Posts : 37
- Scores: 1
- Reward points: 0
- Joined: 2011/08/01 00:00:00
- Status: online
Re: Another Escort Van Project: 77 Mk2
2021/10/05 16:14:31
(permalink)
Wow that looks great Deano. Yep, not being an expert on bubbles I reckon fitting the arch in between the two skins makes good sense.
Only one word of advice from the sidelines is to make sure there is no movement between any panels in areas you propose using body filler. But sounds like your going to stitch it all the way around so all good.
BTW what is a good product for seam sealing prior to painting?
I'll start a new thread on the track car soon it will all make sense.
|
martymexico
Deity
- Total Posts : 2760
- Scores: 454
- Reward points: 6169
- Joined: 2011/08/01 11:02:49
- Location: Adelaide Sth Aust Australia
- Status: offline
Re: Another Escort Van Project: 77 Mk2
2021/10/05 21:44:42
(permalink)
Hey Deano good progress there, the van actually looks good bubbled up 👍. I'll see what I can salvage from your arch(s) , I know 1 side is not too bad but the other needs a complete arch. Mark, as for seam sealer/drip check , I use sikaflex 227 , designed for auto panel sealing and has strong joint adhesion. eBay seller in Darwin has 3x tubes for about $55 , cheap considering Bunnings sell 1 for 28 bux https://www.ebay.com.au/i...rid=705-154756-20017-0
|