deano
Deity

- Total Posts : 1627
- Scores: 440
- Reward points: 4006
- Joined: 2015/08/19 10:49:10
- Status: offline

Re: Another Escort Van Project: 77 Mk2
2025/12/06 18:40:51
(permalink)
I should have taken a pic, but was hoping the stalk was working by the time i'd cleaned it right out and freed up the innards..
Na, the cancelling knob is still in situ, its the actual with plastic nub that it cancells against thats the issue. The stalk is rivetted together, so not easily re-assembe-able if you drill it out, but theres a white triangular sliding plate that does the cancelling. When the wheel is turned, this christmas tree shape is pushed in, and it then presses sideways against the indicator holding springs, returning it into a home position. With the plate warn, it doesnt have enough throw against the springs. Theres also some slide pins on mine that guide this plate, and these have their straight slots now worn out, again not moving correctly. I'll revist it once its driving and been tested.
Im glad about the brackets, much betetr than I would have made.
|
martymexico
Deity
- Total Posts : 2765
- Scores: 456
- Reward points: 6177
- Joined: 2011/08/01 11:02:49
- Location: Adelaide Sth Aust Australia
- Status: online
Re: Another Escort Van Project: 77 Mk2
2025/12/07 14:09:22
(permalink)
|
deano
Deity
- Total Posts : 1627
- Scores: 440
- Reward points: 4006
- Joined: 2015/08/19 10:49:10
- Status: offline
Re: Another Escort Van Project: 77 Mk2
2025/12/08 12:49:16
(permalink)
thanks Marty!
I put an order in, due early Jan. So I can tick that off hopefully.
|
deano
Deity
- Total Posts : 1627
- Scores: 440
- Reward points: 4006
- Joined: 2015/08/19 10:49:10
- Status: offline
Re: Another Escort Van Project: 77 Mk2
2025/12/17 13:03:09
(permalink)
the replacement Ali indicator stalk arrived, not bad for around $20 inc delivery. It did have a dry joint on one of the earth wires, but 2 seconds with the soldering iron fixed that. 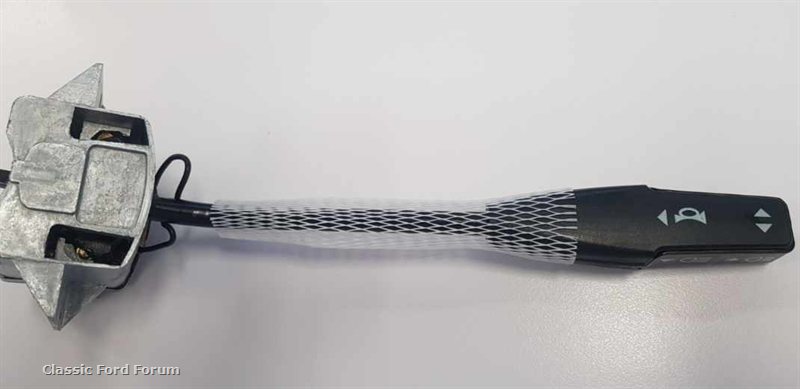.jpeg)   And for future reference, I found this stalk wiring diagram from the Group 4 website, who make replacement loom plugs also. -1000x667w.png)
|
PartTimeMK2
Deity
- Total Posts : 486
- Scores: 423
- Reward points: 764
- Joined: 2023/12/01 12:00:42
- Status: offline
Re: Another Escort Van Project: 77 Mk2
2025/12/20 08:34:56
(permalink)
Crazy that we can get new reproduction parts which is good for the future.
I need to pull mine out and give them a once over, but that is an after Christmas issue I think!
|
deano
Deity
- Total Posts : 1627
- Scores: 440
- Reward points: 4006
- Joined: 2015/08/19 10:49:10
- Status: offline
Re: Another Escort Van Project: 77 Mk2
2025/12/22 13:30:28
(permalink)
while Marty rockets along with not 1 but 2 rebuilds, i'm redoing stuff again, the headlights. The repo stalk was fine, plugged everything in and it operated as expect, including horn, and even self cancells which wsa the main reason to replace the old one. Plus it has light icons I can see, so 1/2 step forward. I'll admit to fitting the headlight adjusters and rings all wrong, but that was partly because i had a generic headlight kit. The headlight stampouts in the Express Panels are larger than the size of a generic headlight kit, so you really need to use actual Escort buckets, which plus they also hold the grill too. By this stage, I'd butchered mine making 1 kit from 2, which got the light fitted, but properly. So now, decent globes, with parkers, and correct buckets in:  One question though, its a bit hard to see, but at the outer edges of the grill, is it held in just with screws through the bucket, or is there a spacer or plug missing? The grill easily pulls in to meet the bucket, and so those side gaps wont be as obvious. Once this is sorted, I can get those spot brackets positioned in under the grill. Very slow progress on this channel! 
Attached Image(s)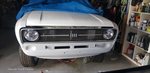 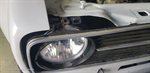
|
martymexico
Deity
- Total Posts : 2765
- Scores: 456
- Reward points: 6177
- Joined: 2011/08/01 11:02:49
- Location: Adelaide Sth Aust Australia
- Status: online
Re: Another Escort Van Project: 77 Mk2
2025/12/22 14:23:15
(permalink)
You're original headlight buckets are not handed so the left side works in the right etc. And yes there is meant to be a oblong grill clip like the rest of the clips. If you don't have any left, take over from the middle and use it on the outer mounting. Or be daring and print a few up once you've designed it .
Speak of which, tinklecad has done yet another upgrade according to Dave's Garage..
|
deano
Deity
- Total Posts : 1627
- Scores: 440
- Reward points: 4006
- Joined: 2015/08/19 10:49:10
- Status: offline
Re: Another Escort Van Project: 77 Mk2
2026/01/14 13:38:24
(permalink)
Another year in the garage rolls in, I hope everyone survived the fires, floods and cyclones getting around the place ok. We've had some wicked dry lightening storms and days of smoke from the bushfires, enough to cover everything outside in ash, and get into the shed as well. Ive been doing some small annoying jobs just to tick things off, barely worth taking photos of. I found my 'reco'd' steering rack had a bush that had turned to little stones of Bakelite. The rack itself looks ok, so I'll have a go at replacing it. Sparesbox had a Nolathane one (41020) for $10, plus the same for postage.  I managed to get the rear loom sorted and fitted neatly under the floor, so have back lights too now, reversing, stop, indicators and even warning lights, so thats good. What is a bit weird though, was i'm now getting some great sparking from the coil, namely from the negative spades on the coil across to the HT lead. The engine starts, and runs fine, apart from impersonating a spot welder. I shut it off pretty quick, and I havent been game to try it since. I'll try and take a vid, but essentially everything is new and unchanged as it has been running for the past 3 months. I checked the polarty of the coil connections werent reversed, checked the inner HT lead under its boot, the coil, leads, plugs, and electronis ignition is new, clean, dry and pushed on. On going back over the last things worked on, I'd pulled the dash out again to get the blinker dispay globes to flash, which they now do. The alternator exciting dash light now works too, and is the only globe thats not an LED. Middle one below. The dash has the membrane replaced, and I fitted a new style voltage regulator at the same time. It will be something I've done, but we'll see. 
Attached Image(s)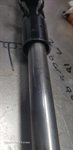 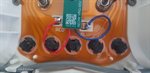
|
deano
Deity
- Total Posts : 1627
- Scores: 440
- Reward points: 4006
- Joined: 2015/08/19 10:49:10
- Status: offline
Re: Another Escort Van Project: 77 Mk2
2026/01/23 13:24:36
(permalink)
|
deano
Deity
- Total Posts : 1627
- Scores: 440
- Reward points: 4006
- Joined: 2015/08/19 10:49:10
- Status: offline
Re: Another Escort Van Project: 77 Mk2
2026/01/23 13:32:07
(permalink)
And onto the back doors. Not many suprises under the paintwork which was nice  As customary I mixed up an excess of expoxy primer filler, so it got extra extra coats which wont hurt anyway when it comes time to flatten out  
|
PartTimeMK2
Deity
- Total Posts : 486
- Scores: 423
- Reward points: 764
- Joined: 2023/12/01 12:00:42
- Status: offline
Re: Another Escort Van Project: 77 Mk2
2026/01/23 13:45:10
(permalink)
Those doors look next to perfect under the paint, gotta love a win like that!
|
deano
Deity
- Total Posts : 1627
- Scores: 440
- Reward points: 4006
- Joined: 2015/08/19 10:49:10
- Status: offline
Re: Another Escort Van Project: 77 Mk2
2026/01/23 13:50:43
(permalink)
I'm not sure whats hapenning with the forum, its locking up for me at least.
So on redoing again, the pics dont correspond, apologies.
The LHS door above is still in progress and actually is the worse of the 2, with oil canning on the bottom 1/2.
It might have been looked at before at least once, and seems a little stretched. Its not much, so I might try hitting it with the slapper file to see if it may shrink down a little. I dont have a pic of the RHS door before.
As it was just one door being painted I omitted using a roller, and did it all in brush, plus it was only primer filler so needs good sanding anyhow. You know when the penny drops, and you just '"get" something? As I painted this door, the whole idea of being able to 'push' the paint around just suddenly gelled. Only took 55 years. :( Before that it was splat it one and flatten it out basically.
Also for the eagle eyed, check the rear hoodliner.
Our last 40+ day was too much, so its back to looking like a tontine at least until its fully sanded and painted, when the door rubbers can go on. Car Builders Spray Adhesive , -1 point.
|
martymexico
Deity
- Total Posts : 2765
- Scores: 456
- Reward points: 6177
- Joined: 2011/08/01 11:02:49
- Location: Adelaide Sth Aust Australia
- Status: online
Re: Another Escort Van Project: 77 Mk2
2026/01/23 16:57:42
(permalink)
Looks good, the back barns are in way better cond than my raw orange ones. With the drumming, try using a bottled BBQ gas torch and just heat till it's glowing red in a spot going in small circles to the size of a 75c piece, bigger than a 50c! Then while it's hot use a rasp file and dolly behind but not where your hitting as that'll stretch metal more, not good. The idea of it is to corrugate the sheet which will tighten up the drumming, also the heat and cooling will shrink back more.
If that's not an option you can also buzz a weld along to try to heat and shrink but will need grinding back.
Selleys contact glue is what I've used for 40yrs and it's never fallen off like yours has.. PS, more hot coming this weekend so more of your lining might fail !
|
deano
Deity
- Total Posts : 1627
- Scores: 440
- Reward points: 4006
- Joined: 2015/08/19 10:49:10
- Status: offline
Re: Another Escort Van Project: 77 Mk2
2026/01/28 13:11:55
(permalink)
back on the ground now, running and with the steering rack done and ride height set, so happy days again. Will look better once Martys bumperettes are satin black though. 4wd Escort Van anyone? :) 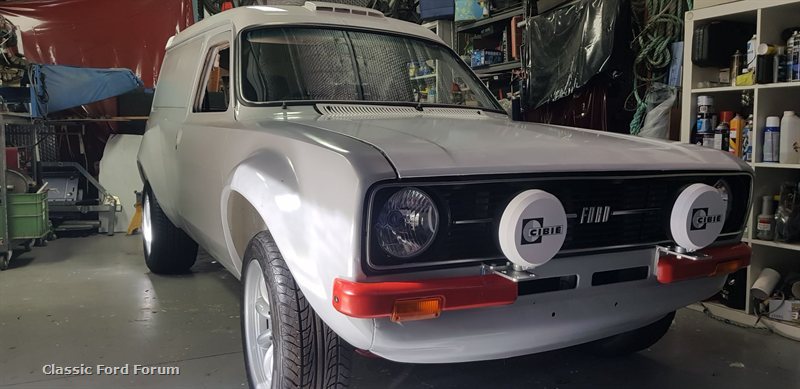 
Attached Image(s) 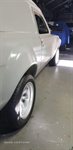
|
mico
Enthusiast

- Total Posts : 7
- Scores: 0
- Reward points: 889
- Joined: 2022/02/18 16:13:01
- Status: offline
Re: Another Escort Van Project: 77 Mk2
2026/01/28 13:23:50
(permalink)
Looking fantastic Deano, I've been stalking your progress for a while now! Are you going to Small Ford Sunday this weekend for a look?
|