deano
Deity

- Total Posts : 1620
- Scores: 436
- Reward points: 3732
- Joined: 2015/08/19 10:49:10
- Status: offline

Re: Another Escort Van Project: 77 Mk2
2024/01/10 11:28:12
(permalink)
I've been procrastinating for the past week over finishing the rear passenger side reay wheel arch, as pictured. The front edge profile needs trimming back, but as its cut currently, it wants to kink and not sit nicely. The other side came up ok, but i've lost my recollection or condifidence on how to do it and not screw it up. Probably needs cutting up higher to make the blend behave.  so for now,we'll do something else. Floor basically sorted:  and some extra weight stuck down incase the future spec Pinto goes wild 
|
deano
Deity
- Total Posts : 1620
- Scores: 436
- Reward points: 3732
- Joined: 2015/08/19 10:49:10
- Status: offline
Re: Another Escort Van Project: 77 Mk2
2024/01/10 11:33:26
(permalink)
 some Ebay stainless bends came in, $45 for x6 inc postage, 2.5". I have 2 exhausts, some bends, just need a few more bits. While in the procrastination mood, the 4 door dash had an indicator light globe not blinking, so I pulled the dash out.  Those membranes are a dumb arse design, especially when the globe holders have been rotated X many times in 50 years, and strip or fold away the contact strip.
Attached Image(s)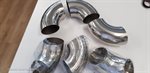 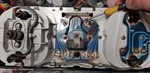
|
deano
Deity
- Total Posts : 1620
- Scores: 436
- Reward points: 3732
- Joined: 2015/08/19 10:49:10
- Status: offline
Re: Another Escort Van Project: 77 Mk2
2024/01/10 13:15:10
(permalink)
in the end, it's just an unreliable connection with terminals on the membrane in general. I cleaned them also with isopropyl, which helped a bit, plus also cleaning the powdercoating off the underside of the new bumperettes where the front indicators mount gave them a much better earth. Some new black vinyl is coming for the seats, which led to the next decision, going all vinyl and having highlight seat stitching instead of the Recaro fabric insert. This was mainly as I coudn't find a material color effect I liked So what stitching? Ideally, it should match the stripe colour as well. I reread my own thread (a bit perverse?) for stripe color suggestions, and ended up following Drews comment about liking a Suzuki swift lime. There's a guy around the corner who has one of these, a Suzuki Jimny, in the same colour, Kinetic Yellow:  which you have probably all seen examples around. Its the right mix of Pine Limey for me, and maybe a bit of a through back to trad escort colors also. I need to check it will work over the grey base of the car, as the website says it may need white base and the plan was just to get a couple of rattle cans mixed up and spray the stripes on. Will need to be cleared after, so a bit of phaffing all up.. The other option would be to do vinyl stripes instead. I have access to a cutting machine, but may just do it manually. Theres a few Lime colours available, just need to pick the closest. Ebay cost is around $70 for 6metres of decent film, which would be heaps. Does anyone know (or could easily measure) the typical width of the outer ring, and the boarder width of a Mk1 with the common bubble arch stripes like the below example? It wont have the bonnet ones done, but may have some on the rear barn doors. Its still miles off from this stage, but we can all dream huh. 
Attached Image(s) 
|
martymexico
Deity
- Total Posts : 2760
- Scores: 454
- Reward points: 6169
- Joined: 2011/08/01 11:02:49
- Location: Adelaide Sth Aust Australia
- Status: offline
Re: Another Escort Van Project: 77 Mk2
2024/01/10 14:07:46
(permalink)
I'm pretty sure you can order the stripes on what ever colour you like from UK, PJ graphics? Just get the sedan RS one and where the extra length of the van at the back happens you will have enough cause of the bubbles cutting thru them if you know what I meant.. Or ask the eBay guy who does the Sun downer stripes to do them. https://www.ebay.com.au/i...artemis&media=COPY Personally once you know the colour you want and this being from me, a do it myself person is to mask up the car and paint the stripes on, like on the orange Mex. The loop is approx 3/4" and that gap again to the main stripe. I normally draw pencil lines on the body so I don't create mistakes. I did stripes on a black mk1 and used pinstripe tape for the thickness of the thin loop and gap plus create the shape as it's very flexible for corners. Just remember the top loop stripe is above the swaged line and make the corners nice and flowing . If you do paint them on(spray paint) I found out that wet sanding with 1200 grit works great as you can buff the panels all in one after. The tape needs to come off before paint dries or you will be regretting it ... I have the colour and stripes planned for mine but it's also donkey yonks away , at least I have the wing badges made up specially!
|
martymexico
Deity
- Total Posts : 2760
- Scores: 454
- Reward points: 6169
- Joined: 2011/08/01 11:02:49
- Location: Adelaide Sth Aust Australia
- Status: offline
Re: Another Escort Van Project: 77 Mk2
2024/01/10 14:15:46
(permalink)
With the arch that you butchered, I think I recall saying to cut along the style line ( the one an inch above the return lip ) and trim away the bubble where needed so it can flow nicely without anyone picking it. This is how I did the fglass ones on my mk1, you'll need to cut almost where the sharp hook starts, about 300mm up from the base/floor
|
deano
Deity
- Total Posts : 1620
- Scores: 436
- Reward points: 3732
- Joined: 2015/08/19 10:49:10
- Status: offline
Re: Another Escort Van Project: 77 Mk2
2024/01/10 14:53:31
(permalink)
thanks Marty, yes I think you're right I need to take the cut up higher.
And I had done a version of your suggestion, at least for the opposite trailing blend, which also still needs doing.
Thanks for the taping dimensions, I expected it may match to a regular marking tape width.
I have a roll of the blue plastic (3mm or so?) pinstriping marking tape that I've used before on the boat.
Great for flames!
I read in one CF mag a guy who did a light blue MK2 van with the same stripes but from a coupe kit, and he found they where difficult to match to the van profile also.
The idea of being able to wetrub down and polish all over the finished product rather than getting polish in the decal edges, and it will be more shiney, which is important!
Might even be worth trying the 2K rattle cans, which I havent done before.
Masking it is! (When the time comes.)
|
MarkA
Deity
- Total Posts : 248
- Scores: 168
- Reward points: 1378
- Joined: 2022/11/26 09:07:52
- Status: offline
Re: Another Escort Van Project: 77 Mk2
2024/01/10 20:54:41
(permalink)
Deano, I got the 2 printed circuits and they are great. I'll dig out the guys details if you want. I think $100 was the cost. Well worth it if you value your time and sanity. Isn't that Car Builders nice to work with. Here's my pic of the heat proofing on the build car. Made carboard templates so very time consuming but really happy with the job and now will be doing engine installs very carefully. My favourite car, the Jimny. Sexiest little beast, but I cannot figure out value for money, 40 odd K for a box with 4 wheels? My cousin has a the bright blue one. My option would be the vinyl. Super fast and easy to change. You probably know more about it than me but there are varying types for different applications.
Attached Image(s)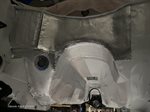
|
deano
Deity
- Total Posts : 1620
- Scores: 436
- Reward points: 3732
- Joined: 2015/08/19 10:49:10
- Status: offline
Re: Another Escort Van Project: 77 Mk2
2024/01/11 13:24:30
(permalink)
yes please Mark, that would be great if its not a PITA.
Although the idea is to be selling the car, not spending more money on it (although the dash lights have to work)
I vaguely remember seeing some for sale somewhere (maybe FB?)
Car Builders seem pretty good, would be great if they have wider range for what we need, but still worth checking them.
Those sheets of deadener are so heavy, I was amazed how much each box weighed.
Agreed about the vinyl, it depends if I can find a colour close to Jimny green, and then I'll also check with the paint guys. Could always do both methods, one on each side I guess.
|
PartTimeMK2
Deity
- Total Posts : 486
- Scores: 423
- Reward points: 764
- Joined: 2023/12/01 12:00:42
- Status: offline
Re: Another Escort Van Project: 77 Mk2
2024/01/11 14:30:14
(permalink)
I'll be doing something similar to Mark with my engine bay too, On the fence if I'll use the gold foil type or the embossed type. Plus i'll be adding something like this to the straight pipe sections. Can't help with the body stuff unfortunately, I'm pretty hopeless when it comes to paint etc. Leaving all that to the panel shop  
Attached Image(s)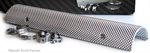
|
MarkA
Deity
- Total Posts : 248
- Scores: 168
- Reward points: 1378
- Joined: 2022/11/26 09:07:52
- Status: offline
Re: Another Escort Van Project: 77 Mk2
2024/01/11 17:57:49
(permalink)
That stuff you have made that piece of art from Mark is the embossed shielding that works best when 'stood off' the component in question with spacers.
The self adhesive like Deano or I used comes in a few types per the Car Builders website. The tape works a treat for covering but joins etc.
I'll search for the circuit guy Deano and send it through.
|
PartTimeMK2
Deity
- Total Posts : 486
- Scores: 423
- Reward points: 764
- Joined: 2023/12/01 12:00:42
- Status: offline
Re: Another Escort Van Project: 77 Mk2
2024/01/11 22:31:00
(permalink)
Oh i didn't make that! That's a screenshot of a product you can buy, Though i'll give it a crack when the time comes.
|
deano
Deity
- Total Posts : 1620
- Scores: 436
- Reward points: 3732
- Joined: 2015/08/19 10:49:10
- Status: offline
Re: Another Escort Van Project: 77 Mk2
2024/01/12 15:45:46
(permalink)
|
deano
Deity
- Total Posts : 1620
- Scores: 436
- Reward points: 3732
- Joined: 2015/08/19 10:49:10
- Status: offline
Re: Another Escort Van Project: 77 Mk2
2024/01/16 13:04:47
(permalink)
since everyone else is playing with their heaters, i may as well do the same. Stripped down, cleaned up  I thought someone may have been in here before me at some stage, unless the styrene foam was a common thing. The motor was pretty tight to rotate but freed up. The O ring seal was stiff and going crusty, but some liberal coating in whatever oily stuff that was close to hand (Le Tan SPF30+) actually breathed new life into it. The seal came up a treat, going back to pliable and soft. Plus when its buggeringly cold and I need the heater, we'll get a pleasent coconut scent reminder of being on hols. Or it will rot the seal in a couple of weeks, stay tuned.  I thought the core might have survived, but it dribbled slightly and needs a bit more of a test.
Attached Image(s)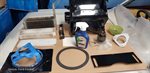 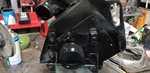
|
PartTimeMK2
Deity
- Total Posts : 486
- Scores: 423
- Reward points: 764
- Joined: 2023/12/01 12:00:42
- Status: offline
Re: Another Escort Van Project: 77 Mk2
2024/01/16 18:49:10
(permalink)
Nice! My heater core should arrive by the weekend according to Aus Post so if you need a new one i'll let you know if this supplier is any good
|
deano
Deity
- Total Posts : 1620
- Scores: 436
- Reward points: 3732
- Joined: 2015/08/19 10:49:10
- Status: offline
Re: Another Escort Van Project: 77 Mk2
2024/01/17 10:32:02
(permalink)
That would be great.
I havent been sure from the website which was the correct core for the metal (mk1?)version heaters.
Would be good if they gave dimensions: the one I have in cthe pics is 270w x 80d x 100h, and 220mm overall height.
I'm thinking about painting a dotted line inside the van:
front 1/2 of the mk2 van is mk2 up to the firewall, and everything back including the heater, was mk1.?
Well, maybe at least when it left the factory. Now, who knows.
Cluster guage sheet for the 4 door is on its way. Thanks Mark for the link.
|