martymexico
Deity

- Total Posts : 2771
- Scores: 459
- Reward points: 6177
- Joined: 2011/08/01 11:02:49
- Location: Adelaide Sth Aust Australia
- Status: offline

Re: Paul's Mk2 RS2000 project - Now going ZETEC!
2018/11/08 09:21:30
(permalink)
Nice work Paul, I'm going to want one of these 👍
|
Paul Dunstan
Supporter

- Total Posts : 1378
- Scores: 35
- Reward points: 4790
- Joined: 2011/08/01 11:02:49
- Location: Adelaide SA Australia
- Status: offline
Re: Paul's Mk2 RS2000 project - Now going ZETEC!
2018/11/24 11:09:25
(permalink)
Just starting to look at the wiring loom as I need to incorporate additional fuses / relays for the added accessories (EPAS, fuel pump, ECU etc). I also need to add relays to the original wiring to help save the ancient switch gear. In tracing the wiring (as I don’t have a complete RS2000 schematic) it’s obvious why things like headlamp switches melt!! The High beam wiring enters the fuse box as a single wire, through the fuse (8A according to the schematic 🤔- assume RS was 20A) and exits in a parallel circuit each feeding their respective high beam and driving lamps. Now even with stock 55w lamps that’s 220w or 18.3A which I consider a significant load to be placed switchgear expecting to last. Some then replace the drivingamps with 100w bulbs and wonder why things don’t last 🤔.
In any case relays are going in for the headlamps, Ignition, fuel pump, horn etc this time around.
|
Robbie
Deity
- Total Posts : 368
- Scores: 56
- Reward points: 3956
- Joined: 2015/08/07 22:56:46
- Status: offline
Re: Paul's Mk2 RS2000 project - Now going ZETEC!
2018/11/24 11:57:27
(permalink)
Have you thought about getting a whole new loom made? the quality of the build is already so high.
|
Paul Dunstan
Supporter
- Total Posts : 1378
- Scores: 35
- Reward points: 4790
- Joined: 2011/08/01 11:02:49
- Location: Adelaide SA Australia
- Status: offline
Re: Paul's Mk2 RS2000 project - Now going ZETEC!
2018/11/24 12:49:55
(permalink)
No I haven’t as I have 2 identical looms and will use the matching wire colors to extend wiring as required to relocate the fuse box to the passenger footwell. Thanks for the kind words but this is a budget build and I consider a complete new loom an unnecessary expense. Whilst I’m a sparky I can’t justify the material cost of rewiring - the only real advantage is weight saving as the original loom is in good condition. I will however replace some of the connectors that aren’t up to scratch as I go also. In addition the plugs for the OEM switchgear (stalks, ignition barrel) is unavailable which means joining new to old wiring anyhow.
|
Matt75
Deity
- Total Posts : 2185
- Scores: 67
- Reward points: 6533
- Joined: 2011/08/01 11:02:49
- Location: Doncaster Vic Australia
- Status: offline
Re: Paul's Mk2 RS2000 project - Now going ZETEC!
2018/11/24 17:05:00
(permalink)
|
Paul Dunstan
Supporter
- Total Posts : 1378
- Scores: 35
- Reward points: 4790
- Joined: 2011/08/01 11:02:49
- Location: Adelaide SA Australia
- Status: offline
Re: Paul's Mk2 RS2000 project - Now going ZETEC!
2018/11/24 21:25:19
(permalink)
Thanks Matt. If the original loom was no good then I may consider rewiring. I think it OTT for my purposes.
|
Paul Dunstan
Supporter
- Total Posts : 1378
- Scores: 35
- Reward points: 4790
- Joined: 2011/08/01 11:02:49
- Location: Adelaide SA Australia
- Status: offline
|
Paul Dunstan
Supporter
- Total Posts : 1378
- Scores: 35
- Reward points: 4790
- Joined: 2011/08/01 11:02:49
- Location: Adelaide SA Australia
- Status: offline
Re: Paul's Mk2 RS2000 project - Now going ZETEC!
2019/06/01 21:37:45
(permalink)
Not a lot happening although the engine has been machined and with a mate to build it up and assess my compression. Then the head can be cc’d and finished. Spent the day making a start on wiring my custom gauge cluster. Almost done as just wanting to use put some sleaving over the loom where it goes to the plug. Just need the plugs for the speedo and tacho as I think it will look a little neater than spade lugs - and then terminate the main connector. - and mount the plug. I will mount a gauge dimmer adjacent to the cluster and delete the original switch in the dash. As I have said before I’ve also incorporated a brake fail and park brake warning in the cluster to remove the tacky under dash warning lights.
post edited by Paul Dunstan - 2019/06/01 21:51:00
Attached Image(s)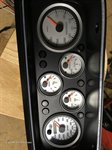 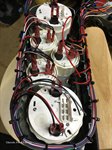
|
Robbie
Deity
- Total Posts : 368
- Scores: 56
- Reward points: 3956
- Joined: 2015/08/07 22:56:46
- Status: offline
Re: Paul's Mk2 RS2000 project - Now going ZETEC!
2019/06/02 11:21:33
(permalink)
Your brake fail sensor is connecting to the float level in the reservoir?
|
Paul Dunstan
Supporter
- Total Posts : 1378
- Scores: 35
- Reward points: 4790
- Joined: 2011/08/01 11:02:49
- Location: Adelaide SA Australia
- Status: offline
Re: Paul's Mk2 RS2000 project - Now going ZETEC!
2019/06/02 15:22:05
(permalink)
Yep. Spot on Robbie  . Decided to tape the cluster loom which I feel is better.
post edited by Paul Dunstan - 2019/06/02 19:00:57
Attached Image(s)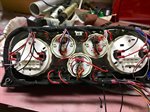
|
Paul Dunstan
Supporter
- Total Posts : 1378
- Scores: 35
- Reward points: 4790
- Joined: 2011/08/01 11:02:49
- Location: Adelaide SA Australia
- Status: offline
|
Paul Dunstan
Supporter
- Total Posts : 1378
- Scores: 35
- Reward points: 4790
- Joined: 2011/08/01 11:02:49
- Location: Adelaide SA Australia
- Status: offline
Re: Paul's Mk2 RS2000 project - Now going ZETEC!
2019/06/23 17:35:50
(permalink)
Finishing off a few small jobs so I can begin bolting some gear into the car - namely brakes and steering. Needed to add a bracket to provide some additional support due to the torque of the EPAS as I didn't want to rely solely on the dash mounting point and the bracket at the base of the tube near the floor. Also wanted to add some rigidity to the firewall as originally the booster assembly tied in the inner guard to the firewall. Removing the booster and going with the hydraulic pedal box places all the pedal forces on the firewall so I wanted to distribute this in a similar way to the OEM set-up. I plan to have a simple M8 rose jointed rod running between the firewall bracket and a bracket bolted into position where the booster assembly once was secured. Wasn't happy with the driving position of the DBW throttle so I modified the mounting to allow for more fore and after adjustment as well as being able to alter the angle of the pedal.
|
NQRS
Deity
- Total Posts : 897
- Scores: 58
- Reward points: 6931
- Joined: 2011/08/01 11:02:49
- Location: Townsville QLD Australia
- Status: offline
Re: Paul's Mk2 RS2000 project - Now going ZETEC!
2019/06/23 21:36:25
(permalink)
Hey Paul,
I've heard of de-cluttering an engine bay but yours takes the cake! That is the neatest set of brake lines ever, would have been a fun job getting those tight little turns sorted. Len
|
Paul Dunstan
Supporter
- Total Posts : 1378
- Scores: 35
- Reward points: 4790
- Joined: 2011/08/01 11:02:49
- Location: Adelaide SA Australia
- Status: offline
Re: Paul's Mk2 RS2000 project - Now going ZETEC!
2019/06/23 23:16:37
(permalink)
Thanks Len. It wasn’t as hard as it looks. However as the rear line was made from the back forward I had a few nervous moments bending that one so it finished perfectly.
|
Paul Dunstan
Supporter
- Total Posts : 1378
- Scores: 35
- Reward points: 4790
- Joined: 2011/08/01 11:02:49
- Location: Adelaide SA Australia
- Status: offline
Re: Paul's Mk2 RS2000 project - Now going ZETEC!
2019/06/30 17:48:13
(permalink)
More therapeutic brake line manufacturing  I had originally planned to run flexible and I feel that was the easier option but the way I have planned the brake lines exiting the pedal box into the engine bay meant a very sharp radius to clear the top of the brake pedal and run over the top to the MC's. I have also heard of issues when bleeding dual master pedal boxes which I think may be attributed to the flexible lines exiting the MC's and looping over the pedal box meaning the MC's are not the highest part of the system. Doing it in hard lines means the MC's outlet remain the highest part of the high pressure system. Obviously the reservoirs are higher than the MC's  . As it so happens the flexible lines I ordered will fit the front struts and I can modify the 3rd hose to run from the body to the diff  . I'm also a brake fitting short to allow me to complete the clutch hard line to the MC.
Attached Image(s)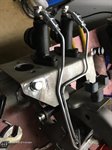 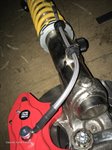
|