Drewdog
Deity

- Total Posts : 1064
- Scores: 171
- Reward points: 5495
- Joined: 2013/03/06 22:31:01
- Status: offline

Re: Rough '69 Capri
2016/06/19 15:24:55
(permalink)
Coming along nicely, great to see some quality metal work being done. Keep the pics coming...
Cheers Drew...
GT Cortina Project "The Ugly Duckling"
|
Wiggy333
Deity

- Total Posts : 1012
- Scores: 42
- Reward points: 3744
- Joined: 2014/12/01 13:28:20
- Location: Sydney
- Status: offline

Re: Rough '69 Capri
2016/06/20 17:33:33
(permalink)
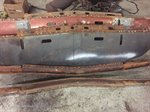
I reckon while your far in to the front it's a good idea to separate the stone guard front valance. Lots of water goes through the grill. After pulling two apart yesterday of which both looked rust free aside from surface rust I discovered this as seen in pics. Brings back the question of wether to acid dip or sand blast or old school sand. Thing is to pull things apart to get access to be perfect would be tearing all apart and rebuild cars from scratch( good luck with that one).
Attached Image(s)
|
blue74
Master

- Total Posts : 301
- Scores: 28
- Reward points: 4184
- Joined: 2015/04/16 12:54:53
- Status: offline

Re: Rough '69 Capri
2016/06/20 22:00:51
(permalink)
Good point Wiggy333, I will have a close look at it. Looks like you have been busy with the drill!
I was also considering bolting the valance on, is this something others have tried?
|
blue74
Master

- Total Posts : 301
- Scores: 28
- Reward points: 4184
- Joined: 2015/04/16 12:54:53
- Status: offline

Re: Rough '69 Capri
2016/07/20 18:39:28
(permalink)
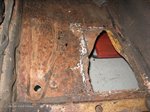
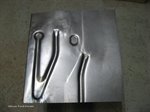
The Capri front floor pan sections have had a bodged rust repair in the past with a large portion cut out and a plate fitted over the top. I made a die up and pressed a front passengers side floor pan rust repair section to weld in. I will have to do the same for the drivers side next.
post edited by blue74 - 2016/07/21 21:28:07
Attached Image(s) 
|
Wiggy333
Deity

- Total Posts : 1012
- Scores: 42
- Reward points: 3744
- Joined: 2014/12/01 13:28:20
- Location: Sydney
- Status: offline

Re: Rough '69 Capri
2016/07/20 18:43:59
(permalink)
Like that can have three please.
|
gtv6capri
Deity

- Total Posts : 1461
- Scores: 53
- Reward points: 5548
- Joined: 2011/08/01 11:02:49
- Location: Melbourne Vic Australia
- Status: offline

Re: Rough '69 Capri
2016/07/22 09:23:30
(permalink)
I have floor sections coming its the curved section where your feet will sit, left and right side, be here a the end of next month
Capri The car I always promised myself
|
Wiggy333
Deity

- Total Posts : 1012
- Scores: 42
- Reward points: 3744
- Joined: 2014/12/01 13:28:20
- Location: Sydney
- Status: offline

Re: Rough '69 Capri
2016/07/22 16:30:04
(permalink)
I would like to order a couple please when they land. PM me with price and payment details when you can. Thanks
|
blue74
Master

- Total Posts : 301
- Scores: 28
- Reward points: 4184
- Joined: 2015/04/16 12:54:53
- Status: offline

Re: Rough '69 Capri
2016/07/25 08:32:15
(permalink)
Wiggy333 I could make up some more floor pan sections if you need them. They would be $160 each.
As I mentioned above I will be making the RH side one next.
|
blue74
Master

- Total Posts : 301
- Scores: 28
- Reward points: 4184
- Joined: 2015/04/16 12:54:53
- Status: offline

Re: Rough '69 Capri
2016/09/06 21:39:43
(permalink)
The front floor sections which is the lower section of the bulkhead, were a bit like Swiss cheese so I have made both a new left and right section and cut them ready to fit in.
Attached Image(s) 
|
cosworthfreak
Moderator

- Total Posts : 684
- Scores: 53
- Reward points: 6187
- Joined: 2011/08/01 11:02:49
- Location: Location
- Status: offline

Re: Rough '69 Capri
2016/09/06 21:50:23
(permalink)
You've certainly got some metalworking skills Rob. Do you do it for a living?
Cheers
Jamie
|
deano
Deity

- Total Posts : 1590
- Scores: 422
- Reward points: 3732
- Joined: 2015/08/19 10:49:10
- Status: offline

Re: Rough '69 Capri
2016/09/07 08:50:12
(permalink)
blue74
The Capri front floor pan sections have had a bodged rust repair in the past with a large portion cut out and a plate fitted over the top.
I made a die up and pressed a front passengers side floor pan rust repair section to weld in.
He says casually, I made up a die and pressed up a new section. 10 points right there. My daughter would say, skills to pay the bills dad..Nice work indeed.
|
Wiggy333
Deity

- Total Posts : 1012
- Scores: 42
- Reward points: 3744
- Joined: 2014/12/01 13:28:20
- Location: Sydney
- Status: offline

Re: Rough '69 Capri
2016/09/07 09:27:35
(permalink)
Some people say Im a brick artist. I don't like that terminology I prefer craftsman and Blue 74 you fit that bill quite well when it comes to steel. Is that the trick with plywood and clamps coupled with blunt bolster and hammer. It always looks easy when you watch some else do it but never easy in practice unless you've practiced many times before. Please show us more
|
blue74
Master

- Total Posts : 301
- Scores: 28
- Reward points: 4184
- Joined: 2015/04/16 12:54:53
- Status: offline

Re: Rough '69 Capri
2016/09/08 22:19:42
(permalink)
Thank you for your kind words. Jamie, I don't do this for a living I just enjoy the challenge of "making stuff" in the shed for R&R and hopefully it works out in the end. We are all blessed with particular skills and sometimes the only one I have is dogged determination, much to the frustration of my wife. The internet is a great source of information to get some useful advice. It also helps if you have a like minded person to bounce ideas off. Keith at your request I have some pictures here of a headlight mounting plate, the pictures explain better than I can in words, what I used to make it. These flat panels are quite simple to make using these techniques with a hammer solid work bench and some wood. I used cold rolled steel. I am trying for the RS look for the front of my car and needed something to mount the headlight buckets to. I was going to cut and weld the original bracket however it was more practical and neater to make a new one. When using the wooden block I can make both a right and left side by flipping it over and using the other side. Hopefully this gives some inspiration to have a crack. the worst thing that can happen is you end up with a piece of scrap metal.
|
blue74
Master

- Total Posts : 301
- Scores: 28
- Reward points: 4184
- Joined: 2015/04/16 12:54:53
- Status: offline

Re: Rough '69 Capri
2016/11/22 20:34:20
(permalink)
I have been working on the LH A pillar area at the moment. Can't see much progress for all the time it takes to make up the pillar however now that is done I am finding more old repairs from a flipped bonnet and more rust (causing the demise of the pillar in the first place). Couldn't see any other way to repair the inner scuttle than remove a piece of the outer section.
post edited by blue74 - 2016/12/02 11:01:02
|
blue74
Master

- Total Posts : 301
- Scores: 28
- Reward points: 4184
- Joined: 2015/04/16 12:54:53
- Status: offline

Re: Rough '69 Capri
2017/03/07 14:40:01
(permalink)
A bit more done, now to start the other side.
|