sundowner
Aficionado

- Total Posts : 727
- Scores: 14
- Reward points: 5514
- Joined: 2011/08/01 11:02:49
- Location: south Australia
- Status: offline

Re:Mk2 Panny Van Resto
2013/04/05 11:08:12
(permalink)
great work you have done more than me and jake have in one year since you have started this thread
|
bennymac24
Enthusiast

- Total Posts : 50
- Scores: 1
- Reward points: 1746
- Joined: 2012/01/21 16:02:30
- Status: offline
Re:Mk2 Panny Van Resto
2013/04/06 16:46:52
(permalink)
Cheers Matt sundowner
great work you have done more than me and jake have in one year since you have started this thread
Haha, yeah, well it certainley helps having someone who has done something similar to there van before around alot. Kinda takes some of the guess work and worries out of it. But mine is going to be a lot less involved/extreme than Jakes. The only custom body work will be roll pan, roof scoop, fuel filler, wheel arches and i also want to get rid of the external hinges on the rear doors. I don't have the time to do much more with quality i want and time frame i have. As it is i wont have the time to do anything to the interior, that will have to come at a later date. I'm pretty sure i can get the engine running in there within my time frame but incase things turn to crap i've still got my pinto to slap in there for my wedding.
post edited by bennymac24 - 2013/04/06 17:45:00
|
bennymac24
Enthusiast
- Total Posts : 50
- Scores: 1
- Reward points: 1746
- Joined: 2012/01/21 16:02:30
- Status: offline
Re:Mk2 Panny Van Resto
2013/04/07 15:59:43
(permalink)
I Didn't end up getting to Mallanats this weekend like i wanted, nor did i get out into the shed to do some body work. But i did get out there and try another part of build, I want to make my own tail light lenses and LED lights for them as there are no aftermarket options and also make some LED lights for the front indicators as i will be using clear ones. All i really want to do is get rid of any orange on the car as it wont match my colour scheme. As i said before no one makes these already for escorts (as far as i know) and i know the tail lights will be complicated to make especially seeing as i have never made an LED board before, so i thought i would start on a board to suit the front indicators, small and relatively easy as i'm only using one colour LED. So here we go. Its at this point id like to state that this is merely a trial piece for one, to see if my research is any good, and two, just to see if it is something i can do on my own. It is by far not a master piece, my circuit was hand drawn, the board was cut with side cutters, the LEDs are all over the place and my soldering is less than average. In saying that i'm still stoked with the results :) Here is my board after i cleaned it, the black edges still need to be trimmed down 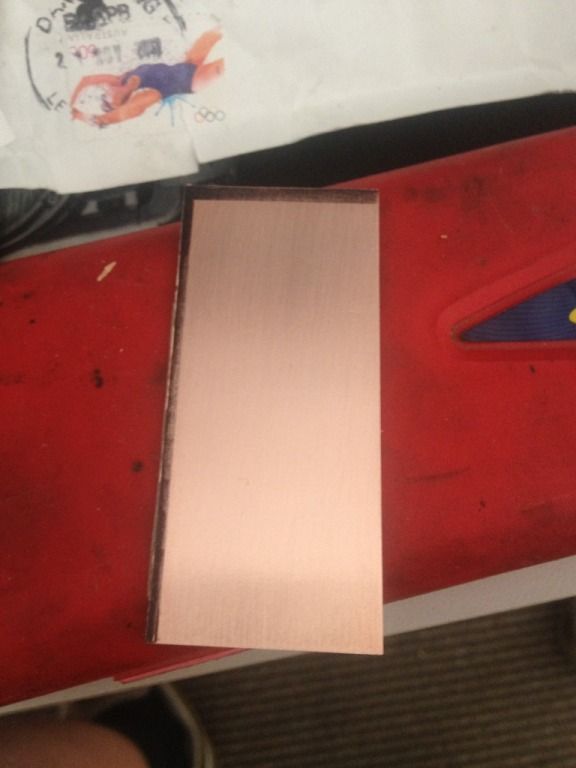 I forgot to take one of the circuit i drew on it before etching but here you can see it while in the etching bath. 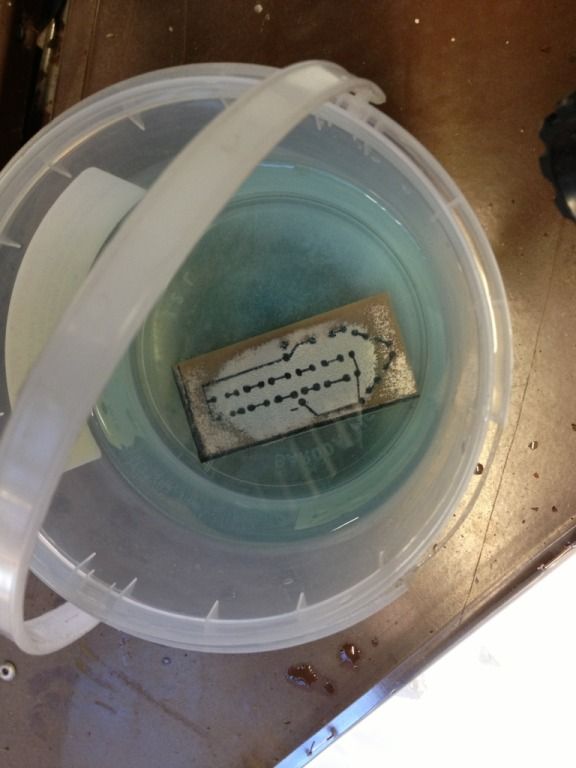 All cleaned up, here is my circuit board. 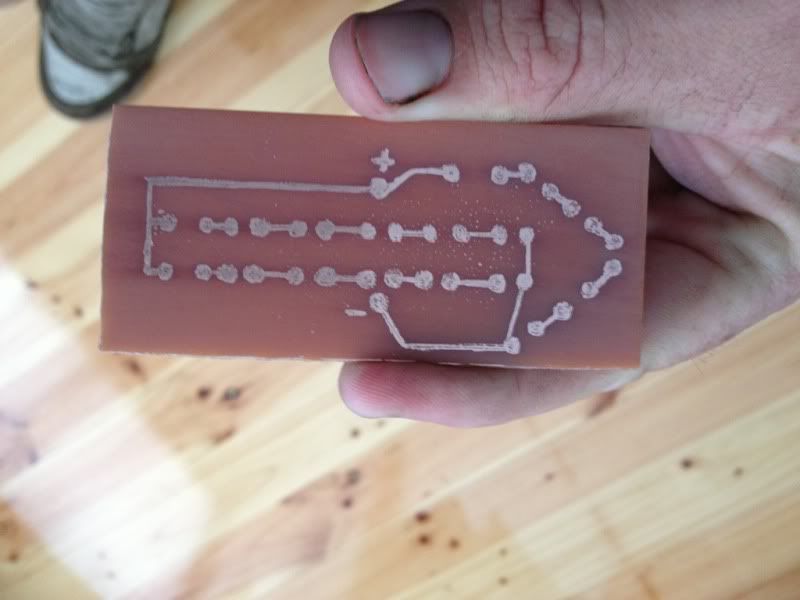 the smallest drill bit i had was still too big, 1/16th'' but it did the job for this little project. 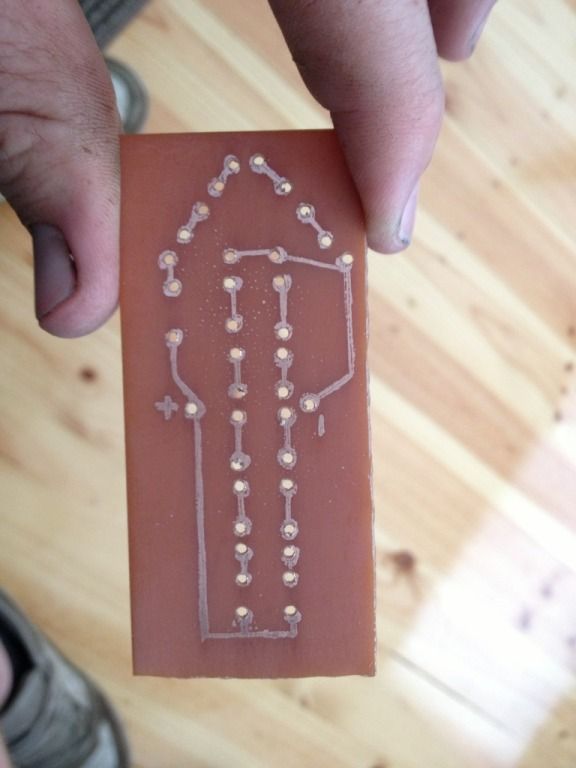 LEDs in the board. I had an idea to make arrows in the indicators as something a little different, i like the outcome. 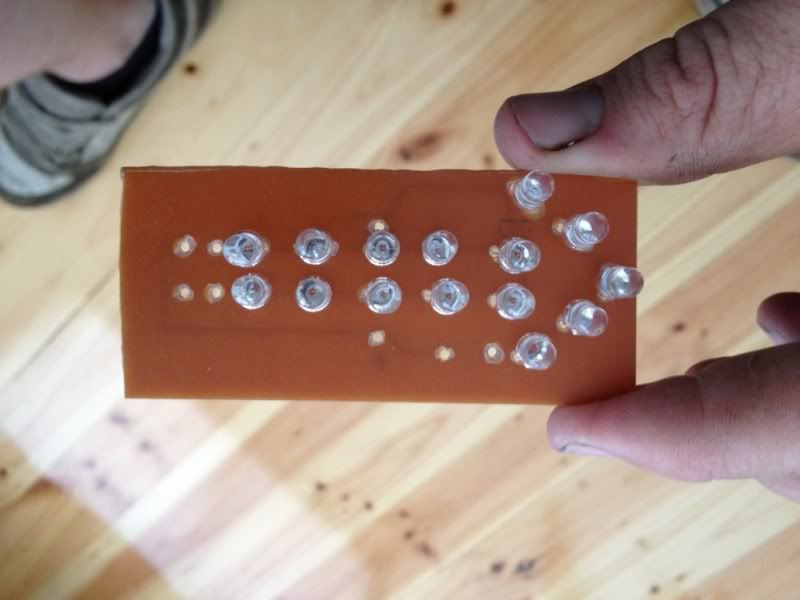 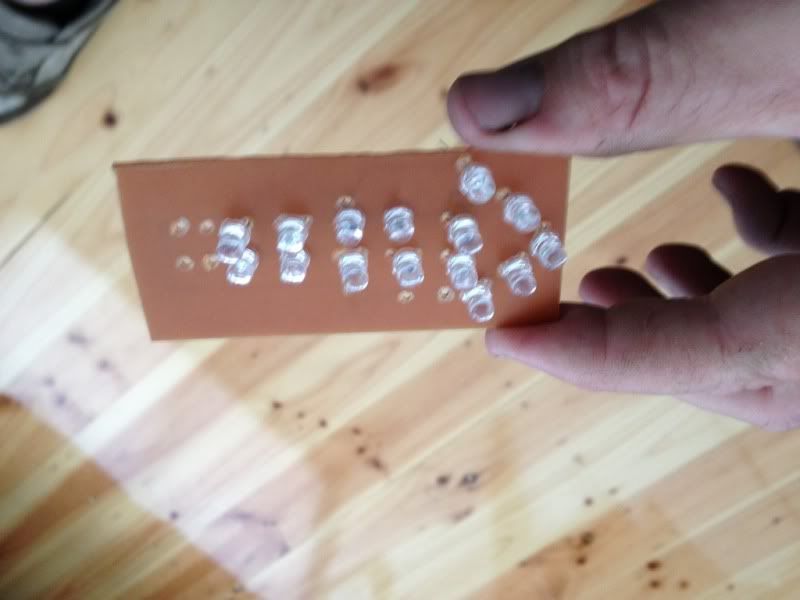 All soldered up ready for power. 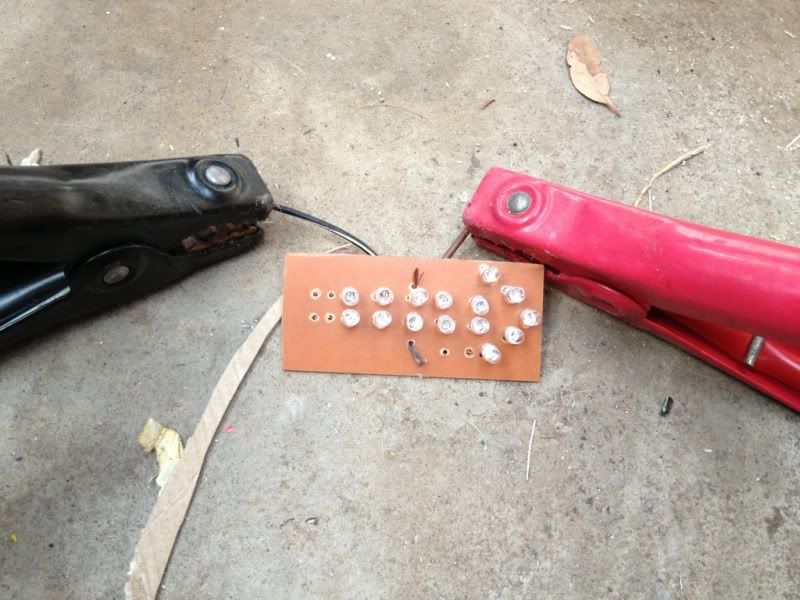 And presto, it actually worked. 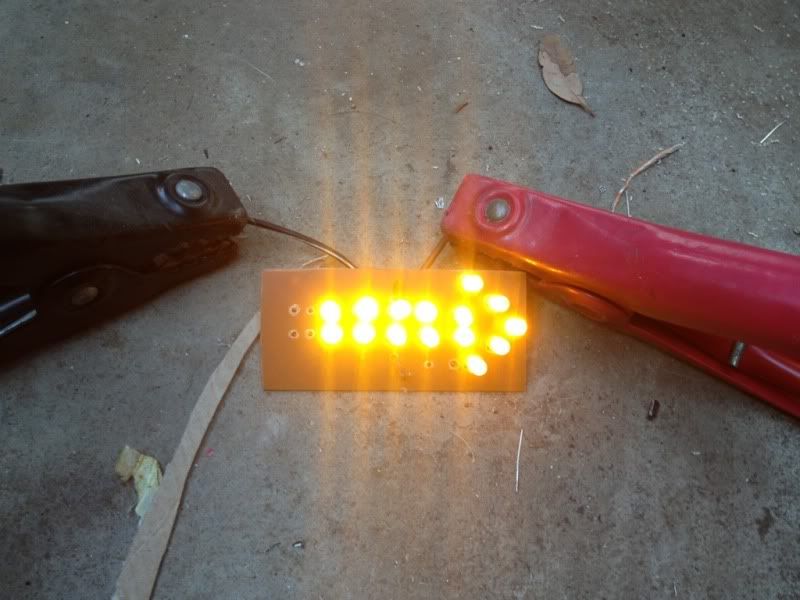 And here are a few pics of it in the housing behind an the original orange lense. 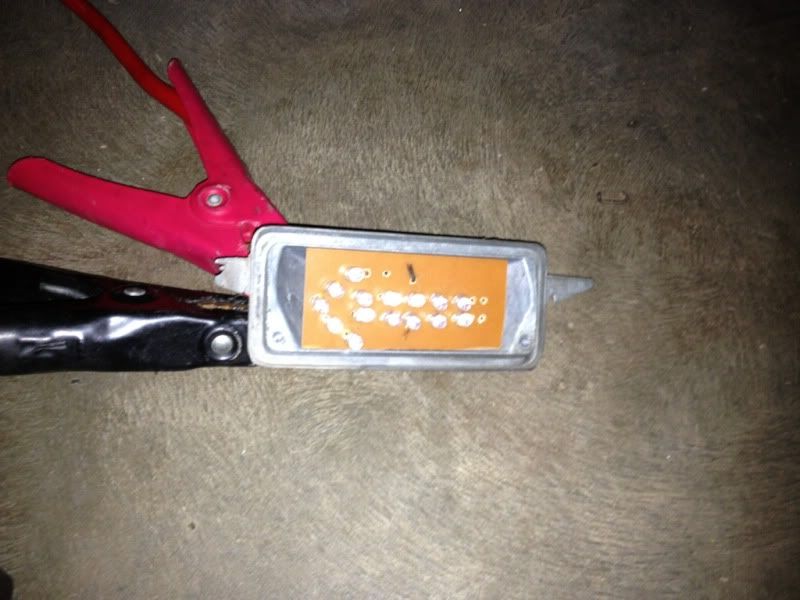 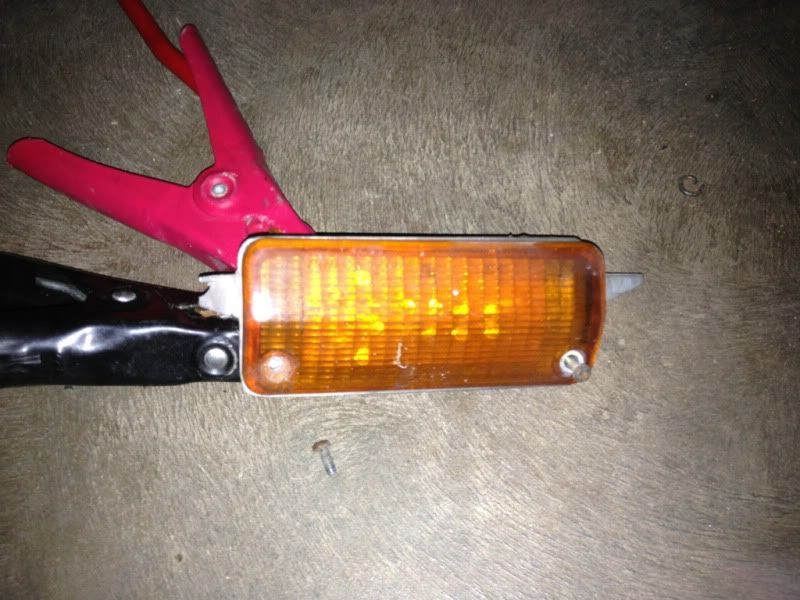 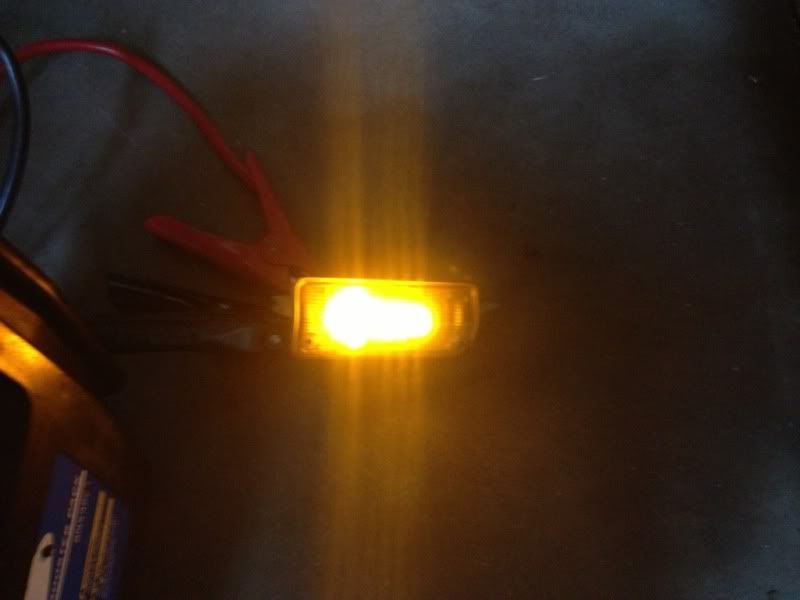 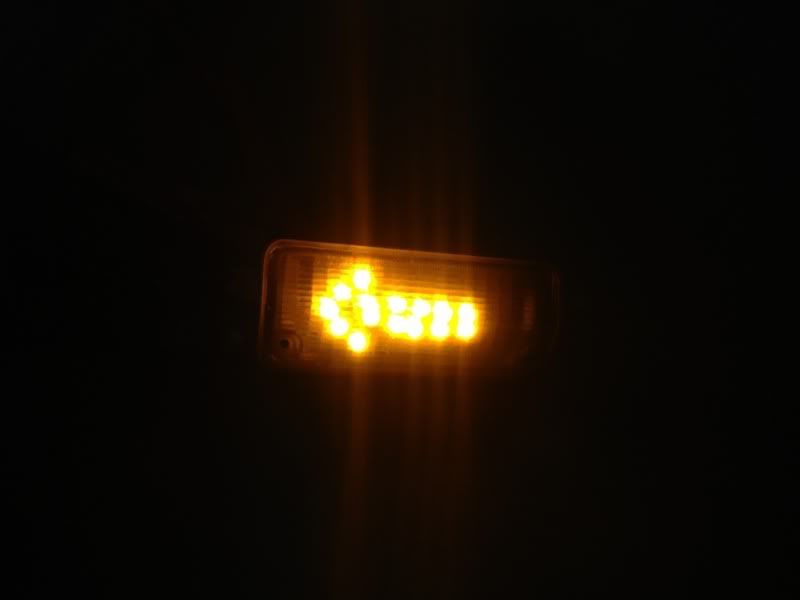 So there you have it, like i said, i'm stoked with the out come. However, it was a very tedious and time consuming job so having said that, my LED lights will have to to wait till its on the road after the wedding as i don't see my self having the time to do it before and i want to do it properly and neat, so i know they will look good and last a while. Hope you enjoy. Benny
|
Flighter
Deity

- Total Posts : 1107
- Scores: 43
- Reward points: 5151
- Joined: 2011/10/17 14:55:59
- Status: offline
Re:Mk2 Panny Van Resto
2013/04/07 16:13:11
(permalink)
WTB: Recaro seat - any condition considered
|
bennymac24
Enthusiast
- Total Posts : 50
- Scores: 1
- Reward points: 1746
- Joined: 2012/01/21 16:02:30
- Status: offline
Re:Mk2 Panny Van Resto
2013/04/08 10:27:53
(permalink)
I have thought about using veroboard. And I still might. But I think a circuit board would look more profesional. Cheers for the info tho.
|
OssBoss
Enthusiast
- Total Posts : 68
- Scores: 1
- Reward points: 4260
- Joined: 2012/12/03 09:47:41
- Location: Central Coast NSW
- Status: offline
Re:Mk2 Panny Van Resto
2013/04/08 19:48:07
(permalink)
Make sure you put the correct current limiting resistor on the leds or they won't last very long. I can't see any in the photos.
|
bennymac24
Enthusiast
- Total Posts : 50
- Scores: 1
- Reward points: 1746
- Joined: 2012/01/21 16:02:30
- Status: offline
Re:Mk2 Panny Van Resto
2013/04/08 20:32:42
(permalink)
Yeah, I do have them on the back of the board. I used one of the led calculators to work out what ones I needed.
|
bennymac24
Enthusiast
- Total Posts : 50
- Scores: 1
- Reward points: 1746
- Joined: 2012/01/21 16:02:30
- Status: offline
Re:Mk2 Panny Van Resto
2013/04/20 23:41:26
(permalink)
|
bennymac24
Enthusiast
- Total Posts : 50
- Scores: 1
- Reward points: 1746
- Joined: 2012/01/21 16:02:30
- Status: offline
Re:Mk2 Panny Van Resto
2013/04/26 18:51:28
(permalink)
Got out in the shed anzac day and did a bit more. The day after i paint stripped the engine bay it bucketed down and flooded my carport and turn my engine bay to surface rust, man was i annoyed. So i got the wire brush out and finished cleaning off the old paint then rust converted the whole engine bay just for safe measure. I also found a rust hole next to the strut support that i didnt see before, as soon as i hit it with the wire brush it opened up. GRRRR. Here i am thinking i'm getting closer to having the front done and this pops up, ah well. So rather than it getting to me i just fixed it then and there. Then i chucked some primer on it just to make sure no surface rust showed again. Here are some pics. 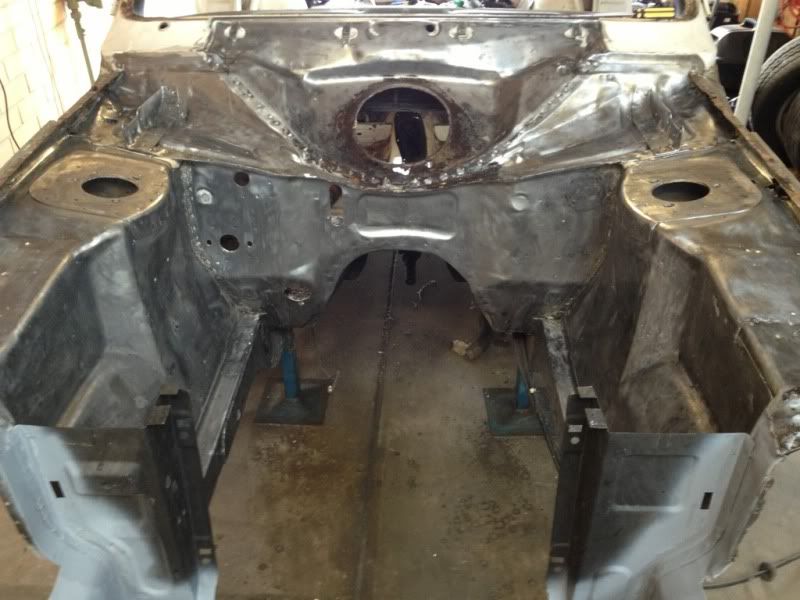 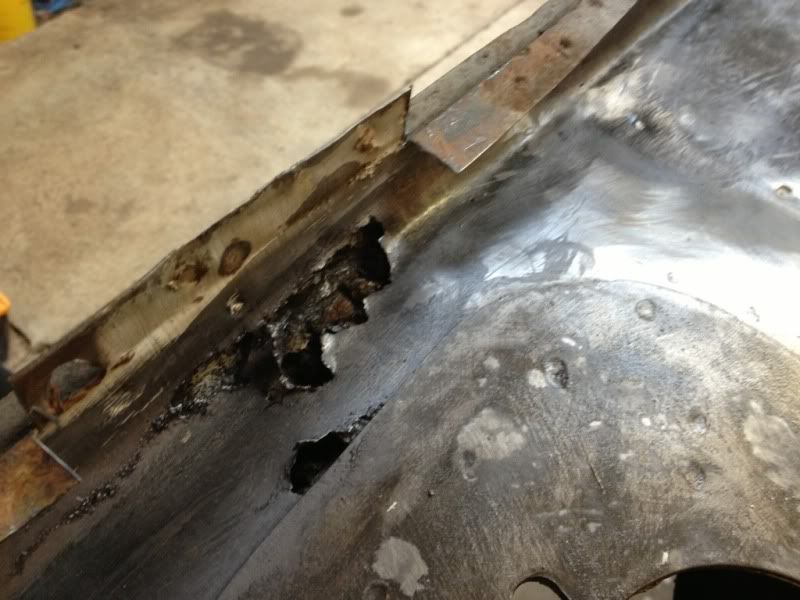 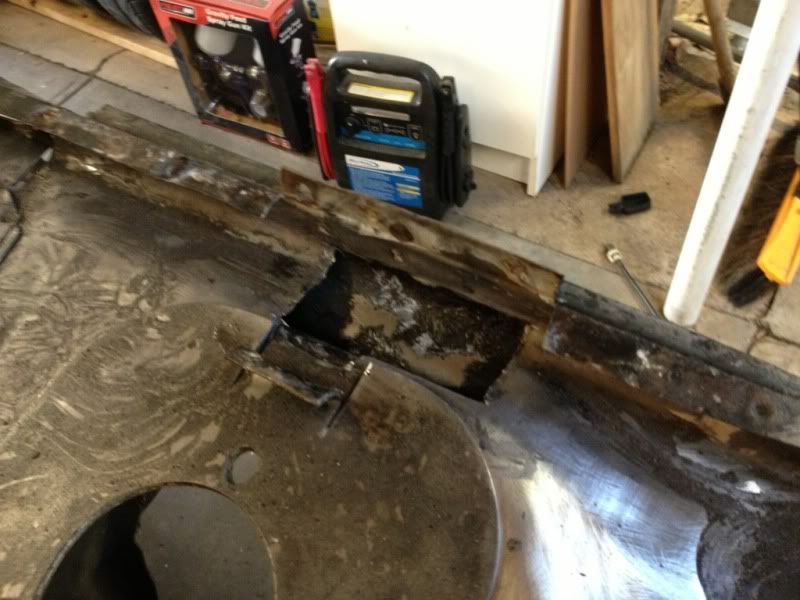 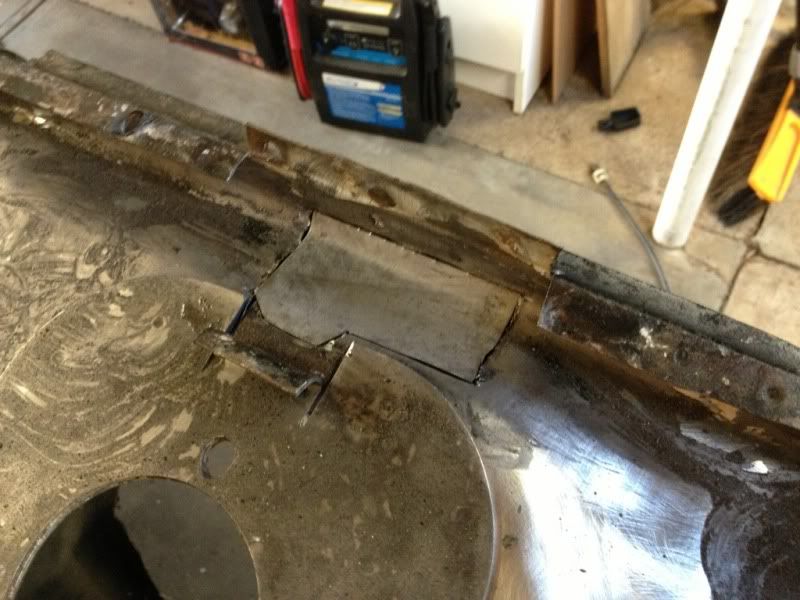 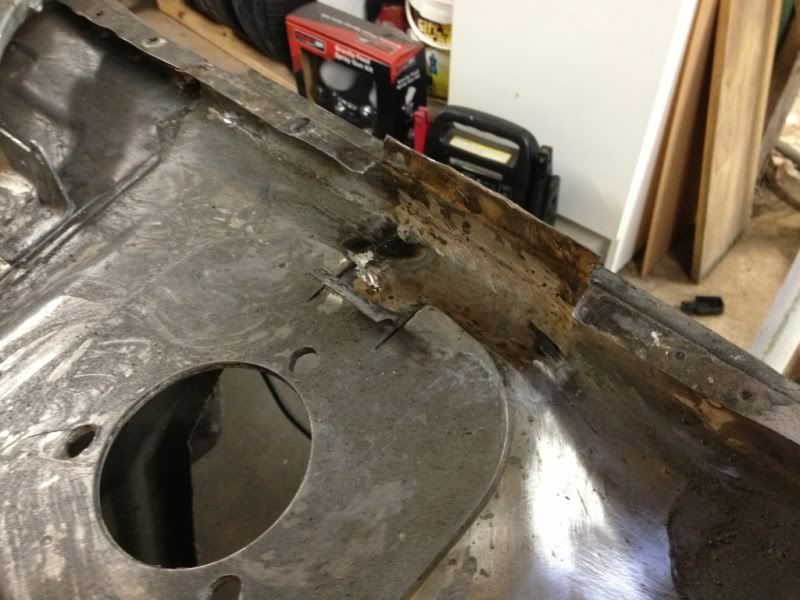 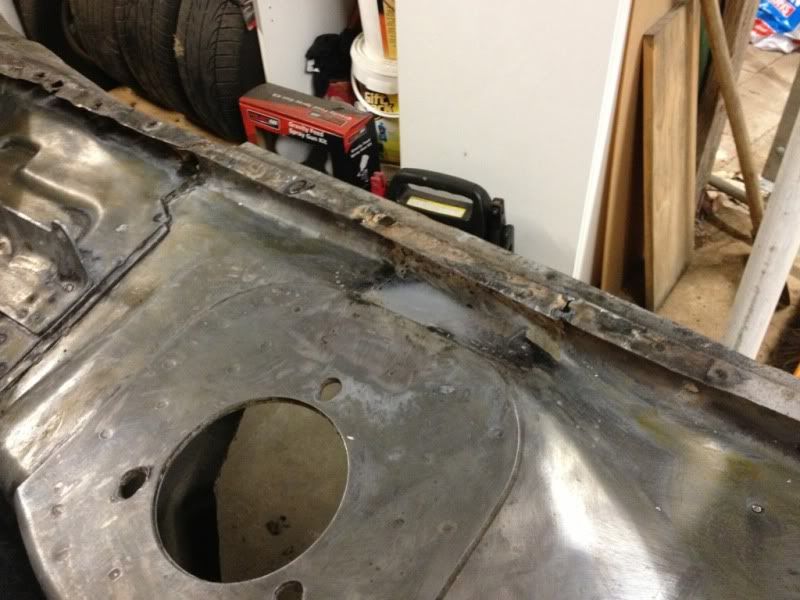 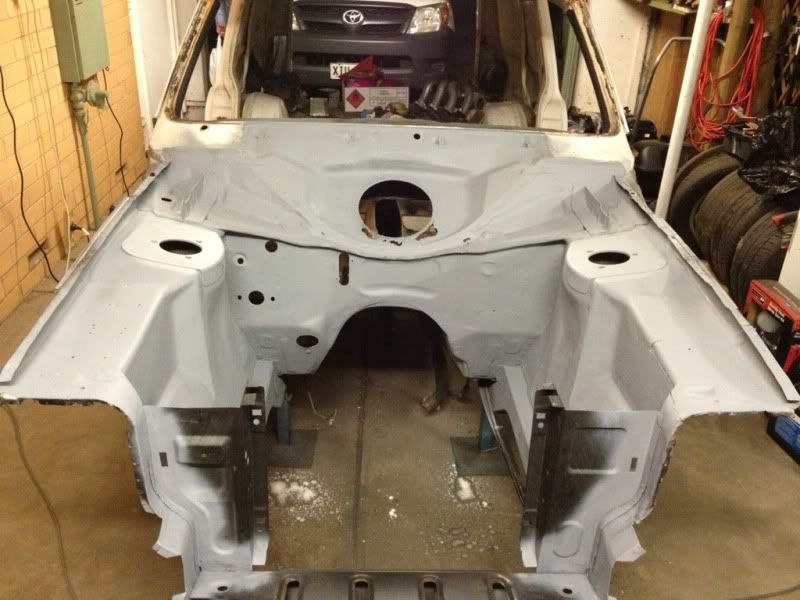 Hopefully by the end of the weekend i will have the heater section done and started smoothing out the rest of the engine bay. Cheers guys. Benny
|
bennymac24
Enthusiast
- Total Posts : 50
- Scores: 1
- Reward points: 1746
- Joined: 2012/01/21 16:02:30
- Status: offline
Re:Mk2 Panny Van Resto
2013/04/28 19:18:56
(permalink)
|
bennymac24
Enthusiast
- Total Posts : 50
- Scores: 1
- Reward points: 1746
- Joined: 2012/01/21 16:02:30
- Status: offline
Re:Mk2 Panny Van Resto
2013/04/29 22:48:30
(permalink)
|
bennymac24
Enthusiast
- Total Posts : 50
- Scores: 1
- Reward points: 1746
- Joined: 2012/01/21 16:02:30
- Status: offline
Re:Mk2 Panny Van Resto
2013/04/30 21:02:06
(permalink)
Started on the lower section tonight. It will be done very similar to the top half so i started making templates but before cutting out the old section i made one piece first just to make sure its something i can do. I didnt want to cut ot the old stuff and realize its a bit out of my league and be left with a huge hole in my firewall. Here are some pics. Getting my templates 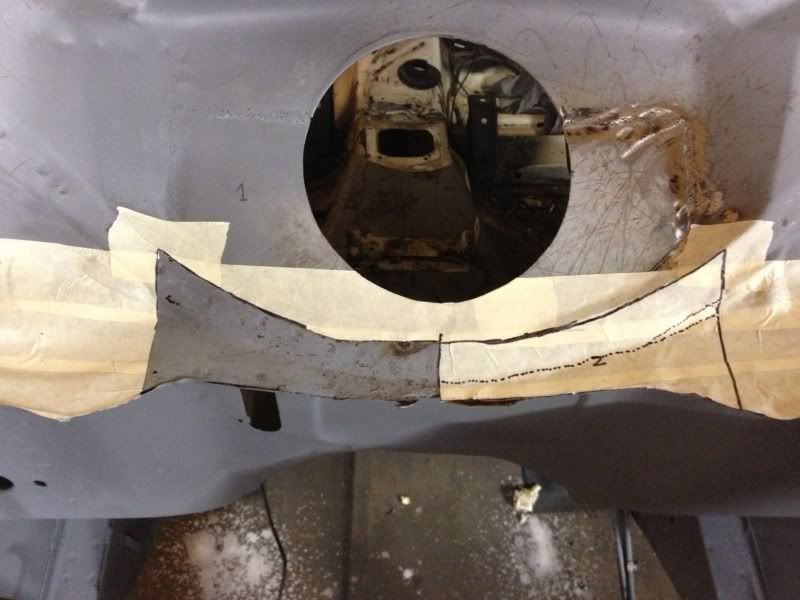 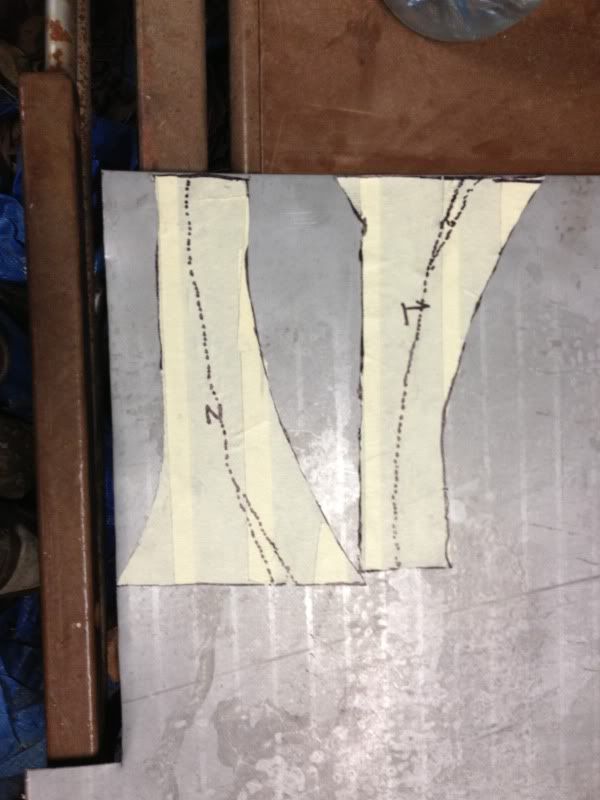 After i cut it out, i'm left with a flat piece of metal 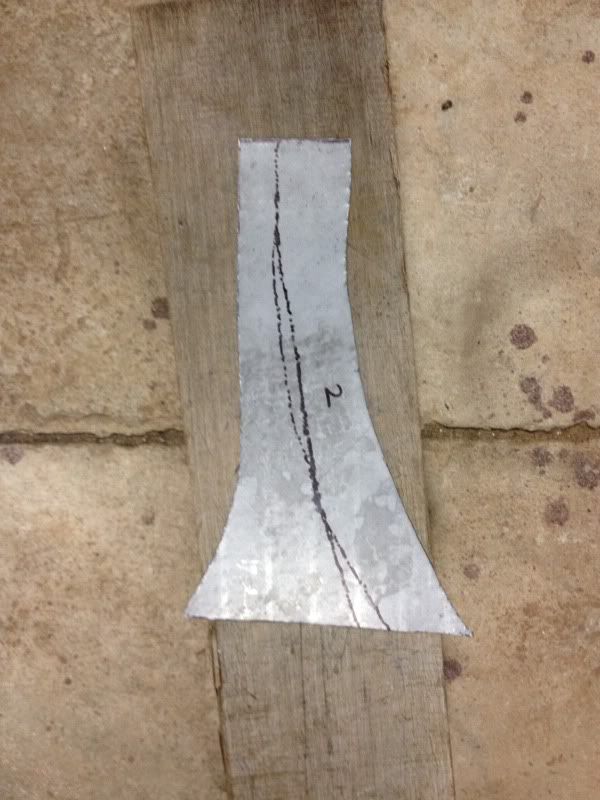 And after an hour and a bit of beating, folding, stretching, more folding, more stretching and more beating, Wellah. 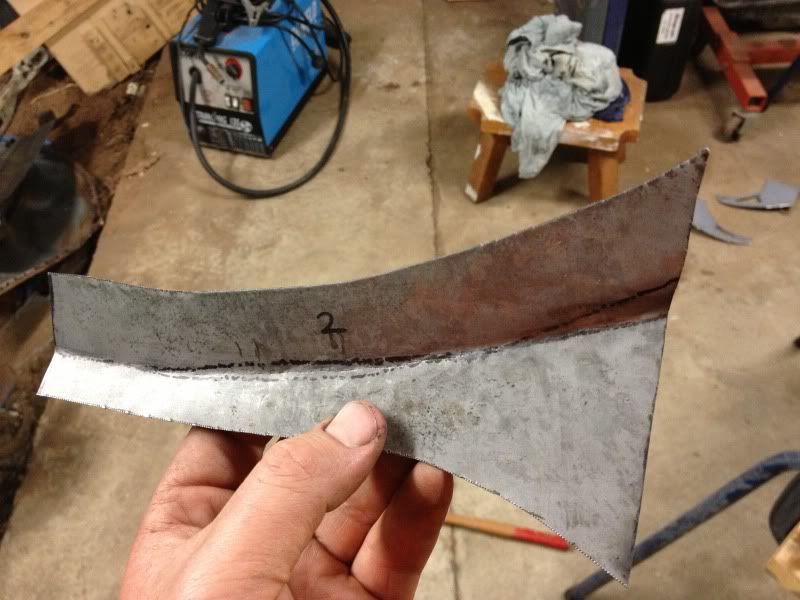 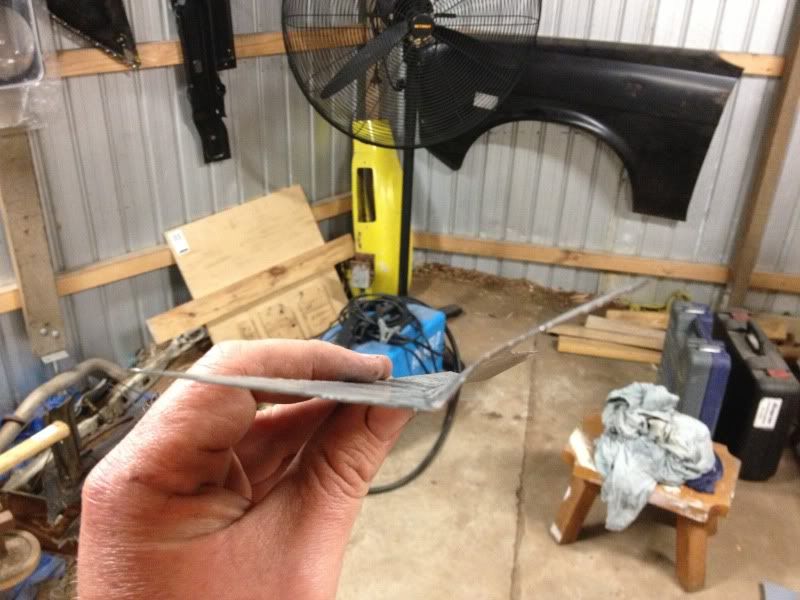  And just a pick of it sitting on top of the old stuff in place. 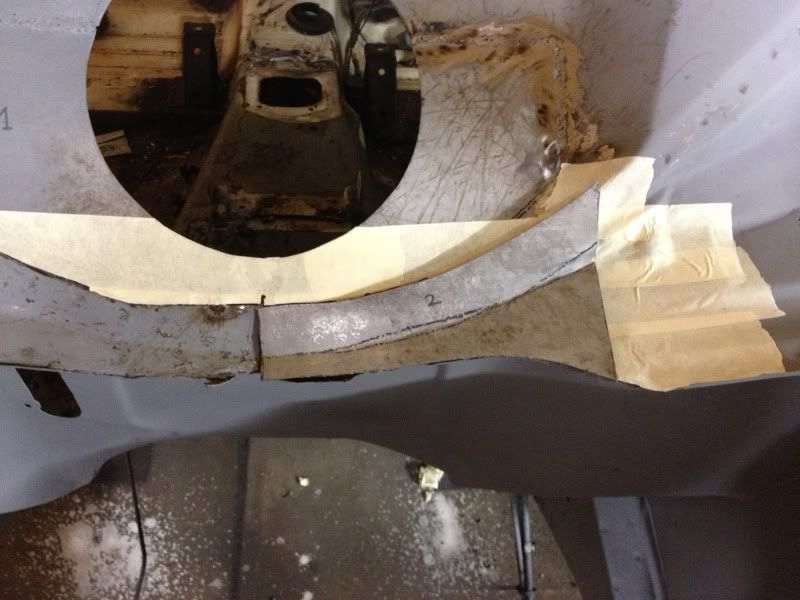 It still needs a bit of tinkering but i'll do that when i cut out the old piece, like i said, i just wanted to see if i could do it first. Cheers for looking Benny
|
Chillipepperz
Enthusiast
- Total Posts : 46
- Scores: 5
- Reward points: 4697
- Joined: 2012/11/25 17:09:30
- Status: offline
Re:Mk2 Panny Van Resto
2013/04/30 21:21:33
(permalink)
I'm facing this exact issue right now and wondering where to start so thanks for the detail: i love your technique with the masking tape! I have the repair panel from smcka but its only the lip, not around the air vent circle bit so you have really helped me work out what to do. Keep the pics coming and great work overall.
|
bennymac24
Enthusiast
- Total Posts : 50
- Scores: 1
- Reward points: 1746
- Joined: 2012/01/21 16:02:30
- Status: offline
Re:Mk2 Panny Van Resto
2013/04/30 22:49:26
(permalink)
Cheers mate and Glad I could help.
I didn't know you could get that lower section. I wish I did, damn, it would of saved me a bit of work, especially for $40. I don't know if I should get it or not. I've already made half of it. Haha, ah well. I'll keep doing it the hard way. At least it's pretty satisfying making things from scratch. Well that's I'll keep telling myself anyway, haha.
|
SaggaRS
Enthusiast
- Total Posts : 231
- Scores: 5
- Reward points: 2969
- Joined: 2011/08/01 11:02:49
- Location: Adelaide SA
- Status: offline
Re:Mk2 Panny Van Resto
2013/05/01 10:56:57
(permalink)
You are doing a great job Benny, keep up the good work and keep the pics coming.
|