phoenix 13918
Enthusiast

- Total Posts : 187
- Scores: 4
- Reward points: 1705
- Joined: 2012/05/17 17:44:08
- Location: Adelaide
- Status: offline
|
phoenix 13918
Enthusiast
- Total Posts : 187
- Scores: 4
- Reward points: 1705
- Joined: 2012/05/17 17:44:08
- Location: Adelaide
- Status: offline

Re:Nicks 69 GT
2012/05/19 14:58:16
(permalink)
|
phoenix 13918
Enthusiast
- Total Posts : 187
- Scores: 4
- Reward points: 1705
- Joined: 2012/05/17 17:44:08
- Location: Adelaide
- Status: offline
Re:Nicks 69 GT
2012/05/28 17:43:13
(permalink)
Got the head liner in today, I've been told that the wrinkles will sort themselves out with some heat, anyone know if thats true before I try to bake it with a heat gun? 
Attached Image(s)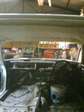
|
accapmad
Aficionado

- Total Posts : 230
- Scores: 11
- Reward points: 4511
- Joined: 2011/08/01 11:02:49
- Location: Australia
- Status: offline
Re:Nicks 69 GT
2012/05/29 21:50:54
(permalink)
Definitely looking great. Just leave the car in the sun for a few hours - gentle warmth required. Having done my own full bare shell rebuild, and the headlining too, I'd say that was the worst/scariest job in the whole lot. Almost anything else is recoverable if you muck it up. Cutting the headliner for stretching it - once only ever - is of course not recoverable in the case of mishaps. Congrats, keep up the good work.  p.s. Could you pls report back on the distance rearwards from door shut of the leading edge of the fake vents. My set on the shelf is getting restless....
accapmad - In the Land of Oz
|
Johnscapris
Enthusiast
- Total Posts : 98
- Scores: 5
- Reward points: 5609
- Joined: 2011/08/01 11:02:49
- Location: Morayfield Qld Australia
- Status: offline
Re:Nicks 69 GT
2012/05/30 15:47:07
(permalink)
☄ Helpful
Nick,
I think your wrinkels are exccessive. Over several weeks the lining may tighten. You should be able to remove all wrinkles (if the lining is made correctly) prior to glueing.
Start at the middle of the front and rear windsreens, stretch tight ensureing support bars are sitting vertically (hold with heavy duty paper clamps) and progessively work away from the centre line evenly on both sides until about 300mm from the edge. Then go to the support bars and stretch the lining evenly on both sides. Then work your way down each side and finally the corners. When it looks OK use contact glue and glue section by section. You may have to leave the paper clamps on until contact is cured (24 hrs)
Cut interior light hole and locate rear view mirror screw holes prior to glueing.
After glueing remove excess lining.
Good Luck.
Regards
Johnscapris
|
phoenix 13918
Enthusiast
- Total Posts : 187
- Scores: 4
- Reward points: 1705
- Joined: 2012/05/17 17:44:08
- Location: Adelaide
- Status: offline
Re:Nicks 69 GT
2012/05/30 17:00:00
(permalink)
accapmad
Definitely looking great.
Just leave the car in the sun for a few hours - gentle warmth required.
Having done my own full bare shell rebuild, and the headlining too, I'd say that was the worst/scariest job in the whole lot. Almost anything else is recoverable if you muck it up. Cutting the headliner for stretching it - once only ever - is of course not recoverable in the case of mishaps.
Congrats, keep up the good work.
p.s. Could you pls report back on the distance rearwards from door shut of the leading edge of the fake vents. My set on the shelf is getting restless....
according to my tape measure the dummy vents are 76mm from the back of the door opening of the body
|
gtv6capri
Deity

- Total Posts : 1461
- Scores: 53
- Reward points: 5548
- Joined: 2011/08/01 11:02:49
- Location: Melbourne Vic Australia
- Status: offline
Re:Nicks 69 GT
2012/05/30 17:32:10
(permalink)
You need to find a UK delivered car with the die cast vents. My 3000E has the pressed alloy ones and I can slide them back and forward. They are currently at 65mm from the door opening. The cast ones are fixed
Capri The car I always promised myself
|
ronsmallford
Deity
- Total Posts : 853
- Scores: 43
- Reward points: 5723
- Joined: 2011/08/01 11:02:49
- Location: Brisbane Qld Australia
- Status: offline
Re:Nicks 69 GT
2012/06/01 14:40:42
(permalink)
☄ Helpful
Great project Nick, and keep at it youll get there in the end.
As far as the headliner is concerned, no it wont tighten with heat by itself. The idea is that after applying some heat to the wrinkes you can then stretch them out. When the jobs done there should be no wrinkles as they wont come out with age.
Before starting its good to lay the headliner on top of the car in the sun until it goes nice and pliable then start to fit (see johnscapris) then when its all in and there is still a wrinkle or two use the heat gun carefully and stretch these out. Regards. ...Ron.
"Horsepower loves the absense of weight" (from Elfin ad) "The car that reshapes your life".(Ford ad)
|
phoenix 13918
Enthusiast
- Total Posts : 187
- Scores: 4
- Reward points: 1705
- Joined: 2012/05/17 17:44:08
- Location: Adelaide
- Status: offline
Re:Nicks 69 GT
2012/06/01 21:42:57
(permalink)
thanks for the help guys, looks like I'll be trying to peel it off where its glued and stretching it some more
|
oldcapriman
Enthusiast
- Total Posts : 62
- Scores: 0
- Reward points: 4833
- Joined: 2011/08/01 11:02:49
- Location: Brisbane Qld Australia
- Status: offline
Re:Nicks 69 GT
2012/06/02 21:13:41
(permalink)
Nick I would agree with what both John & Ron have said. If you used the spray on glue it should not be too difficult to pull away & then it resets pretty well. I used the big paper clips as John described everywhere I could & kept stretching & working from one side to get most of the wrinkles out. Also make sure the cross rods are in the correct place as there is set order to them. It is in the big red manual. It is really difficult in the corners & sometimes the harder I tried the worse it seemed to get but in the end it looked pretty good. I found it one of the most difficult things to do really well. Also if you do peel part of it away, check carefully where all the interior fittings go eg. sunvisors, rear view mirror, light & hand grabs. Also that the clips that hold the screws for each of these are correctly sitting in their place otherwise you will be like me spending hours trying to locate the exact spot for each. Thankfully, I had the other cars to measure exactly where I thought they should be but once you make a hole in the lining then that is it & you can't cover it up. Anyway have fun & keep at it & it will all be worth it in the end. I have a few pictures in my blog on the red Capri in the Sections 7 & 9 if you want to have a look.( http://redcapri.blogspot.com.au/) Regards Ian A 
|
phoenix 13918
Enthusiast
- Total Posts : 187
- Scores: 4
- Reward points: 1705
- Joined: 2012/05/17 17:44:08
- Location: Adelaide
- Status: offline
Re:Nicks 69 GT
2012/06/11 15:33:05
(permalink)
I had a bit of a play around with that infernal head lining today, its looking much better now thanks for the help guys :)
They really are a bugga of a thing to install!!!
|