1970capriwithvinyl
Enthusiast

- Total Posts : 37
- Scores: 0
- Reward points: 1079
- Joined: 2011/08/01 11:02:49
- Status: offline

RE: Working my WAY To the engine BAY
2010/01/06 16:07:20
(permalink)
gtv6 just read your post ...
so the golden hue i flipped about is ok?
Should i still pressure wash .. keep in mind their are LOTS of crevices acid can seep into even though im careful applying so i thought i was on winner with the water wash ..
confused now
|
hotboostgt
Aficionado

- Total Posts : 532
- Scores: 4
- Reward points: 5440
- Joined: 2011/08/01 11:02:49
- Location: nth brisbane qld Australia
- Status: offline
RE: Working my WAY To the engine BAY
2010/01/06 21:18:37
(permalink)
Im a bit confused about this etch stuff as well . I have spoked 2 separate crash suppliers to the trade also spoken to area sales manger of ppg and they all say same thing.. Etch prime in the ppg range is the same stuff as 2 pak or acrylic used for bare metal.
Maybe other brands are different.[?]
|
GTV6
Master

- Total Posts : 740
- Scores: 35
- Reward points: 6497
- Joined: 2011/08/01 11:02:49
- Location: Perth WA Australia
- Status: offline
RE: Working my WAY To the engine BAY
2010/01/06 23:26:04
(permalink)
Bummer, yes the yellow tinge is good, it means the conditioner has worked. No need to pressure spray, youre not trying to remove the acid just neutralise it. Be sure to blow hard to get at places with air to dry them. To remove rust/old paint in hard to get at areas I use the clean and strip disks, keep them moving as they heat the panel up real fast. Be carefull when talking to crash repair guys as they work different to restorers. eg many crash repairers say to bog over bare metal, restorers say never bog over bare metal as the heat causes condensation which will rust later. Makes sense. How many times have you seen bog fall out or crack due to rust under it? The restorers (who taught me) say to only bog over epoxy primer. When talking to reps make sure you tell them which system you want to use, metal condition followed by epoxy primer, or etch primer followed by normal primer. They are 2 different methods. The way we were taught was based on ppg products. To strip rust I sand with 80, then 120 then metal condition. I use 40 to remove bog and 36 on a 7" sander (or clean and strip disk) to remove tough rust. Again mg pics (still doing capri mechanical first)of before and after sanding procedure (not metal conditioned yet) 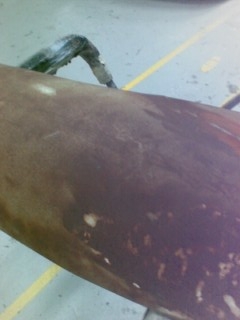 Before 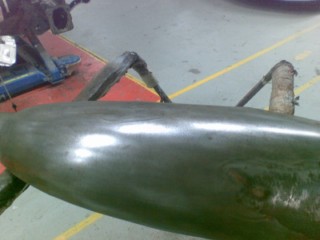 After So to summarise the method I was taught and use is. Strip Sand metal condition epoxy primer bog more epoxy primer if bogging takes you past allowable time high build primer guide coat then block back colour coat clear coat
|
1970capriwithvinyl
Enthusiast
- Total Posts : 37
- Scores: 0
- Reward points: 1079
- Joined: 2011/08/01 11:02:49
- Status: offline
RE: Working my WAY To the engine BAY
2010/02/06 06:06:02
(permalink)
Thanks GT , My arsenal of tools to rid the etch prime over the rust include: 60g metalite ( clothback tough norton paper) 60g dry cut Strip discs for grinder Wire brushes of various sizes to suit drill and grinder palm sander 6 inch DA air sander Threw the stripper over my shoulder after it wouldn't take on the fiddly bits and finally i also use what's left of my finger tips on a file on hard to get at areas [88] > HB Gt , im using the epinamel ( 2k ) straight onto the cleaned / treated metal as it gives a large window ( 3 - 6 months ) of un - topcoated time to allow bogging etc , its marine grade I originally used etch prime and by gee ive learen't my lesson about walking away from that stuff and leaving it unsealed  i covered the bay up with a couple of heavy sheets to keep the night air off and it has done the trick , no evidence of the R word another day in the bay and she's ready for the 2 kay
|
GTV6
Master
- Total Posts : 740
- Scores: 35
- Reward points: 6497
- Joined: 2011/08/01 11:02:49
- Location: Perth WA Australia
- Status: offline
RE: Working my WAY To the engine BAY
2010/02/06 09:25:40
(permalink)
Even though you cant see any new rust I would still go over the whole with with metal conditioner again right before painting. For the sake of an extra 45 mins better to be safe than sorry - but that's just me.
|
1970capriwithvinyl
Enthusiast
- Total Posts : 37
- Scores: 0
- Reward points: 1079
- Joined: 2011/08/01 11:02:49
- Status: offline
RE: Working my WAY To the engine BAY
2010/03/06 16:52:40
(permalink)
some piccies
[img]uploaded/1970capriwithvinyl/201063163743_2nd go bare metal.JPG [/img]
Above : Where you can see the rust is how the entire bay was
30 hrs of work ( after work ) makes for no fun at all
would not wish on my worst enemy [B)]
This is a work in progress shot , it finished up quite shiny
[img]uploaded/1970capriwithvinyl/201063163520_epinamel finish resize.JPG [/img]
This is the epinamel , i sh|t myself when i popped open part a and it was like a gooey tar consistency ( thinking how am i going to punch this thru 1.8 gun )
I was not told and still don't know for sure if a putty gun is advisable , nothing on tech sheet except lots of pressure which i gave it
The flow was terrible , i was using a new gun , but a cheapie , anyway it went on without any fizz/ chemical reaction to all of my prep work so im grateful of that
[img]uploaded/1970capriwithvinyl/201063164634_2nd go engine bay 2.JPG[/img]
I NEVER want to see bare metal again
[:x)]
Question/s ,
>>>When i get to the plenum chamber what have you guys done to cleanup the un accessable area under the 'grille' area , under the wiper attchments ??
I will be smoothing out a little ( engine bay ) but im not going overboard ( at least thats the plan )
>>>Should i drip check where i have removed it( ie around bonnet hinges, drip rail below bubble etc ?) is it functional for water lye or just for appearance ?
Cheers Jonny
|
hotboostgt
Aficionado
- Total Posts : 532
- Scores: 4
- Reward points: 5440
- Joined: 2011/08/01 11:02:49
- Location: nth brisbane qld Australia
- Status: offline
RE: Working my WAY To the engine BAY
2010/03/06 21:08:21
(permalink)
Looks good Jonny. That grill section I haven't touched and I dont really know what to do either.Im thinking a sand blast to get most of it clean then blow over it.Its not done very well from the factory if you see and original car the paint is just lightly blown in that general direction. Are you going to get rid of some of those screw holes? Youre right about never seeing bare metal again. 
|
blown66
Enthusiast
- Total Posts : 103
- Scores: 0
- Reward points: 939
- Joined: 2011/08/01 11:02:49
- Location: Perth W.A. Australia
- Status: offline
RE: Working my WAY To the engine BAY
2010/03/06 23:26:43
(permalink)
What a familar sight that is as I have my wifes Capri at the same stage almost, just need to do the final sand & the engine bay & door shuts will be in colour by Saturday evening.
I will try to put some pics up by the end of the weekend.
|
GTV6
Master
- Total Posts : 740
- Scores: 35
- Reward points: 6497
- Joined: 2011/08/01 11:02:49
- Location: Perth WA Australia
- Status: offline
RE: Working my WAY To the engine BAY
2010/04/06 00:06:08
(permalink)
Nice work! The data sheet you posted lists nozzle size as 1.5-2mm at 50-60 psi.
Dont know about sand blasting, how will you get the sand out? I would worry about it settling in the gaps and retaining water later.
I will ask the guys at night school if they have any ideas.
|
1970capriwithvinyl
Enthusiast
- Total Posts : 37
- Scores: 0
- Reward points: 1079
- Joined: 2011/08/01 11:02:49
- Status: offline
RE: Working my WAY To the engine BAY
2010/05/06 16:08:59
(permalink)
Some good news ... thought id see how this epinamel would react to 180 dry cut Sands like a dream , its enjoyable compared to sanding metal  Anyway , broke thru to metal here and there and it was clean as i left it ... Left part a in sun for couple of hours ( duh why the hell didn't i do that first time ) and she flowed out of the gun nicely Im actually looking forward prepping this bay now , its nice when things work out Keeping the filler to a minimum as i don't mind the factory spot weld look, will be wiping the metal overlaps though What have you guys done ? paintable sikaflex type wipe? post some pics when theres something worth showing ( Hbgt - im leaving the screw holes mate - really like your thread looking forward to those pics blown66 - gtv6 thanks for all the metal advice ) cheers jonny
|
blown66
Enthusiast
- Total Posts : 103
- Scores: 0
- Reward points: 939
- Joined: 2011/08/01 11:02:49
- Location: Perth W.A. Australia
- Status: offline
RE: Working my WAY To the engine BAY
2010/06/06 23:40:51
(permalink)
|
hotboostgt
Aficionado
- Total Posts : 532
- Scores: 4
- Reward points: 5440
- Joined: 2011/08/01 11:02:49
- Location: nth brisbane qld Australia
- Status: offline
RE: Working my WAY To the engine BAY
2010/07/06 08:33:15
(permalink)
Looks nice and straight . Did you tape over the chassis number so you can build clear over it later? Ive heard horror stories of road transport dept come rego time scraping paint off with a screwdriver so they can read the numbers.[8~2]
|
escortinadriver
Deity

- Total Posts : 1299
- Scores: 155
- Reward points: 6343
- Joined: 2011/08/01 11:02:49
- Location: Vic Australia
- Status: offline
RE: Working my WAY To the engine BAY
2010/07/06 09:08:54
(permalink)
quote:
Originally posted by hotboostgt
Looks nice and straight. Did you tape over the chassis number so you can build clear over it later?
Ive heard horror stories of road transport dept come rego time scraping paint off with a screwdriver so they can read the numbers.[8~2]
It WILL happen, trust me!!! Shaun
|
blown66
Enthusiast
- Total Posts : 103
- Scores: 0
- Reward points: 939
- Joined: 2011/08/01 11:02:49
- Location: Perth W.A. Australia
- Status: offline
RE: Working my WAY To the engine BAY
2010/07/06 23:36:46
(permalink)
Hotboostgt funny you should mention that because we were working on it today & I asked the question where is the chassis ID number stamped because only 2 weeks ago my mate had to scrap back the shock tower on his XYGT because it was not clearly visable, so no we have not taped it but will sort it before we go to much further. I am assusming it is on the top of the passengers side tower ??.
|
cosworthfreak
Moderator

- Total Posts : 685
- Scores: 54
- Reward points: 6301
- Joined: 2011/08/01 11:02:49
- Location: Location
- Status: offline
RE: Working my WAY To the engine BAY
2010/08/06 00:10:05
(permalink)
The position of the chassis/body number will depend on what the build year was. From your pics it looks like a '71 or '72, so the chassis number (a CK number) will be stamped in the engine bay on top of the drivers side shock tower. It will be curved around the opening for the strut top between two of the three bolt holes - between the hole closest to the drivers guard and the hole closest to the front of the car.
For a 1970 it will be stamped on the highest point of the slam panel, behind the bonnet lock mechanism. There will also be a number stamped on top of the drivers shock tower (between the two inner bolt holes and parallel to the inner guard), and this will be a J number which should also be on the compliance plate.
Cheers
Jamie
|