1970capriwithvinyl
Enthusiast

- Total Posts : 37
- Scores: 0
- Reward points: 1079
- Joined: 2011/08/01 11:02:49
- Status: offline

Working my WAY To the engine BAY
Hey Fellas,
I created this topic to get some input on my Mk1 " on the road " project
SO Far i have worked my way from the rear /diff/ underbody to the engine bay
Here is what i started with
Basically alot of surface rust from sitting in a carport for a while
It got wired off and treated before some paint to seal it back up
[img]uploaded/1970capriwithvinyl/200982310236_rear end resixe.jpg [/img]
And here is how it has progressed
[img]uploaded/1970capriwithvinyl/2009823102347_IMGP4156-12.jpg [/img]
I added some rustproof/tar to all the seams and its basically a tidy up
I also picked up some orange enamel to maybe repaint a few parts so its not all black
[img]uploaded/1970capriwithvinyl/2009823102942_IMGP4184222.jpg[/img]
Now for the engine bay
It has had a dodgy repaint at some stage
The car will be silver fox , do i do the bay in black gloss , or silver fox or a combo of both ( chassis rail black - bay silver? )
what will be the easiest way to tidy it up
I guess i will wire wheel it and rust proof, etch primer then smooth out a little then colour
What have you blokes done with the top of the guard where the rubbers sit ? all those spot welds look crap
I want it smoothed up , i can tack in some metal strips? or will this effect the bonnet closing / sitting right?
[img]uploaded/1970capriwithvinyl/2009823103945_IMGP4135333.jpg[/img]
thanks for reading
jonny
|
ronsmallford
Deity

- Total Posts : 853
- Scores: 43
- Reward points: 5723
- Joined: 2011/08/01 11:02:49
- Location: Brisbane Qld Australia
- Status: offline
RE: Working my WAY To the engine BAY
2009/08/23 12:26:20
(permalink)
Great work so far Jonny. The silver fox is a very classy color and fresh black really sharpens it up. As to the guard channels and the engine bay the original factory look is the safest bet. On my rebuild I converted the guards to bolt on and did away with the spot welds but this now is not "original" like yours. Im thinking, silver fox engine bay, black engine with sterling silver extracters and orange plug leads. Maybe an orange gt stripe (original of course) down the side. Throw the orange paint over the back fence.  All just opinions of course.
|
1970capriwithvinyl
Enthusiast
- Total Posts : 37
- Scores: 0
- Reward points: 1079
- Joined: 2011/08/01 11:02:49
- Status: offline
RE: Working my WAY To the engine BAY
2009/08/23 14:19:29
(permalink)
Hey thanks CP , Have checked your build AWWWWESOME
Ha , yer the orange i picked at supercheap for $10 , thats how popular it is [:x)] ( i was thinking rear shocks )
There was 4L of canary yellow but i just couldn't do it [88]
Thats 2 votes for the orange stripe now, i'll take keeping the spot weld look into serious consideration after your comment,
Ive had a good investigation where the rear of the guards meet the pillar and it looks like i have got away with leaving them on ( phew )
If anyone out there is thinking of doing their underbody BUILD A ROTISSERIE! ( it was seriously crappy being under their for days )
yer i would have liked to keep her the original dark/ claret red , but i just love some nice silver
heres a pic of a rushed acrylic job that im redoing , possibly 2k ,
the wheels i have seem like wrong offset ( i bought them online ) so i have to do something especially at the front ! ( ive seen adjustable ball joint arms on a rally site - have to talk to someone that knows how to squeeze the front end a little ) maybe someone here has done it ?
[img]uploaded/1970capriwithvinyl/200982314931_IMGP379033344.jpg [/img]
This Guys Paint was absolutely stunning , ive kept some pics of silver cars with show finish to keep my mind on the job
[img]uploaded/1970capriwithvinyl/200982314176_IMGP3771gttttt.jpg[/img]
cheers jonny
|
Phil
Supporter

- Total Posts : 1786
- Scores: 35
- Reward points: 4581
- Joined: 2011/08/01 11:02:49
- Location: Sydney NSW Australia
- Status: offline
RE: Working my WAY To the engine BAY
2009/08/23 17:27:50
(permalink)
The bay has got to be silver...with black rails if black has to feature 
|
hoogs544
Enthusiast
- Total Posts : 53
- Scores: 1
- Reward points: 3917
- Joined: 2011/08/01 11:02:49
- Location: wollongong nsw Australia
- Status: offline
RE: Working my WAY To the engine BAY
2009/08/23 20:41:49
(permalink)
Good start mate. what is the under body tar that your using? it looks good. Is that a reverse leaf spring held to the rear leafs with u bolts? does it lower the car? my car is all black underneath and it looks very plain but its clean and tidy and not a show car. My engine bay is black too and doesnt look bad cos the engine has some chrome bits and I hid all the wiring. its easier to keep clean when semi gloss black(gloss black is hard to keep clean and shows every dint). I ran a thin layer of bog over the spot welds on the guards just to even it out a little. If your car is original i wouldn't do it just for originality sake, but mines not. good stuff. keep up the good work
|
V8GFISH
Enthusiast
- Total Posts : 63
- Scores: 0
- Reward points: 0
- Joined: 2011/08/01 11:02:49
- Location: Perth WA Australia
- Status: offline
RE: Working my WAY To the engine BAY
2009/08/23 23:20:32
(permalink)
Nice car Jonny,
My favorite colour on a Capri is silver. I'd paint the ebay silver with black rails too, stands out more imo.
Those mags look great too! I know the twin of this Capri over here in Perth with a 5ltr V8 in it.
Keep up the good work mate
|
1970capriwithvinyl
Enthusiast
- Total Posts : 37
- Scores: 0
- Reward points: 1079
- Joined: 2011/08/01 11:02:49
- Status: offline
RE: Working my WAY To the engine BAY
2009/08/24 06:41:15
(permalink)
Gee im glad i posted now ( was leaning towards black ) So silver bay , possibly black rails Hoogs - The gear im using is just brushed on where the floorpan meets the chassis and some of the rear floorpan as well Here is the exact stuff http://www.septone.com.au/detail.asp?item_cat=11&item_number=370&page_num=1your can use a gun but i don't mind the brush as it looks a little factory - like you say not for show really The leafs are not modified , i chucked them back up to move the car around , i intend on replacing some of those dodgy looking nuts bolts ( one missing ) maybe stainless depending on budget - its not a priority now I seen a thread somewhere about lowering blocks and resprings , let me know what you find How bout a pic of that tidy engine bay ?, Hidden wiring sounds good Im not sure about battery in the boot ? with the fuel tank so close so have not looked into that Thanks V8GF , Thats the only thing , its not exactly an original idea , but this is my first capri , ive had her for a while now waiting for the right timing to get her up to scratch, and it just has to be silver fox - to me its timeless and class and suits the era of course thanks for reading and the encouragement fellas jonny
|
ronsmallford
Deity
- Total Posts : 853
- Scores: 43
- Reward points: 5723
- Joined: 2011/08/01 11:02:49
- Location: Brisbane Qld Australia
- Status: offline
RE: Working my WAY To the engine BAY
2009/08/27 16:44:51
(permalink)
Hey Jonny I just noticed your comment about adjustable TCAs. Unless these are used in conjunction with adjustable strut tops you wont be able to pull the wheel in to the body because of changing the camber of the wheel. Idealy the wheel should be a little further out at the bottom than the top. (One to one and a half degree negative for road use). Adjustable strut tops used on ther own might pull the top of the wheel in enough and at the same time give you the negative camber that is desired. Also before you do any repaint get the top of the guards rolled.
So what Im saying is The TCAs wont achieve what you want but the adjustable strut tops might.
|
1970capriwithvinyl
Enthusiast
- Total Posts : 37
- Scores: 0
- Reward points: 1079
- Joined: 2011/08/01 11:02:49
- Status: offline
RE: Working my WAY To the engine BAY
2009/08/28 16:25:49
(permalink)
Thanks heaps CP !
On further reading after my post i thought i may have to do both , but the adjustable tops sound good - i will take some pics when i have the front end back in to show the issue
I REALLY want those wheels to sit nice , but i will be putting it over the pits with a set of kidneys which fit perfect in the meantime
Plus if i want some horses in their later i may be wasting money with the tcs? ie bigger brakes ? have not researched that yet but so many options and im sure the little kent will have me bored as batpoo poo with the 3speed behind it ( i have not driven it past 60k/h due to the auto slipping )
Will definitely take your advice in the guard rolling
Hmmm can i attempt this myself - what's involved there.....( looks like ill be on the net awhile tonight )
cheers
jonny
|
1970capriwithvinyl
Enthusiast
- Total Posts : 37
- Scores: 0
- Reward points: 1079
- Joined: 2011/08/01 11:02:49
- Status: offline
RE: Working my WAY To the engine BAY
2010/05/31 17:35:47
(permalink)
update , Well the underbody hardened up nicely and should last a real longtime ( thats the positve ) The neg - is ... I took the engine bay back to metal , uncovered a large amount of filler ( not much rust ) and welded up a few pinholes around where the moisture sits near towers So far it WAS going to plan, beautiful bare metal ready ( mostly ) I'll just use this rust converter here ( top of firewall) and blah blah Painted etch primer seen a chemical reaction from leftover acid ( converter ) got the sh{ts with that and left it so long the etch primer alone so long it breathed in a big huff of moisture [:-(] So, im back to halfway bare metal ( again ) This time im gonna get rid of that converter properly ( ANY TIPS/Hints??) And i have a product called Wattyl pr250 epinamel http://www.wattyl.net.au/marine/documents/TDS/Epinamel%20PR250%20v2.pdf It reads like the goods , and im confident of sealing up the girl properly this time  will get some piccies up soon
|
hotboostgt
Aficionado

- Total Posts : 532
- Scores: 4
- Reward points: 5440
- Joined: 2011/08/01 11:02:49
- Location: nth brisbane qld Australia
- Status: offline
RE: Working my WAY To the engine BAY
2010/05/31 20:59:22
(permalink)
Looks good. Im in the process of bare metal rotisserie job on mine(delete 72). If you cant spray with etch within the same day , you MUST wipe bare metal over with thinners using a clean rag.Then dont touch at all after,as the moisture from your fingers will cause rust. Like Ron said Silver engine bay , black motor , black rails. NO orange paint.. But its your car.
|
GTV6
Master

- Total Posts : 740
- Scores: 35
- Reward points: 6497
- Joined: 2011/08/01 11:02:49
- Location: Perth WA Australia
- Status: offline
RE: Working my WAY To the engine BAY
2010/01/06 00:45:18
(permalink)
Having just done a spray painting course at night school here's the way they teach. 1. Strip to bare metal and sand with 120 and optionally then with 180. 2. Metal condition with phosphoric based acid, wash off with water and dry it thoroughly with air and clean rags. Dont touch. If you do touch it thinners wont get the oil off. You have to acid wash again or you will get finger print marks in your top coat from where it is rusting again. 3. Prime with expoy primer - do not use etch primer as phosphoric acid does the etching (never etch an etch). Epoxy primer is the only primer that doesnt absorb moisture. All other primers let moisture through. 4. Prime with high build primer (this can be done wet on wet but check your paint system technical data sheets), block back, wash with grease and wax remover, run over with tack rag and top coat. Usually top coats should be applied within 24 hours of sanding - again check data sheets. Dont wipe back and forth too much with tack rag as it will cause static build up that will attract dust. If you want to use etch primer followed by normal primer (instead of acid wash) then you need to get your top coat on quickly to minimise moisture absorbtion. Attached is a pic from my MGA project. I bought this from a bloke who left it in primer. The whole thing has rusted and has to go back to bare metal. Hope that helps. 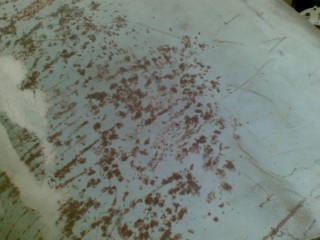 OK after posting just opened your attachment. You have a 2 pack epoxy primer and they told us you cant use etch primer under epoxy primer and must go the acid wash route. I would suggest you talk to Wattle tech people to make sure you prepar it correctly. The other thing is that you can get epoxy primer as 2 pack or single pack and you must be consistent with the whole paint system. Ie you cant put 2 pack paint over single pack epoxy primer. Also the nasty's in 2 pack are absorbed through the skin and eyes and normal filters dont stop them, so cover up fully and get a positive pressure breathing system when using 2 pac.
|
1970capriwithvinyl
Enthusiast
- Total Posts : 37
- Scores: 0
- Reward points: 1079
- Joined: 2011/08/01 11:02:49
- Status: offline
RE: Working my WAY To the engine BAY
2010/01/06 05:52:16
(permalink)
Thanks to both Gts It is an issue trying to get the whole bay metal at once ( by gee that etch primer bites hard ),i would prefer to stage it but im not risking acid on fresh epoxy , so its all at once I gotta admit im nervous washing acid with water ( start oxidising again straight away? ) but ive got a nice pressure blaster which should get the damn acid right off , follow with air and / or ( metho? as per bottle of acid instruction i guess )and off course no touching ( thanks for that ) Ive got a nice mask and eye protection on the way from a very good paint shop that im buying from go to whoa , so i don't conflict systems i should have something to show for the effort late this afternoon
|
GTV6
Master
- Total Posts : 740
- Scores: 35
- Reward points: 6497
- Joined: 2011/08/01 11:02:49
- Location: Perth WA Australia
- Status: offline
RE: Working my WAY To the engine BAY
2010/01/06 13:51:32
(permalink)
The water is needed to neutralise the acid. The way to use metal conditioner is to have a bucket of water handy. Dip a scotchbrite pad in the water, put the conditioner on the pad (I use a sauce bottle to squeeze it on) then rub the panel. Then wash it off with wet rag - this is to neutralise the acid. Then dry it. Once finsihed the metal will have a yellow or purple tinge to it. A long as you dry it properly it will be fine. Get some good rubber gloves and wear safety spec of course. Here's another pic from the mg. This was a test to see how much I could clean it up without sanding. This is what it looked like using only metal conditioner. Notice how its yellow now. Took about 1 week to see rust starting again. You can do it as you strip in stages and then just do the whole bay once more just before painting. 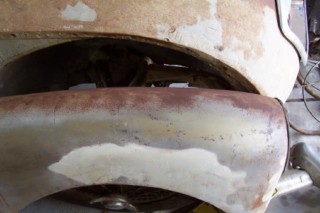 I forgot. Dont let it dry. If it dries go over it again and wash off while still wet.
|
1970capriwithvinyl
Enthusiast
- Total Posts : 37
- Scores: 0
- Reward points: 1079
- Joined: 2011/08/01 11:02:49
- Status: offline
RE: Working my WAY To the engine BAY
2010/01/06 16:00:04
(permalink)
solid 8 hrs in the bay today
The etch is extremely difficult to remove as it seems to have bonded with the underlying rust , the stripper i orginally hit it with had little to no effect ( im not sure if stripper has a tin life or not )its under 12 months old
3/4 ready - the fiddly bits under the bonnet hinges and bottom of heater bubble are super tough work even with 60 grit norton metalite paper with a file behind it
it has really worn me down this one ( GT hats off to u if the car you bought in primer has been etched as well )
At the end of the day i acid wiped and pressure washed ( DO NoT DO THIS )
all i ended up with was instant golden hue and had to re acid and
damp wipe / then damp metho wipe / then damp thinners wipe
tough lesson , its really turned me off going to metal on the other panels as im in a high humidty climate and you can watch the metal turn as your working on another section[8~2]
|