fordsy
Aficionado

- Total Posts : 797
- Scores: 13
- Reward points: 3029
- Joined: 2011/08/01 11:02:49
- Location: Location : Location !
- Status: offline

RE: Steve's Mk2
2010/04/03 23:17:17
(permalink)
|
Paul Dunstan
Supporter

- Total Posts : 1378
- Scores: 35
- Reward points: 4790
- Joined: 2011/08/01 11:02:49
- Location: Adelaide SA Australia
- Status: offline
RE: Steve's Mk2
2010/05/03 12:29:02
(permalink)
HI Steve
I'm also planning to replace the captive nuts as one of mine required re-tapping and was not as secure in the chassis as I would have liked.
I realise you may have just installed for the images but will you be installing the bolts from the top in future?
|
fordsy
Aficionado
- Total Posts : 797
- Scores: 13
- Reward points: 3029
- Joined: 2011/08/01 11:02:49
- Location: Location : Location !
- Status: offline
RE: Steve's Mk2
2010/05/03 13:14:52
(permalink)
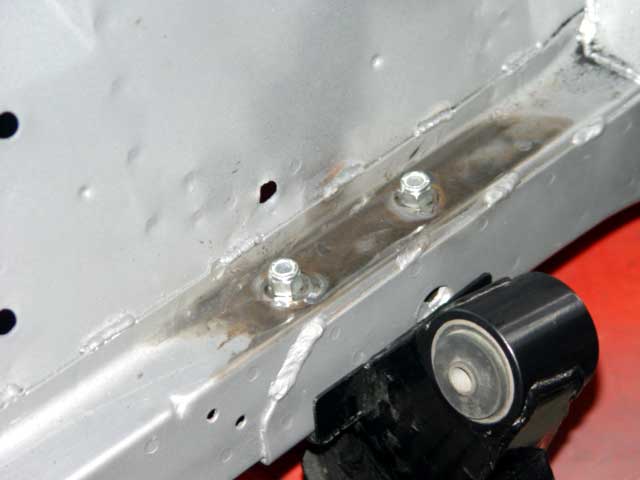
Yeah, the bolts will be on top. That's just how I fitted it up to make sure it all worked. The metal tubes in the chassis are 10mm ID, 16mm OD. The captive nuts are still in there but the threads have been drilled out. The tubes sit on the nut and are welded to the top rail.
|
Gdub
Master

- Total Posts : 927
- Scores: 32
- Reward points: 2475
- Joined: 2011/08/01 11:02:49
- Location: Melbourne Vic
- Status: offline
RE: Steve's Mk2
2010/05/03 20:51:01
(permalink)
I have had to do this on both my cars. Its a pretty easy thing that makes it a lot more secure. I have a small piece of flat steel that i shaped up and sits under the bolt on top of the rail.
The most important thing is the crush tubes inside!
G
|
nigel mk1
Enthusiast

- Total Posts : 284
- Scores: 0
- Reward points: 2995
- Joined: 2011/08/01 11:02:49
- Location: Melbourne Victoria Australia
- Status: offline
RE: Steve's Mk2
2010/06/03 13:02:08
(permalink)
quote:
Originally posted by fordsy
The captive nuts are still in there but the threads have been drilled out. The tubes sit on the nut and are welded to the top rail.
Ah yep i did it this way also. I scratched my head for a while working out out to remove the captive nuts until i realised there was no real need to... just drill out the threads. Awesome progress Steve, alloy archs look spot on. Only way to do it on a mk2 i reckon.
|
PeterM
Master
- Total Posts : 933
- Scores: 34
- Reward points: 4984
- Joined: 2011/08/01 11:02:49
- Status: offline
RE: Steve's Mk2
2010/03/19 22:34:31
(permalink)
Hello Fordsy, I noticed that your topic was just about to fall over the edge to page two, so I thought I would bump it up to the top again. How about some production updates? 
|
Sterling
Scholar

- Total Posts : 1060
- Scores: 0
- Reward points: 663
- Joined: 2011/08/01 11:02:49
- Location: Flinders VIC Australia
- Status: offline
RE: Steve's Mk2
2010/03/19 22:47:09
(permalink)
quote:
Originally posted by fordsy
i had to do this for 1 of the crossmember bolts on my mk2, because it had been f*cked at one stage, and it kept jamming when i tried to put it back in, ended up getting angry (which involved the rattle gun) only made things worse, so had to drill it out. lol. did you have to use a super long drill bit from underneath? or did you mark it and drill it out from the top? i had to put a drill bit into a socket with extension, then put the socket into the industrial sized drill i have to make it all work [:x)]
|
KIZZA
Aficionado
- Total Posts : 471
- Scores: 0
- Reward points: 4135
- Joined: 2011/08/01 11:02:49
- Location: melbourne vic Australia
- Status: offline
RE: Steve's Mk2
2010/03/19 22:54:15
(permalink)
What Fordsy has done there Sterling is drill it out oversize to allow for a 'crush sleeve' to be put in. This way the sleeve takes all the pressure not your chassis.
|
Sterling
Scholar
- Total Posts : 1060
- Scores: 0
- Reward points: 663
- Joined: 2011/08/01 11:02:49
- Location: Flinders VIC Australia
- Status: offline
RE: Steve's Mk2
2010/03/20 07:49:41
(permalink)
intresting...
|
fordsy
Aficionado
- Total Posts : 797
- Scores: 13
- Reward points: 3029
- Joined: 2011/08/01 11:02:49
- Location: Location : Location !
- Status: offline
RE: Steve's Mk2
2010/03/20 13:28:57
(permalink)
quote:
Originally posted by PeterM
Hello Fordsy,
I noticed that your topic was just about to fall over the edge to page two, so I thought I would bump it up to the top again.
How about some production updates?
Hi Peter. Thanks for rescuing the thread. Haven't done very much over the past couple of weeks. My top mounts have arrived so the front struts are now complete. The rims are all organised and should be here in a couple of weeks. Same with the front brake calipers, mounts, hats and discs. As for actual work, it's been a bit slow cause I'm giving the Landcruiser a bit of a spruce up as I'm going to sell it. Last thing I did on the shell was strip part of the paint off the roof. Once i've finished the paint stripping I should be able to get some more pics up. I'm back on lates next week so I should have about 15 hours over 4 days to put into the car give or take.
|
fordsy
Aficionado
- Total Posts : 797
- Scores: 13
- Reward points: 3029
- Joined: 2011/08/01 11:02:49
- Location: Location : Location !
- Status: offline
RE: Steve's Mk2
2010/03/21 23:01:28
(permalink)
Didn't get too much done today as I spent most of the time on things other than the shell. I did finally manage to weld the rods from the drivers side arches to the shell and found some bits and pieces I have been looking for. The front struts are all bolted up minus the hubs. The rims should be here within a couple of weeks so the plan is to get the shell to primer on top and finished underneath so I can get it back rolling again.
I made up a rolling engine stand today out of bits from the rotisserie and a spare crossmember. With a couple of add ons I should have a test bed to run an engine outside of the car. That's the plan anyway.
I'm moving bits and pieces around as I need to take the tray off the Cruiser and give it a coat of paint and clean up the rear chassis. My time will be split for a few weeks so I'm not expecting to get things done quite as quick as I have been.
Pics tomorrow when the camera charges up.
|
fordsy
Aficionado
- Total Posts : 797
- Scores: 13
- Reward points: 3029
- Joined: 2011/08/01 11:02:49
- Location: Location : Location !
- Status: offline
RE: Steve's Mk2
2010/03/24 16:55:18
(permalink)
Spent the day stripping paint so nothing real interesting to add. Was using diggers stuff from bunnings in a real thick layer. Works a treat. More of the same tomorrow.
Once the majority of the paint is gone from inside I'll be starting on the rear firewall and tidying up the internal of the front firewall.
|
Simon
Supporter
- Total Posts : 313
- Scores: 5
- Reward points: 6377
- Joined: 2011/08/01 11:02:49
- Location: Melbourne, Australia
- Status: offline
RE: Steve's Mk2
2010/03/24 17:04:09
(permalink)
I feel your pain Steve, but I found the Diggers stripper to work quite well too. What sort of gloves are you using?
|
fordsy
Aficionado
- Total Posts : 797
- Scores: 13
- Reward points: 3029
- Joined: 2011/08/01 11:02:49
- Location: Location : Location !
- Status: offline
RE: Steve's Mk2
2010/03/25 00:56:33
(permalink)
Leather riggers gloves with long sleeves. I can't stand rubber gloves. I leave the stuff on for about 20 minutes then scrape it off. That's followed by a wipe down with rag soaked in thinners. Next day I clean up the area with the wire wheel on the grinder.
|
Luke
Supporter
- Total Posts : 435
- Scores: -1
- Reward points: 6018
- Joined: 2011/08/01 11:02:49
- Location: Australia
- Status: offline
RE: Steve's Mk2
2010/03/25 15:33:17
(permalink)
Very nice build fordsy. Some good work has gone into it 
|