Go back to home

Simon's Mk1

Page: < 12345.. > >> Showing page 4 of 6 - Powered by APG vNext Trial
Author
Mk2_2dr_2L
Supporter
  • Total Posts : 528
  • Scores: 2
  • Reward points: 4877
  • Joined: 2011/08/01 11:02:49
  • Location: Toowoomba QLD Australia
  • Status: offline
RE: Simon's Mk1 2008/07/05 17:54:29 (permalink)
0
I would be interested in reading about your TX3 Simon.

I nearly bought one at the start of the year, but I could see it turning into another project, which I don't need at the moment ! (Although I am starting to regret passing it up now)

It had a microtech an exhaust and a pwr intercooler and went much better than i had imagined and it felt pretty nibble as well !

Cheers,
Damion.
#46
Simon
Supporter
  • Total Posts : 313
  • Scores: 5
  • Reward points: 6377
  • Joined: 2011/08/01 11:02:49
  • Location: Melbourne, Australia
  • Status: offline
RE: Simon's Mk1 2008/08/05 09:52:17 (permalink)
0
Thanks Damion.

My TX3 is NA, but it's still good fun. Only minimal mods and it behaves quite well on the track. I considered a 4WD turbo for about 5 mins before I found out how much it costs to replace the gearbox!

I'll get some piccies up soon.
#47
Mk2_2dr_2L
Supporter
  • Total Posts : 528
  • Scores: 2
  • Reward points: 4877
  • Joined: 2011/08/01 11:02:49
  • Location: Toowoomba QLD Australia
  • Status: offline
RE: Simon's Mk1 2008/08/05 16:56:14 (permalink)
0
Yeah the one I was looking at just had a gearbox built with the familia GTR internals.. I guess there is an expensive price to pay for traction haha.

I was looking for a non turbo one at one stage, but all of the cleanish ones were too dear for what I was willing to pay.
#48

escort1600
Enthusiast
  • Total Posts : 122
  • Scores: 0
  • Reward points: 5589
  • Joined: 2011/08/01 11:02:49
  • Location: Melbourne/Perth Australia
  • Status: offline
RE: Simon's Mk1 2009/06/02 16:55:22 (permalink)
0
Any news on this simon is it rolling shell yet?
#49
Simon
Supporter
  • Total Posts : 313
  • Scores: 5
  • Reward points: 6377
  • Joined: 2011/08/01 11:02:49
  • Location: Melbourne, Australia
  • Status: offline
RE: Simon's Mk1 2010/12/03 14:03:43 (permalink)
0
Just to reply to Carlo's post from last year: Ummmmm, nope!

Unfortunately it still looks the same. In the time spanning from my last post about the Mk1 up until now, I've moved house and now have a daughter, so not a lot has happened. But now it's time - no more work on the Laser, or the X Pack. My primary focus is on the Mk1, so hopefully updates will be a little more frequent. Fingers crossed!

Basically, seam welding continues, as does the buying of parts. I picked up a new round headlight front panel from SMCKA at Small Ford Sunday this year. The panel on my shell has a slight bend in the front left from what I can only imagine was a due to a minor impact at some point. The front left headlight surround has also been butchered at some point to fit a dodgy aftermarket front guard, so it just made sense to buy new given I also plan to fit round headlights.

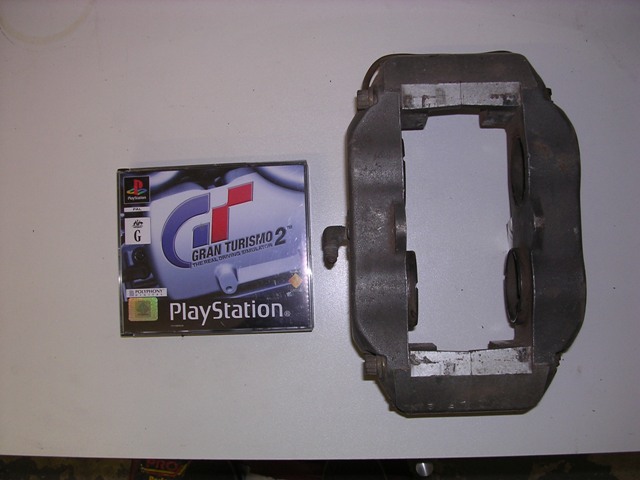
I also picked up a pair of JFZ 4 pot calipers on eBay for an absolute bargain. Gotta love an auction that ends on Christmas day! They are HUGE! The pistons are 2 inches in diameter and I think I'm going to need a minimum rotor size of 290-300mm.

Here's a pic next to a standard sized CD case:


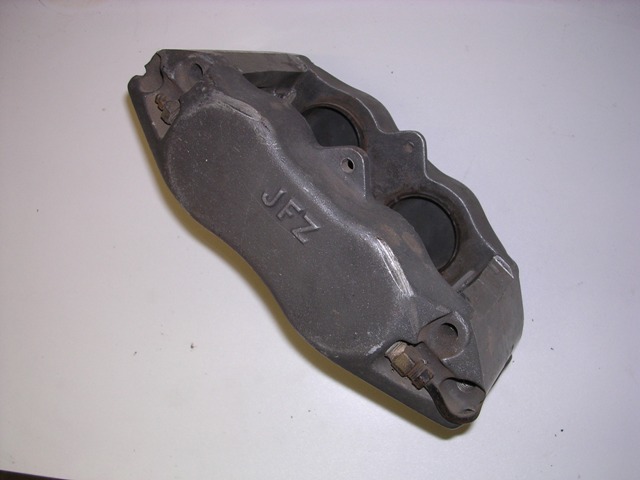
As they are at the moment, they necessitate a rotor width of at least 30mm, but the two caliper halves are fed via a solid crossover pipe. So basically they can be split, meaning I should be able to mill them down to suit whatever width rotor I want to use. But if not, they cost me next to nothing so it's no great loss.

I've also been informed that this arrived this morning:


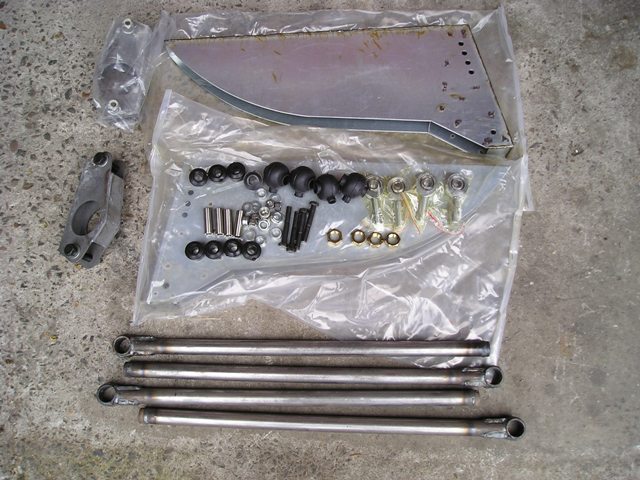
You may have seen that I had already made my own 4 link boxes and brackets, but I ended up sending them up to a friend (Tanz) in Queensland, as I had planned to make up a new set that allowed for more adjustment. But, things change - I have a different job now, and unfortunately no longer have access to the sheet metal guillotine and folder that I used to make the first set. But given how much you can pick up a brand new complete kit for these days, it's really not worth the hassle. In fact, I don't think I could make it myself for what the kit owes me. Thanks to Paul (Mk1 Lotus) at Pozformance for all of his assistance.

Hopefully there will be more updates to follow shortly.

#50
Chippa666
Enthusiast
  • Total Posts : 64
  • Scores: 1
  • Reward points: 1098
  • Joined: 2011/08/01 11:02:49
  • Location: Melbourne Vic Australia
  • Status: offline
RE: Simon's Mk1 2010/12/03 20:16:33 (permalink)
0
Woo Hoo,

It's about time you did an update and glad to hear your getting back into it. I think you've had that car alot longer than I've had mine! Can't wait to see the finished product. Will be well worth the wait.

Now get back out to the shed and keep working![:x)]

Chippa
#51

GeoffWade
Supporter
  • Total Posts : 308
  • Scores: 0
  • Reward points: 2266
  • Joined: 2011/08/01 11:02:49
  • Location: Narre Warren Vic Australia
  • Status: offline
RE: Simon's Mk1 2010/12/03 22:10:53 (permalink)
0
Good to see you have a bit of fire in the old belly again Simon. Love your work. Hope to see some substantial progress in the near future
#52
Simon
Supporter
  • Total Posts : 313
  • Scores: 5
  • Reward points: 6377
  • Joined: 2011/08/01 11:02:49
  • Location: Melbourne, Australia
  • Status: offline
RE: Simon's Mk1 2010/03/18 23:26:49 (permalink)
0
Thanks guys.

Brief update. The seam welding of the chassis rails and strut tops is just about done. I just need to finish off a few tight areas I haven't been able to get the wire brush into to clean back the paint/sealer/surface rust. I still have the floor pan joins to do, but I'll wait until I've fitted the four link kit, diff tunnel etc. etc. before doing that.

Here's a pic of the shell in its new home:


Section of the driver's side chassis rail:


Underside of driver's side strut top:


Engine bay:


Strut top:


That's it for now. Hopefully more to come after the weekend.
#53
Simon
Supporter
  • Total Posts : 313
  • Scores: 5
  • Reward points: 6377
  • Joined: 2011/08/01 11:02:49
  • Location: Melbourne, Australia
  • Status: offline
RE: Simon's Mk1 2010/03/22 00:27:13 (permalink)
0
Engine bay stripped:


There's a bit of work to do in the firewall/heater plenum area, but at least I can see what I'm dealing with now.


Mind you, it was a little alarming finding surface rust under the factory paint! Thankfully I had always intended to do a bare metal respray as the previous owner did a really bad job painting it white. This just gives me another reason to do it. Have a look at this:


[:u]

#54
Luke
Supporter
  • Total Posts : 435
  • Scores: -1
  • Reward points: 3996
  • Joined: 2011/08/01 11:02:49
  • Location: Australia
  • Status: offline
RE: Simon's Mk1 2010/03/22 17:55:56 (permalink)
0
The stiching looks nice and neat. Dont worry about the rust I got it under a 3 yr old paintjob[8~2]
#55
tanz
Enthusiast
  • Total Posts : 37
  • Scores: 0
  • Reward points: 2151
  • Joined: 2011/08/01 11:02:49
  • Location: Australia
  • Status: offline
RE: Simon's Mk1 2010/03/23 14:42:16 (permalink)
0
Simon,

what paint stripper did you use? It looks to have cleaned up nicely!

Cheers Anthony.
#56
Simon
Supporter
  • Total Posts : 313
  • Scores: 5
  • Reward points: 6377
  • Joined: 2011/08/01 11:02:49
  • Location: Melbourne, Australia
  • Status: offline
RE: Simon's Mk1 2010/03/23 16:27:07 (permalink)
0
Hi Anthony,

Long time no see! Mate, the paint stripper was the cheapest tin at Bunnings. I'll grab a name off the label when I get home.

It's pretty potent stuff for an 'off the shelf' product. I started off wearing latex gloves, then doubled them up, and then resorted to heavy dish washing gloves, but it still permiates through and burns like buggery.

It's not a one coat process unfortunately, but I'm dealing with four layers of primer/paint. One decent coat of stripper gets the bulk off, a second coat gets the remainder of the orginal paint and primer off, then a third in select areas just for clean up. it's still time consuming work. It'd be nice to just have the shell bead blasted.

Have a look at PeterM's thread. The stripper he's using looks like nasty stuff, but seems to do a great job.
#57
muzza
Enthusiast
  • Total Posts : 246
  • Scores: 0
  • Reward points: 1181
  • Joined: 2011/08/01 11:02:49
  • Location: Sydney NSW Australia
  • Status: offline
RE: Simon's Mk1 2010/03/23 23:21:48 (permalink)
0
I just stripped my bonnet today with some bunnings stripper, The goo indeed ate through my dishwashing gloves too. My eyes stung a little too. took me two goes to get it clean. I used a rust converter after on all the surface rust.
#58
Simon
Supporter
  • Total Posts : 313
  • Scores: 5
  • Reward points: 6377
  • Joined: 2011/08/01 11:02:49
  • Location: Melbourne, Australia
  • Status: offline
RE: Simon's Mk1 2010/03/24 13:46:41 (permalink)
0
Anthony,

The paint stripper I used was 'Diggers'.
#59
tanz
Enthusiast
  • Total Posts : 37
  • Scores: 0
  • Reward points: 2151
  • Joined: 2011/08/01 11:02:49
  • Location: Australia
  • Status: offline
RE: Simon's Mk1 2010/03/24 14:24:03 (permalink)
0
Thanks mate!
#60
Page: < 12345.. > >> Showing page 4 of 6 - Powered by APG vNext Trial
Jump to:
© 2025 APG vNext Trial Version 5.1