PeterM
Master

- Total Posts : 933
- Scores: 34
- Reward points: 4984
- Joined: 2011/08/01 11:02:49
- Status: offline

Re: Heater Bubble Rust Repair
2014/09/02 22:36:29
(permalink)
This is what I did for our RS2000 resto a few years ago. The original round rusty baffle was removed and the sheet metal cut out to just short of the mounting points for the heater assembly. A removable replacement was made from 1mm stainless steel sheet. In this resto it was not necessary to remove the heater bubble because the rust was very minor which was treated with acid. As seen in the photos it is very easy to access the entire inside of the heater bubble. No welding was required.
|
jpayne
Scholar

- Total Posts : 360
- Scores: 19
- Reward points: 2898
- Joined: 2011/08/01 11:02:49
- Location: Melbourne
- Status: offline
Re: Heater Bubble Rust Repair
2014/09/02 23:12:50
(permalink)
|
79Escort
Aficionado

- Total Posts : 208
- Scores: 10
- Reward points: 4238
- Joined: 2011/08/01 11:02:49
- Location: Adelaide
- Status: offline
Re: Heater Bubble Rust Repair
2014/09/04 17:51:33
(permalink)
Matt75
Will the car be parked outside whilst in your possession? If not then I think the extra drainage thing is a waste of time.
Great work so far. Keep it up.
Matt
RS 2000
Agreed, keep the drain hole stock, the water pooling is like factory evaporative air conditioning for our escorts and also negates the need for pollen filter. 
cheers
Thanks guys, ended up deciding not to do a drain. It will be parked outside most likely, however if I seal it right it shouldnt rust. I have flattened out the flange on the bubble a tad, so the water will come off. Also going to flatten the flange below it when I make that part. Here's how its going:   Planning on glassing the holes below the section I cut out as it will be much easier. Making the repair section fit:      Gaps arent as perfect as I would have liked however They are close enough for a good weld. From inside:  Gotta make the section which isnt there, thats the next step. Wont tack in the top part yet as I plan to weld it to the firewall section then weld in the whole repair to the car. Thanks for putting that up Peter, looks good! Putting the fan shroud in last is what I will do as well so I can seal the inside of the bubble properly. Cheers, Ryan
post edited by 79Escort - 2014/09/04 21:46:07
|
79Escort
Aficionado
- Total Posts : 208
- Scores: 10
- Reward points: 4238
- Joined: 2011/08/01 11:02:49
- Location: Adelaide
- Status: offline
Re: Heater Bubble Rust Repair
2015/02/13 21:07:20
(permalink)
Finally gotten back to the repair: Made the lower section, welded that to the top section and tacked it into the car. I stupidly did this whilst I had no welding helmet thus the welds are not very accurate. I also blew through in spots (on the lowest setting on the mig) - an issue which I have now addressed with a piece of brass held behind the metal and the wire speed cranked. Doesn't look too neat now but it certainly will when I finish the welding. There are cuts in the lower section, I made these to be able to bend the steel easier. The cuts will be all filled up with metal. I spent a while making it symmetrical and I reckon its pretty good. Opinions on this statement are welcome!!! You can see what I ended up doing with the heater bubble, it will not hold water on the outside now as I took away the lip. Also removed the lip directly below it.   Cheers
|
NQRS
Deity

- Total Posts : 897
- Scores: 58
- Reward points: 6931
- Joined: 2011/08/01 11:02:49
- Location: Townsville QLD Australia
- Status: offline
Re: Heater Bubble Rust Repair
2015/02/13 21:55:47
(permalink)
Nice neat looking job. Have you given any thought to using the factory drain pipe for Escorts with Kent engines? I got one but my engine is a Pinto so won't just push into the bubble drain hole - too tight a space. Haven't worked out if I can do a cut and shut on it yet. Len
|
2lt_Scort
Supporter
- Total Posts : 1285
- Scores: 23
- Reward points: 5188
- Joined: 2011/08/01 11:02:49
- Location: Adelaide Australia
- Status: offline
Re: Heater Bubble Rust Repair
2015/02/14 13:30:26
(permalink)
Good work Ryan. Coming along well.
|
79Escort
Aficionado
- Total Posts : 208
- Scores: 10
- Reward points: 4238
- Joined: 2011/08/01 11:02:49
- Location: Adelaide
- Status: offline
Re: Heater Bubble Rust Repair
2015/05/13 22:44:28
(permalink)
Finally got back to this thread Len, I havent thought about that as the car didnt have one when I got it. I will just run without it. So I have finished!!!!! Car sat in the shed untouched for too long due to Uni and other commitments. I made a new fan shroud and test fitted it (rolled it into shape using a round piece of firewood). It is an interference fit to the hole and was fitted from the inside of the car after the bubble was put back on.   Used some filler to make things smooth   And after the whole surface was primed and painted to protect if from water, I used high strength silaflex to attach the bubble. I left the spot weld holes in the bubble in an effort to make it look like factory spot welds once finished.  Once the bubble was on I used sikaflex to seal the entire inside seam between the firewall and the heater bubble. Then I ran a bead around the hole and pushed the shroud into place. I went crazy on the sikaflex as you can tell but nobody will see it in there and its doing the job.  Primed  And painted using a pressure pack I had made up  And here is the finished product    Colour is slightly off however with the bonnet on you cant really tell. Pretty happy with the result, looks reasonable for a first try and does exactly what it was intended to do - stops the car leaking! Cheers, Ryan
|
jpayne
Scholar
- Total Posts : 360
- Scores: 19
- Reward points: 2898
- Joined: 2011/08/01 11:02:49
- Location: Melbourne
- Status: offline
Re: Heater Bubble Rust Repair
2015/05/14 15:13:32
(permalink)
well done as you say good job for its location the complexity of it and the first attempt.
JP
|
79Escort
Aficionado
- Total Posts : 208
- Scores: 10
- Reward points: 4238
- Joined: 2011/08/01 11:02:49
- Location: Adelaide
- Status: offline
Re: Heater Bubble Rust Repair
2015/05/15 08:34:45
(permalink)
Thanks JP
If anyone has photos or tricks they would like to share that would be great. I'm sure this wont be the last repair I make on one of these so any opinions, advice or constructive criticism is more than welcome
Cheers
|
troppo
Aficionado
- Total Posts : 376
- Scores: 8
- Reward points: 4348
- Joined: 2014/01/05 13:45:37
- Status: offline
Re: Heater Bubble Rust Repair
2015/05/16 16:26:59
(permalink)
Where did you get the patch panel for under the heater bubble at the top of the firewall? The one in the first post
|
Detentespring
Supporter

- Total Posts : 9
- Scores: 0
- Reward points: 4441
- Joined: 2012/08/25 20:41:02
- Status: offline
Re: Heater Bubble Rust Repair
2015/05/17 09:02:59
(permalink)
troppo
Where did you get the patch panel for under the heater bubble at the top of the firewall? The one in the first post
Hi Troppo, I got mine from SMCKA PERFORMANCE (I can't post the link but google will get you there) Unfortunately he is closing down but may still have one. A great guy to deal with. Cheers, Todd.
post edited by Detentespring - 2015/05/17 09:17:57
Attached Image(s)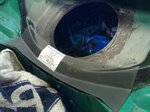
|
troppo
Aficionado
- Total Posts : 376
- Scores: 8
- Reward points: 4348
- Joined: 2014/01/05 13:45:37
- Status: offline
Re: Heater Bubble Rust Repair
2015/05/17 09:25:05
(permalink)
Cheers Todd
I already checked their website and they dont even list them anymore. Thanks anyway mate.
Cheers
Troppo
|
Detentespring
Supporter
- Total Posts : 9
- Scores: 0
- Reward points: 4441
- Joined: 2012/08/25 20:41:02
- Status: offline
Re: Heater Bubble Rust Repair
2015/05/17 09:33:39
(permalink)
Send him an email. The one I got was not on the site either, he had just ordered it in. I think he might not have the time to keep the site up to date. Worth a try. I am glad I got the piece. Would have taken a bit of time to fabricate it.
Todd.
|
troppo
Aficionado
- Total Posts : 376
- Scores: 8
- Reward points: 4348
- Joined: 2014/01/05 13:45:37
- Status: offline
Re: Heater Bubble Rust Repair
2015/05/17 09:59:08
(permalink)
Detentespring
. I am glad I got the piece. Would have taken a bit of time to fabricate it.
Todd.
Yeah, thats why i want to buy one, i could fabricate one but it wont be exact if i do it in one piece and would be a real pain to do in multiple pieces
|
Flighter
Deity
- Total Posts : 1107
- Scores: 43
- Reward points: 5151
- Joined: 2011/10/17 14:55:59
- Status: offline
Re: Heater Bubble Rust Repair
2015/05/17 11:49:42
(permalink)
PM me an outrageously high offer and you could possibly convince me to part with mine (I'm such a hoarder I find it hard to let go of anything).
WTB: Recaro seat - any condition considered
|