Wiggy333
Deity

- Total Posts : 1012
- Scores: 42
- Reward points: 3744
- Joined: 2014/12/01 13:28:20
- Location: Sydney
- Status: offline

Re: Rough '69 Capri
2019/05/05 16:58:04
(permalink)
For rear arches the 2600rs had fiber glass bonded to the rear wheel tubs. Saw one on the weekend so it’s doable and how the cologne 2600 was sent from factory. Owner pointed out the finger prints clamping the fiberglass to rear wheel wells.
|
blue74
Master

- Total Posts : 301
- Scores: 28
- Reward points: 4184
- Joined: 2015/04/16 12:54:53
- Status: offline
Re: Rough '69 Capri
2019/05/07 00:11:45
(permalink)
Thanks Wiggy, it would have been good to get to the Capri 50th anniversary to see that car, I did see some pictures of it from the weekend. Jack, I haven't got much further than what you see in the pictures. Is it because you want to increase the track you need to use Silvia suspension? Fitting the rear independent suspension would be nice however a lot of work including cutting a section out of the chassis. I have to be realistic, I would never get my car finished if I went down that route however it is tempting. I haven't decided what column I will use for mine, I did keep the S13 one however it is missing a couple of parts and it may be easier to look for something else. As for switching on the column, most columns that are collapsible will have the combination switch on it. Make sure you do a forum post of your Capri's progress when you get to it. All I have done in the last couple of weeks is make some brackets for the camber rod mounts and have joined the front mount brackets to the cross member. This will tie it all together as I have a 4 cylinder shell and it doesn't have the strengthening plates on the chassis rails. It also gives me a place to attach the sway bar mounting brackets. 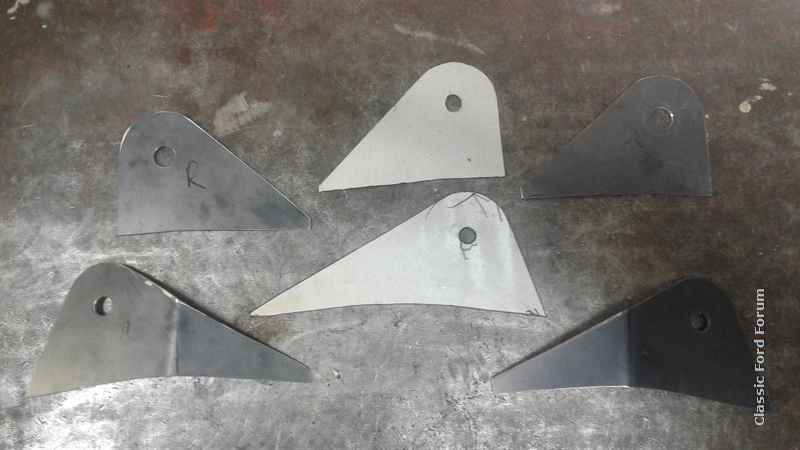(1)(1).jpg)  Gave the S13 lower control arms a clean and lick of paint then fitted S15 ball joints to them, these are needed to suit the S15 knuckles. 
post edited by blue74 - 2019/05/07 13:48:59
|
blue74
Master
- Total Posts : 301
- Scores: 28
- Reward points: 4184
- Joined: 2015/04/16 12:54:53
- Status: offline
Re: Rough '69 Capri
2019/06/11 23:15:05
(permalink)
Over the last couple of weeks slow progress has been made. I have aligned the front cologne arches using items from my "building tools", namely the plumb bob.   The arches were then glued to the guards with resin before sections are removed from the inner guard and the join glassed together. I have been doing this in sections, reattaching the guards to the car for curing so the shape stays where I need it.  The bonnet has also had it's GT bonnet pin holes filled and smoothed.  
post edited by blue74 - 2019/06/12 13:53:17
|
blue74
Master
- Total Posts : 301
- Scores: 28
- Reward points: 4184
- Joined: 2015/04/16 12:54:53
- Status: offline
Re: Rough '69 Capri
2019/06/11 23:33:53
(permalink)
Last week I went to the local wreckers armed with some measurements from the Capri and my tape measure and came home with an EL Falcon steering column. I kept the S13 column however it is too bulky where it goes between the pedals and through the firewall to work with the Capri.   With upper and lower brackets made the Falcon column is now bolted to the Capri just needing the intermediate shaft to be fabricated to work. Some of the reasons I chose the EL Falcon column are it has a compact shroud, is a good length and thin, has height and reach adjustment and has modern switching on the stalks except for headlights and most importantly it is collapsible to please the engineer. I have also bought a steering wheel boss for my more period Sass wheel although don't have a picture of it yet.    What do you folk who drive Capri's think of the standard Capri steering wheel height? would you prefer it to be higher or lower or is it good where it is? I could go up higher if I relieved the column into the under dash bracket, however have left it where it is for now using the blue brackets I made and tacked together that can be seen in the picture.
post edited by blue74 - 2019/06/12 13:57:50
|
blue74
Master
- Total Posts : 301
- Scores: 28
- Reward points: 4184
- Joined: 2015/04/16 12:54:53
- Status: offline
Re: Rough '69 Capri
2019/07/03 22:28:34
(permalink)
|
blue74
Master
- Total Posts : 301
- Scores: 28
- Reward points: 4184
- Joined: 2015/04/16 12:54:53
- Status: offline
Re: Rough '69 Capri
2019/08/14 09:02:14
(permalink)
|
blue74
Master
- Total Posts : 301
- Scores: 28
- Reward points: 4184
- Joined: 2015/04/16 12:54:53
- Status: offline
Re: Rough '69 Capri
2019/08/14 09:15:07
(permalink)
Rolled the panel and put a small bead along it to keep the shape before welding the two sections together.   I'm pretty happy with the fit however concerned about the inaccessible void that will be left between the original guard and the Cologne arch. I decided to put a 25mm access grommet in the lower corners will make it possible to spray fish oil in when it is completed. Couldn't just have a hole, it had to be recessed! A few washers and shims welded together worked well, just need to order a larger step drill to open the hole out for the grommet to fit into.   
|
spud15
Supporter
- Total Posts : 1237
- Scores: 36
- Reward points: 5597
- Joined: 2011/08/01 11:02:49
- Location: Melbourne
- Status: offline
Re: Rough '69 Capri
2019/08/15 18:12:14
(permalink)
|
blue74
Master
- Total Posts : 301
- Scores: 28
- Reward points: 4184
- Joined: 2015/04/16 12:54:53
- Status: offline
Re: Rough '69 Capri
2019/09/24 12:40:00
(permalink)
Small progress, Aligning LH rear arch and making infill inner arch same as the other side.  I won't be using the old 1600 diff assembly so made a jig using it (to fit the brackets to the doner housing), before removing the brackets.  Stripped the incoming Falcon Borg-Warner diff of it's factory brackets and shaped the Capri ones to fit.  As the Falcon housing is about 1550mm wide it will need shortening to suit my application. I have it sitting in position however need to get some wheels sorted to work out how much I want to shorten it by. 
|
blue74
Master
- Total Posts : 301
- Scores: 28
- Reward points: 4184
- Joined: 2015/04/16 12:54:53
- Status: offline
Re: Rough '69 Capri
2019/09/24 12:49:02
(permalink)
I will just make up some steelies for now out of Falcon BA centres and bare 16"x 8" ROH rims. Eventually I plan to get some nice custom alloy wheels made but can't justify the expense yet. Picked up a couple of old wheels yesterday to remove the centres,  and the new blank rims arrived.  I don't have equipment to machine the centre so will send them off later this week to a wheel manufacturer to have them machined and welded with a 0 offset.
post edited by blue74 - 2019/09/24 19:06:46
Attached Image(s)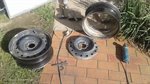 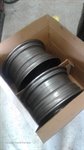
|
cosworthfreak
Moderator

- Total Posts : 686
- Scores: 54
- Reward points: 6301
- Joined: 2011/08/01 11:02:49
- Location: Location
- Status: offline
Re: Rough '69 Capri
2019/09/26 00:08:39
(permalink)
Looking forward to seeing some paint on this with the arches.
|
spud15
Supporter
- Total Posts : 1237
- Scores: 36
- Reward points: 5597
- Joined: 2011/08/01 11:02:49
- Location: Melbourne
- Status: offline
Re: Rough '69 Capri
2019/09/28 07:13:44
(permalink)
Yes it’s a beautiful thing
|
blue74
Master
- Total Posts : 301
- Scores: 28
- Reward points: 4184
- Joined: 2015/04/16 12:54:53
- Status: offline
Re: Rough '69 Capri
2019/11/30 16:04:58
(permalink)
Thanks guys, although body paint will be a long time coming i'm afraid. Got my rear wheels back and my brother painted them for me.  With the tyres on measured, measured and measured again.  And measured a few more times, cut the borg warner housing and had my cousin who has a jig for the job, weld it back together. I have now tacked on the brackets using previously made frame so the housing can be assembled in the car to check the pinion angle when sitting at ride height. 
|
blue74
Master
- Total Posts : 301
- Scores: 28
- Reward points: 4184
- Joined: 2015/04/16 12:54:53
- Status: offline
Re: Rough '69 Capri
2020/04/02 11:42:57
(permalink)
Other priorities over the December/January period prevent much progress on projects however, now the year is moving along I can add some updates. Finally had the custom axles made and fitted them to the the shortened Borg Warner housing, must have got my measurements right, phew.  Time for fitting the V6 Duratec in the hole.  The engine sits back in the bay nicely with clearance between the starter and steering however that creates other problems that will need to be overcome such as reduced space for the alternator and other ancillaries. Of course the Jag or Ford sump variants for this engine are no where near compatible so the Jag one is being modified.
post edited by blue74 - 2020/04/02 12:36:53
Attached Image(s)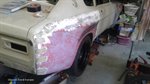 
|
blue74
Master
- Total Posts : 301
- Scores: 28
- Reward points: 4184
- Joined: 2015/04/16 12:54:53
- Status: offline
Re: Rough '69 Capri
2020/04/02 11:59:15
(permalink)
I have purchased an old round column mill and fixed it up, this has been handy to machine down the existing sump and in making a support to bolt the sump to while it is being welded to prevent it warping.    The sump will be built up off what is left of the original, now machined and blasted to clean off any gunk, then bolted to the support frame for fabrication.  The final shape tacked together ready for my brother to finish welding, he's much better at aluminium welding than I am especially when welding cast to plate aluminium. 
post edited by blue74 - 2020/04/02 12:35:18
|