Wiggy333
Deity

- Total Posts : 1012
- Scores: 42
- Reward points: 3744
- Joined: 2014/12/01 13:28:20
- Location: Sydney
- Status: offline

Re: Capri Front Guard Removal
2015/10/28 16:55:18
(permalink)
Here are a couple of pictures of the A pillar. I remove the outside but before I weld it I sand blast everything finally vacuum followed by prep wash then weld. But want to paint before I do the welding. Still on the plan though while it's on the rotisserie of flooding everything with fish oil or rust preventative before the paint goes on. Keith
|
Drewdog
Deity
- Total Posts : 1073
- Scores: 177
- Reward points: 5652
- Joined: 2013/03/06 22:31:01
- Status: offline
Re: Capri Front Guard Removal
2015/10/29 16:00:02
(permalink)
Re spot welds: I've seen guys use a punch to replicate the factory welds after they've been tig'ed or braised...
Repairs are looking great, nice to see some more quality metal work on the site...
Cheers Drew...
GT Cortina Project "The Ugly Duckling"
|
Wiggy333
Deity
- Total Posts : 1012
- Scores: 42
- Reward points: 3744
- Joined: 2014/12/01 13:28:20
- Location: Sydney
- Status: offline
Re: Capri Front Guard Removal
2015/12/04 17:40:07
(permalink)
Sorry but realize I don't know how to start a new post etc etc. Just looking on eBay uk and there is a brown Capri v8 which is rather interesting. It's a two seater with an new Alpha dash fitted crazy body work worth a look. Maybe some one can help post a link and teach me how to use the forum.
|
Wiggy333
Deity
- Total Posts : 1012
- Scores: 42
- Reward points: 3744
- Joined: 2014/12/01 13:28:20
- Location: Sydney
- Status: offline
Re: Capri Front Guard Removal
2016/03/01 16:49:30
(permalink)
Hi regarding removing the spot welds with heat and a hammer which I tried with absolutely no success yesterday I don't know how it could work. I used all three types of flame at various heat stages on my old wreck and nothing came lose and really just damaged the panel. With my new Capri I will try to just cut under the top lip of the guard around 10mm down like Spud suggested. The white Capri was cut on the top horizontal edge and only cause I look can see it on a hot day in the sun at certain angles ( I used to quality control new cars in a past life). But the engine bay finish speaks for itself. Would still like to think you could heat and repop the welds if anyone can find decent info on it. Any input would be greatly appreciated.
|
Wiggy333
Deity
- Total Posts : 1012
- Scores: 42
- Reward points: 3744
- Joined: 2014/12/01 13:28:20
- Location: Sydney
- Status: offline
Re: Capri Front Guard Removal
2016/03/01 16:54:41
(permalink)
And GTV6 I did watch the video and bought the DVD and it's fantastic. Spending time learning Oxy fusion welding on scrap at the moment which has stopped me fixing anything until I master that. And still
practicing lead wiping and getting pretty good at it ( but only on scrap).
|
in rod we trust
Aficionado

- Total Posts : 447
- Scores: 4
- Reward points: 1985
- Joined: 2016/02/27 17:13:04
- Status: offline
Re: Capri Front Guard Removal
2016/03/01 20:26:25
(permalink)
had a go at removing the gaurd this week ...
i found the best way besides using the stud drill was to use a slightly bigger drill bit drill right thru the weld then pop it with a or the most flat chisel you can find ,, came of pretty easy only hard bit was the lip at the front around the headlight ...
once done clean the top of the inner guard real well stick 2cent piece if ya have any or penny under the hole and fill it in
now to find a front fender or at least the front half of one ..
|
Wiggy333
Deity
- Total Posts : 1012
- Scores: 42
- Reward points: 3744
- Joined: 2014/12/01 13:28:20
- Location: Sydney
- Status: offline
Re: Capri Front Guard Removal
2016/03/05 17:47:33
(permalink)
So after a week of removing spot welds and also attacking in different ways here is my two cents on removing the Capri guards. Over the week I've removed four off varying vehicles wanting to save some and not too worried about the others. I'm sort of convinced they should be removed at the weld but I reckon maybe there is a different way. So firstly as I said I've done it the standard way and first few times a hassle but best way is to get a 1/8th drill and drill a centre hole( yes we all know this) but that centre hole I think should keep going until at first you see a little bit of rust dust from between the two panels. Then you know where that junction is so when you use a 0degree drill or spot weld drill that you have been through the panel enough not to hav to use to much force to separate them. Second approach was removing guards of a wreck. I did this by cutting underneath the guard at the internal guard therefore not cutting the guard at all. Whilst I don't care about the wreck there were only two small cuts at front and rear to get it out aside from other spot welds headlight and underneath. Thing is I think once off if treated soaked etc at the spot weld join would cure the rust between the seams. Then reweld back on on the rotisserie and it's a spot you really can't see but obviously needs welding properly for strength. Final things are on last guard I tried I didn't drill the fin that is between the guard and A pillar to remove the guard, this is too tight to get drills etc into so with the last guard I pulled the guard out after all top front and bottom welds were drilled and loosened and got the misses to hold the guard out and push. I then used a brass dolly and tapped the seam where the door and guard meet. This popped the seam from the fin quite easily and meant I could pull the fin side ways more not worrying about the external and remove it from the A pillar far more successfully. Finally a pic of the A pillar once removed
Attached Image(s)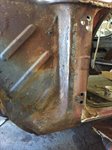 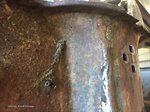
|
spud15
Supporter
- Total Posts : 1237
- Scores: 36
- Reward points: 5597
- Joined: 2011/08/01 11:02:49
- Location: Melbourne
- Status: offline
Re: Capri Front Guard Removal
2016/03/05 20:01:15
(permalink)
doing up an original orange one at the mo - in undercoat now.   but I was able to remove the guards easily - they had the original spot welds - but as for the welds on the A pillars - I was able to access them from inside - u can see the drill holes ive left   - so they came off clean - off course u can see the rust in the a pillar as well - ill take that out
|
Wiggy333
Deity
- Total Posts : 1012
- Scores: 42
- Reward points: 3744
- Joined: 2014/12/01 13:28:20
- Location: Sydney
- Status: offline
Re: Capri Front Guard Removal
2016/03/06 17:52:49
(permalink)
I like it spud I reckon you turn it over soak it with phosphuric acid or vinegar or rust convert it and go from there. Maybe as I'm thinking POR 15 all the insides once finished.
|
GTV6
Master

- Total Posts : 740
- Scores: 35
- Reward points: 6497
- Joined: 2011/08/01 11:02:49
- Location: Perth WA Australia
- Status: offline
Re: Capri Front Guard Removal
2016/03/07 01:53:38
(permalink)
Wiggy333
Maybe as I'm thinking POR 15 all the insides once finished.
You should check out KBS, same type of system, much cheaper.
|
Drewdog
Deity
- Total Posts : 1073
- Scores: 177
- Reward points: 5652
- Joined: 2013/03/06 22:31:01
- Status: offline
Re: Capri Front Guard Removal
2016/03/07 10:19:26
(permalink)
+1 for the KBS system. Just make sure you're well gloved and covered, haha learn from my mistakes, it doesn't come off skin (in particular your face) for a week or two  Cheers Drew...
GT Cortina Project "The Ugly Duckling"
|
Wiggy333
Deity
- Total Posts : 1012
- Scores: 42
- Reward points: 3744
- Joined: 2014/12/01 13:28:20
- Location: Sydney
- Status: offline
Re: Capri Front Guard Removal
2016/03/07 10:29:51
(permalink)
So KBS is just as good just cheaper. I will give that a go then. Can it be sprayed and painted over. Cheers
|
spud15
Supporter
- Total Posts : 1237
- Scores: 36
- Reward points: 5597
- Joined: 2011/08/01 11:02:49
- Location: Melbourne
- Status: offline
Re: Capri Front Guard Removal
2016/03/07 11:04:47
(permalink)
I used stuff in a white plastic container with a gold label - label has gone so im not sure what its called - spray it on and wash the residue off with water and its ready  put the orange up ready for other rust repairs  and sprayed the engine bay  
|
spud15
Supporter
- Total Posts : 1237
- Scores: 36
- Reward points: 5597
- Joined: 2011/08/01 11:02:49
- Location: Melbourne
- Status: offline
|
spud15
Supporter
- Total Posts : 1237
- Scores: 36
- Reward points: 5597
- Joined: 2011/08/01 11:02:49
- Location: Melbourne
- Status: offline
Re: Capri Front Guard Removal
2016/03/07 14:05:08
(permalink)
ha ha - (the relevant authority has inspected the facility - all clear!) - yes - heaps of capris. mostly to be fixed up - every time the missus goes overseas, I start doing another one - hence the orange resurrection ..
post edited by spud15 - 2016/03/07 14:12:54
|