2024/11/21 09:00:44
escortinadriver
martymexico
I can see that patch could've been bigger at the sides by the speed holes there..
A good trick to know is to put strips or tabs behind the main panel by plug welding and weld the new replacement piece onto that , a bit like a drywall repair in a house. Chasing those holes, I turn down the current/wire and pull back the gun so it's about 20-30mm from the panel, this weakens the current a little giving more control filling the holes bit by bit , letting it cool each tack . Glad you're using gas too


thanks for the tips.
 
I used the overlap strip method with some plugs on one of my other patches and it worked quite well. Gave me more metal to work with.
 
I had cut the patch as big at I thought id needed, trouble is, with the metal being so thin, if you get a little too enthusiastic with the wire wheel you create more holes...  Again, in hindsight, I probably should have replaced the entire sill.
 
Yep, using gas and .6mm wire.  I did by myself a TIG on sale, however im doing mybest not to open it and play until after the body work is done. (I'm too easily distracted as it is)
 
Shaun
2024/11/21 09:02:03
escortinadriver
deano
he's getting good at this.
 
One thing I learnt chasing holes, was dont try to plug it directly. Just aim first to get a tack on whatever edge seems thicker, and build ontop of that, then repeat for the other side. Eventually it will span the gap, and you have something to heat up and consolidate with.
Of course I could be totally wrong too!


Im getting better.... not that good yet! Ive certainly got a lot of holes to practice on!
 
Definately no concourse resto going on here though.
 
Shaun
2024/11/21 19:56:37
MarkA
Your on the money Deano. Quick dabs around the perimeter of the hole
2024/11/25 11:17:48
escortinadriver
So moving further along, up to the rear guard.

Quick explore with the wire wheel shows the inner skin is 'relatively' solid. I'll unpick it under the lip and check though. Eventually guards will be rolled for clearance.

It's actually not as bad as I thought it might be.

My question now is where to cut for the replacement section(s)??

I'll have to check the profile of the sedan arch I have and see how closely it matches.

Happy to hear suggestions 😊


Attached Image(s)

2024/11/25 12:56:25
martymexico
Suggestion, I would prolly cut the arch half way along the flared swoop out bit out the arch, it won't affect panel shrink as much as on the flat of the quarter. Even if it's overlapped a few mm is better to absorb heat, just slap a big chunk of rust kill in that area after. Also if the door open is same as wagon, you could cut into door open panel which can be easily hidden away.

If it was my repair I'd make a piece of strap that's folded at 90deg along it's length that just covers the outer flat of the arch and the return edge spot weld lip. I'll use my stretcher to curve the folded 90deg strip to match the arch curve and return lip, hammer and weld as usual. If the inner needs work, it can be accessed while the rusty part is cut off
2024/11/25 14:07:16
deano
If it was my repair:
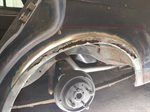
I'd probably want to focus on ideally being able to keep the top radious curve of the arch as the main key.
if you had a replacement section available in one of your cuts (or new), then I'd take the cut back to about 1" high near the door corner and straight across (red line). Mind you, any old cut  section you might have though is possibly in the same condition.
Second option would be along Martys suggestion, the Green line repair. Make a block of timber with the same radious as a rough die, and hammer down a fold thats 10mm thick or so to become the inner guard lip. You might have to tackle it in 3 or 4 sections, repairing a few inches long each time.
Without a shrinker to pull in the curve it might be a bit harder. 
I have a shrinker same as Martys, but still have done all bits manually.
That top bit of the curve is going to be thin, from the rust and also the original stamping. 
If it looks like its too bad to weld, you might have to make each repair section taller, to include the top arch curve return also.
You could even fold the top return back a little shorter, tucking it under whats there, and plug welding through the original panel into the new patch. Hope that makes sense.
Then the 'exposed cut edge' of the original could be seam tacked off where you can to finish off.
This would give you as much new metal to work with, and you are mostly welding onto the new infilled bits wherever possible rather than butting to really thin steel.
Good luck. In the end, you just need something solid, and a skim of filler will help to shape out  and curves that arent right.


Attached Image(s)

2024/11/25 19:34:11
MarkA
Are the arches the same geometry as sedan mk2? (or that vintage).
A donor would be easier? I stand to be corrected there.
2024/11/25 19:48:03
martymexico
I could be wrong, I think they are a match after looking at pics of sedans, he has the replacement cut piece but just asking how and where is the best way to tackle it. Shaun you could do it Fitzee style, I did it on my mk1 and it worked quite good .
2024/11/25 19:54:21
escortinadriver
Thanks everyone.

I'll size up what I have and see what's going to work best.

I have a reasonable rust cut of most of the rear 1/4 from a sedan. The arch part itself looks identical, rear section 1/4 is different.I planned ahead, however I'm not sure how clean it will be until I take to it with the wire wheel. The front guard section I used had a skim of filler, I'll find out tomorrow when I dig it out.

I've used several methods so far, including Fitzees 'cut and butt' techniques. I find that more challenging when there are complex shapes and curves though.

I have tomorrow off so will let you all know how I go.

Shaun.
2024/11/25 19:57:44
escortinadriver
Have both sides like this from the flooded sedan.


Shaun

Attached Image(s)

<< ..1920.. >> - Powered by APG vNext Trial

© 2025 APG vNext Trial Version 5.1

Use My Existing Forum Account

Use My Social Media Account