2026/01/07 08:38:30
PartTimeMK2
I would be interested in seeing photos of that thing for sure! 

Yeah I put the part in the slicer just to see how long the printing of these things would take.. over a day with fuzzy skin, solid infill, thicker walls and variable layer heights on the bends and tops of the curves... will have to wait until i can start it at like 4am.

Without all that it is only like a 10 hour print to check the fitment which is reasonable. The filament isnt too unreasonable, only 60 bucks a roll but I wouldnt want to be making any mistakes that's for sure!
2026/01/07 09:25:19
martymexico
It's going to be a hot day so got out there early for the pics. The K swap intake which I think is on par with the factory long runner type


Since this is destined for my 95 Courier the intake is a knockoff of the Skink2 version , I have added sizes centre to centre (1-4) port for comparison, less than an inch as to pinto but the Honda is slightly Siamese as seen in the stock pic with silver intake . Also is a pic of the Duratec skunk style intake which has a removable plate

Pinto is at 300mm as to 280mm for k swap

Slightly Siamese , if you playing about on CAD, split it in half and stretch the 2x halves then overlap the cut line till it's right then join back up. A pinto intake gasket will be handy to line it all up, I can send a file if in need

Attached Image(s)

2026/01/07 09:40:22
deano
 
Wow, impressive Mark, you are of to a flying start on the inlet.
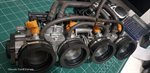
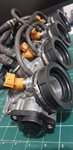
Yes Marty and I got some Hinda bike ITB's from the US, and had been playing with the idea of printing manifolds out.
(Well I was also secretly possibly just going to buy one of DanSt's manifold when the time came, but it continued on).
Alot of the basic config was just doen with thinkercad as a learning exercise, then I bought Rhino#D software and started redoing it in that. In between doing that and the van, I got halted when  couldnt get the  inlet tubes to nicely meet into the flange faces. Marty has recently revived again with a complete unit redrawn.
I think the only iteration left was to maybe to put a common MAP tube across each inlet.
I'm still on hols, on a different pc, but heres the ITBS.I made a Speeduino, and had it connected to the pc.
 
Definately dont use the wifes oven for your curing.


Attached Image(s)

2026/01/07 10:27:30
martymexico
Yes the intake is just a road test for us , helps with the mental block and theory . If you want to buy a danst that's fine. I can make one from ally if the time comes so don't worry..
I might do more on the intake like getting the ends to match the bike itbs etc . Mark said his roll of cf filament was about $60 , I'm used to paying about $15 for PLA or petg so yes it's gotta be a successful print, do a couple of cheap runs especially when it's a 14hr print. If you can use bed glue instead of heat it's less likely to curl up at the edges, even run a 'skirt' around the parts outer edge for added stick down.
2026/01/14 16:13:28
deano
and depending on your bed type, you can just use normal 3M blue painters tape as well.
Thats our go to, get a few prints out of it and remove and replace when needed.
Plus some 3Dlac hairspray if you are really having issues with prints cooling and lifting off.
 
Definately use a raft or a shirt if its a small item that may not have much surface area to stick down with.
3D print is just like gambling, you never know if its going to work out like you hoped till its too late.
2026/01/19 17:01:36
PartTimeMK2
So far so good with prints, only had a few failures that were my fault for the most part. I reprinted the bonnet cable stay in black ABS and I ended up having to increase the size of the part by 1% because of shrinkage but it came out well.
 
I've been away again though so no progress on the car, and I'm away for the rest of this week. May get some stuff done this weekend but we will see. These brake lines will get done eventually I promise!!! 
2026/01/24 18:27:05
PartTimeMK2
With it being stinking hot I've been working on the computer instead of the garage. I started the process of designing and printing rear quarter speaker mounts, So far so good, now I just need to make up a few long brackets to mount it to the panel. 


Because the RS has roll top cards there are "spare" holes in the panel that the non RS cards mount to can run arms from to mount it securely, I will just need to position it in such a way that it doesnt foul on the arm rest part of the trim, there is enough depth that it shouldnt be an issue.

Attached Image(s)

2026/01/24 21:03:28
martymexico
I seen that done on another thread a few months ago !
Are you going to mount them with rods or straps? Yeah if you mount them so the armrest doesn't get in the way you could stealth a cover of some sort. Just be aware the speaker magnet wants to join to the outer bodywork, that's why mine are raised about 30mm .
Expect some proper heat on the way, we got to 44 today, same on Monday
2026/01/25 11:05:20
PartTimeMK2
I may or may not have gotten the idea from around these parts .
 
I'm half a mind to figure out a way to mount them to the door card, but the factor cards are really brittle.
2026/01/25 17:04:33
martymexico
They will sound better if they are connected to something solid, the door trim isn't good enough and it'll sound like a transistor radio which we wouldn't want...
<< ..6364 - Powered by APG vNext Trial

© 2026 APG vNext Trial Version 5.1

Use My Existing Forum Account

Use My Social Media Account