2025/07/13 19:16:41
PartTimeMK2
Great little video that, I have plenty of 1.6mm plate laying about so it's time to do some carboard assisted design and have a crack replicating the gussets and the strengthening insert. The underside also was used as a jacking point so I might insert a new section there too. 
2025/07/14 09:17:57
martymexico
I thought to add this as it has a original Escort MK2 RS , tho early model with the rear how that are, this is how I did my RS but without the chrome FORD badges.
Johnny Smith always does great vids regardless the car(s) , this is a family made museum in Wales
https://youtu.be/zW5BpS0C2G8?si=-8eORLanjFEZJVHc
And the Lotus Carlton was the fastest 4dr car in the world at the time with 185mph before they was restricted to 150 !
2025/07/15 17:13:59
PartTimeMK2
2025/07/16 15:07:39
PartTimeMK2
Managed to get some time in the garage today.

Put the second coat on the diff and ill see if it needs a third after it dries, pretty happy with it as it is though.


I picked up some flat bar and made a start on the next part of the crossmember which is adding the spacers to the mounting area, also stitch welded the mounting points to the rest of the frame. Ford just spot welded the whole thing together for the most part so I'm not surprised that the original piece has so much flex when people push the car.


Next up is the internal/external gussets, drilling the chassis mount holes - will need to die grind the passenger side out a little as they're elongated, and moving the lower control arm mounts up and out and weld the standard ones closed. 
 
After that I'll decide if i am going to put a patch panel into the bottom to get rid of the dents from using it as a jacking point. 
 

Attached Image(s)

2025/07/16 18:02:59
martymexico
Got any blacker, kidding that looks as good as you'll want to get, just be aware when you install the LSD it'll get scratched up again in the vice.

Glad your doing some real mods to the XM , just by installing the plate in the hollow mounting uprights helps heaps and isn't a pocket for dropped nuts ! Nice welding BTW, Once I did the RS XM mod and with the lower arm inners I simply welded washers with the 3/8-10mm hole and drilled the xm, it pays to template the spot so the holes aren't going on any donkey angle.
My project is getting a wcxm so all the beef is done for me, just bought the mounts for $90 from a Subaru rally guy in UK..
2025/07/17 17:58:46
PartTimeMK2
Nice idea on the washers, might steal that. Interestingly enough the uprights are not symmetrical, one side wants a 80mm gusset and the other wants 100mm.

While I was in the garage measuring up and changing over the big migs wire (I was lazy yesterday and used the gasless) I had an idea.

So.. The front of the car relies heavily on the cross member for rigidity, which begs the question - why no horizontal bolts to tie it properly to the chassis rail? Why didn't Ford use the obvious opportunity to extend and brace this section properly with a captive nut here.


Followed by a hole through the rail here.


This would add WAY more rigidity to the front of the vehicle for the cost of a bolt and nut with next to no weight added. In my mind by not locking the crossmember in on the horizontal plane allows for a fair amount of flex considering the pressures and weight exerted on it.

What you think team? Worthwhile mod or pipe dream?


Sneaky edit - Im stealing some pictures from Mk2 Mitch's videos. Look at the amount of room here, it really needs a spacers to at least get it snug between the rail and the crossmember, the amount of flex the turret could have because of this I think would be substantial.


Attached Image(s)

2025/07/17 19:09:31
martymexico
I'll chime in here , yes the xm is made slightly out of whack , not exactly sure the reason for it but it is.

Right now the tech lesson ...
Going way back to my Anglia build, I junked all the Anglia front end and swapped out with escort, they said I can't work but I got it done easily .
Now then the Anglia has a vertical plate similar to Capri V6 so it has 2x vertical boltings and 1 vertical , it's about 3 in higher and has a crush tube like the swaybar front bkts in the chassis.
Also the escort chassis rails can be out by 10mm between cars which is the reason for , 1; the big gaps and , 2; one side has oval holes for the out of wack cars.
If I was going to do the radial bolt, I'd wait till the car comes back so it can be measured for a snug fit . Also it does stop heaps more flexing so yes, do it but maybe raise it with a plate to near the top of the chassis rail for best leverage strength..
When I did the Anglia mod I did the plate and bolt hole first then mounted the XM up then welded it all together.
Edit....
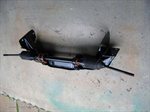
Found a pic from the forum of the xm I converted

Attached Image(s)

2025/07/17 19:21:26
PartTimeMK2
Yeah nice, thought so.

So plan of attack should be to measure rail to rail between the mount holes and measure plate to plate on the crossmember,

If its for arguments sake 3mm each side to center it, fab up two three mm plates to the bracket but go higher up the rail, ending just before the top would be ideal.

Tack it up and test fit to make sure its snug, weld it, drill out the mount holes, maybe even two, because then you could run a sandwich plate in the arch for even more support. Offer it up to the car and snug up the bottom bolts and mark the top holes on the rail, take it out, drill the rails and job done.

Seems easy enough, I'll give it a crack.    


It would basically look like this - obviously not to scale 

Attached Image(s)

2025/07/17 19:28:57
martymexico
Yeah you got it sussed . If I remember I'll measure mine but pretty sure the measurement 2ft rings a bell between rails, also check the rails themselves is they are tapering, but sure they are square to each other
2025/07/20 12:27:28
PartTimeMK2
Small update, it was raining on the day we organized to bring the chassis home so we moved the date to potentially Monday, I have to call the tow truck driver tonight to organize.
 
So to keep myself busy I prepped and painted the rear calipers and chucked a new shelf in the garage to keep the nose cone safe when it comes back next week.


Can't get over how good a finish you can get when you put the spray can in warm water beforehand.  

Attached Image(s)

<< ..3132.. >> - Powered by APG vNext Trial

© 2025 APG vNext Trial Version 5.1

Use My Existing Forum Account

Use My Social Media Account