2023/12/09 14:45:43
PartTimeMK2
Spend a few hours today sorting this lot - the engine bay side is done its just the interior side left to do. I've re-wrapped the engine bay side as the tape was getting super crusty, fixed up a few wires that were a bit dodgy and neatened it up. 
 
Need to replace a few connectors and wire sections that have been hacked with scotch plugs but its mostly good. That can be tomorrows job though.


Attached Image(s)

2023/12/09 15:52:38
martymexico
Wiring, my favorite hate, give me a engine build or welding job any day !

With the roof, a 4dr roof can be stitched in, it's only the C pillar that's different.. Depends on how the body shop would do it, properly from in the gutters or cut n shut all pillars hotrod style . Finding a 2dr for body panels will be good fun, it's gotta be beyond salvation these days before they chop up a shell
2023/12/09 17:36:13
PartTimeMK2
I'm more confident with wiring than I am with welding that's for sure. Working on later model Volkswagens for years had me stitching wiring looms constantly. Rats love the wires in VWs cause of something in the wire sleeves, they will just go up inside the engine bay and munch away. 
 
Nah they wont be cut and shutting just stitching in a skin once we find one. Good to know about the 4 door though, that will hopefully make things easier.
2023/12/10 16:53:17
PartTimeMK2
Wiring loom done - wires that had scotch plugs repaired, checked for resistance then re-wrapped with felt for interior side and engine loom tape for the exterior side. Its super interesting to pull apart one of these looms, they're actually pretty basic once you get into them. 

The only thing I'm suspect on is the ignition switch loom, it had been butchered by the scotch plugs and there wasn't much left of the main yellow wire to repair. I would honestly prefer to replace it with another one but they're hard to come by.


Here is the section I'm worried about long term, black wire is a little frayed at the connection and the yellow wires repair is super close to the connection at the switch. 
 

Attached Image(s)

2023/12/11 11:10:19
martymexico
Might want to throw a dob of sodder on that black wire and use some non conformant (?) paste to prevent future power outages on the loom.
My yellow van a few years back kept clicking on ignition start and a spark came from battery lead, scratching my head for a while I extracted the complete loom and sat it on a table with dash, lights, fan, everything Inc starter motor which I needed to test for the problem... After finding nothing bad except a few wires needed a re sodder, I found out that it was the battery terminal that was made of some Chinese junk causing the sparks, quickly swapped it for a new brass one and all good
2023/12/11 12:16:10
PartTimeMK2
Good idea, I can flow some solder into it fairly easily and a dob of araldite will keep it secure.  
2023/12/13 13:53:12
PartTimeMK2
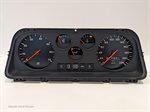
Been busy over the last few days with the instrument panel, it was mostly working when the car was parked up - apart from the fuel gauge but that was a sender float issue not a gauge issue.

 I agonized over painting the shroud and went back and forth quite a few times but finally decided to just do it. I used a Matt black spray pack that I actually use on Warhammer miniatures . It came up great i think! I also got some fluro matt enamel from the local hobby shop and painted the needles with two coats and some plastic polish for the shroud. I left the shroud off for the photo because it's still got a bit more polishing to be done on it and it was hard to see the actual gauges! I am SUPER happy with how it came up! 


I also had a crack at adding a support to the top of the shroud because it was bent like a banana - out came the JB weld and a bit of 3mm flat steel. I think its worked well - once the dash goes away and comes back with a softer foam pad it should sink into it quite nicely.
 

Attached Image(s)

2023/12/13 18:00:09
Drewdog
That came up a treat, little touches like that all add up in the end.
Good work around on the bowed shroud, I was lucky enough to have a straight one to start with but have noticed its starting to sag a little, I'll put that fix in the memory bank.
Carful cleaning the lense, they scratch super easily, lots of soapy water and a gentle hand for that one.
2023/12/13 18:07:45
PartTimeMK2
Yeah I noticed in the past that even trying to clean them can result in light scratches - it's a bitch

I've got some Meguiar's PlastX which I've used with great results on plastic headlights before, I did a super light pass with a foam pad and it's come up really well. I'll do another pass tomorrow with a pad on the drill, light pressure with lots of compound should do the trick. 
2023/12/14 18:50:00
PartTimeMK2
And done! Polished up the plastic this arvo with a black drill pad and PlastX - it's come up like new! Reassembled and now living in a cupboard until its time to reassemble the car - I also took a shot of where i placed the steel bar for anyone who wants to try the same.
 

Attached Image(s)

12.. >> - Powered by APG vNext Trial

© 2025 APG vNext Trial Version 5.1

Use My Existing Forum Account

Use My Social Media Account