2025/10/01 17:00:05
martymexico
Geez that's one weird ugly car, almost like our Purvis Eureka style, I noticed golf mk2 rear lights , yeah they did a decent job
Haha, I only spent about 10 mins on prep , your paint rollering will work well.
I was going to try a bit of talc in the paint as it's meant to go satin or matt depends on the amount you add .

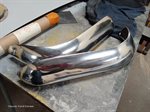
Anyhow, today I've polished off my fingerprints from working the vinyl wrap. The stuff has a protective clear layer and I think if I remove it first I might get a better end finish, I wasn't going to try on these little parts but for my first attempt at such a curved and small part I reckon it's come out fine. I'll glue the return edge to seal from moisture which will possibly start delamination .
The chrome is like a very highly polished stainless so it's plenty good for bumpers


I'll need to purchase more chrome as haven't got enough for the back bumper

Attached Image(s)

2025/10/01 20:32:45
MarkA
That looks good Marty.
AS you have hinted at it will be interesting to see how it goes over time?
2025/10/01 21:34:27
martymexico
Yeah thanks MarkA , I've just ordered 3mtr x 50cm , that'll give me enough to do 2x rear bars and a bunch of other stuff
2025/10/02 20:26:19
martymexico
Finally moving on to the diff housing I spent some time with the gurney pressure washer and C14 degreaser which is very strong stuff. After a free goes out was clean enough to start pulling apart. , there wasn't anything out of the ordinary, once the drums removed I got unbolting the axle flanges and yay 1 bolt was from a different era, I suppose I'll need to replace it or all when it's being rebuilt. Axles are good and straight with good bearings by the look and feel so they'll stay unless I hear some noises while driving.

The bucket has all bolts and the drums etc

Also when the centre was removed I seen left over cogs in the housing amongst the oil. The centre spool is perfect so it was replaced but I'm worried they forgot to remove the broken teeth.


Ratio is 3.77 with the opinion stamp numbers 9:34 , just about spot on for a Pinto in mk1 and RX8 box..

Attached Image(s)

2025/10/03 17:02:04
MarkA
Don't you just break a few teeth off to change the ratio
2025/10/03 20:02:16
martymexico
Today was productive, have the axle housing a decent clean with petrol in a pressure pot to loosen the last of the gunk caked on . I went in for lunch to allow the petrol to evaporate before I wire wheel it to clean and remove paint. Since the housing will need tramp bkts and Panhard bkt mounts welding on it won't be painted black straight away, it'll stay in primer for a while. I did sand paper the housing with 120grit to scuff the surface but when I was doing that I thought to strengthen it while it's pulled apart. I grabbed a piece of SHS 50x50 tube and cut into a wedge lengthwise so both parts will be the same, with some light shaping I had them sitting on the housing niche n tight


Adding these box sections will stop the housing from bending if the driver decides to go flying or off-roading , this may never happen but rather have it than not.
Drilled in speed holes for fun. Welded up


I did take time welding, like an hr to do one side, I didn't want any warping as the weld was set pretty high. Tomorrow I'll try to clean up some sharp edges before epoxy primer

Attached Image(s)

2025/10/03 20:11:05
PartTimeMK2
That is a really cool mod, that housing aint ever bending now!
2025/10/05 16:06:57
MarkA
Yeah, axles next?
2025/10/05 18:57:37
martymexico
Yes Mark, axles are fine except installing longer wheel studs
Yesterday I primed the housing in epoxy then moved on to another little job.


Drilled a hole in the bottom so they're will be a drain plug once it arrives, I found out I needed a M14 tap as my kit only goes to M12, always the way so ordered one while looking for the dunno plug. I could just use a M14 bolt and cut it down but wasn't one of those snazzy magnet plugs


Next little job was install the splash guards, nothing special except I used stainless bolts..

Attached Image(s)

2025/10/05 19:13:51
martymexico
Leaf springs..
I've had a pr of main leafs that are rather flat, I don't know their origin, whether Cortina or Capri, the rear bush is different to Escort . Length and pin is the same so I flipped them over and mounted the other multi leafs, what happened was they are about 4in lower , it's a start and they'll be adjusted once the car has been mostly built up.


This shows how flat they are.

They way I've done them before is to grab a spare set and split them apart, cut the main leafs eyelets off and use it as the second leaf, then it's add which ever smaller leafs works, even adding one. It's all trial and testing ...

Attached Image(s)

<< ..8384.. >> - Powered by APG vNext Trial

© 2025 APG vNext Trial Version 5.1

Use My Existing Forum Account

Use My Social Media Account