2024/03/14 00:16:15
escortinadriver
I watched that episode too.  Its great the way he gets in and makes otherwise expensive conversion parts from readily made materials.  Thats something my DIY nature agrees with.
 
For the price of the off the shelf exhaust fabrication kits, you could just about buy your own 3D printer and still be ahead.
 
 
2024/03/14 08:35:35
MarkA
I'm following the headers with keen interest Marty as I will be fabricating an exhaust from the turbo back for the current build.
2024/03/14 10:27:44
martymexico
Hi Mark , cool, it won't be for a little while yet but one thing it does do is allow to make the tubes equal length, except for 1 which according to Visard should be a tad shorter from memory.
With your exhaust build from scratch as I've shown Deano is to get the SS pipe in mitre lengths and a bunch of angles (usually 90deg) and cut where needed to make the system flow.
I used the cheapest stuff on my mk1 Focus and it worked great, built from the ST170 headers back in 2.5in SS
2024/03/14 10:38:10
deano
yup, as Marty said.
I got a 3m length of 2.5" stainless tube locally, some 90's and quick clamp off ali, a hotdog and a muffler of ebay.
Just need some odds and ends, including an O2 bung, then ready to get chopping once the engines in..
Dave's Garage  just migged his headers up, but I hope to learn to do some TIG as well on this.
 
Plus, if and when the ITBS and Speeduino part goes in, then Martys 3D intake kit will be usefull to assist in the design.
What a clever bunch of old farts we are.
 
2024/04/19 18:28:50
martymexico
Welcome back me !!
I been hectic busy working on a early rally pack instead of my mk1, since the rally pack original owner (83yo) wants to be photo'd next to the car as she did back in 77 so the race is on to have it completed before she passes which can be any time..

Today I decided a change of scenery and worked on my mk1 , working on the roof skin which has the sunroof panel welded in and it's not exactly perfect so first job was to remove the paint and filler which was about 4mm thick across the back half roof skin, coming from a old rally car it's expected.. I used a coral reef disk and it took about 1hr to fully remove the paint, look at the green dust everywhere..


This pic will make Deano proud, I welded the back of the roof panel to the original stepped panel, I used dry weld, or gasless... One thing about it is it spits everywhere and is harder to linish than regular gas MiG, it did the job quite well


Once that's done I got the DA sander with a 60 grit paper and scratched up the metal. Also did some nail welding to pull the lows up with the slide hammer and finally hit it with 2pk Epatec etch primer

Attached Image(s)

2024/04/24 20:00:58
martymexico
I'm still progressing on with the roof skin on the mk1 , slow process adding filler, waiting for it to set, sanding it and repeat. To put it in perspective in using a 300mm wide applicator so I don't shape it wrong. I bought a 25mtr roll of p40 to really eat into the filler. Even tho it looks a lot has been layered on there, I estimate the thickest is maybe 3mm and a majority has been sanded off and is on the floor now.


Enjoy your ANZAC day holiday everyone, do the right thing and go to a morning service, we are .

Attached Image(s)

2024/04/27 18:29:42
martymexico
I'm still doing the roof panel, even tho this looks like an extreme filler zone it's only a few mm thick over the span of the roof

After a sanding session I applied another skim of filler and sanded flat again to bring up any tin pimples which I tap down with a modified coarse file to try and shrink it back down slightly. The leading edge of the dash panel got a serve too.


Getting close to a decent shape now

This is today's afternoon work, I decided to give it a cover of spray primer/putty

I'll feel better once it's in epoxy so I can move on to the next panel

Attached Image(s)

2024/04/27 19:09:45
martymexico
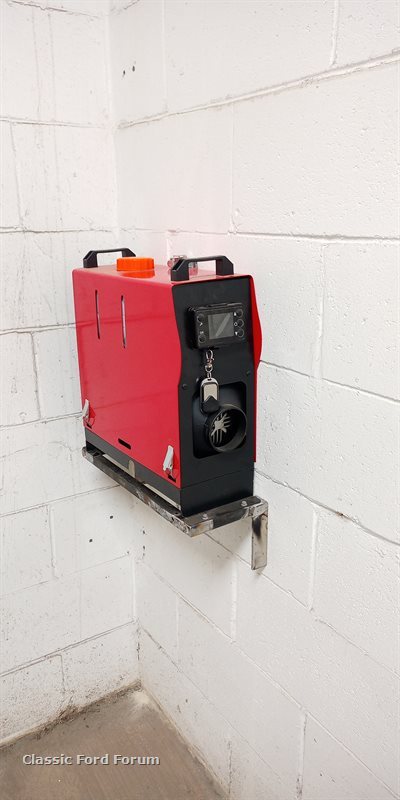
I've had this in the box for nearly a year, kind of bought it near the end of winter , as we're heading into the cooler weather I took the heater into the shed and thought ways of installing it without being in the way. This is an 8kw diesel heater which is 12v

More to make Deano smile is I used gasless dry weld the mounting shelf and screwed to the brick wall. As the heater comes with tubes and exhaust pipe to help install in the truck or caravan etc, but I
went a bit further. I found a length of poly pipe and used that for the cold air intake , I used plastic plumbing elbows and heated the tube to allow them to fit tight.

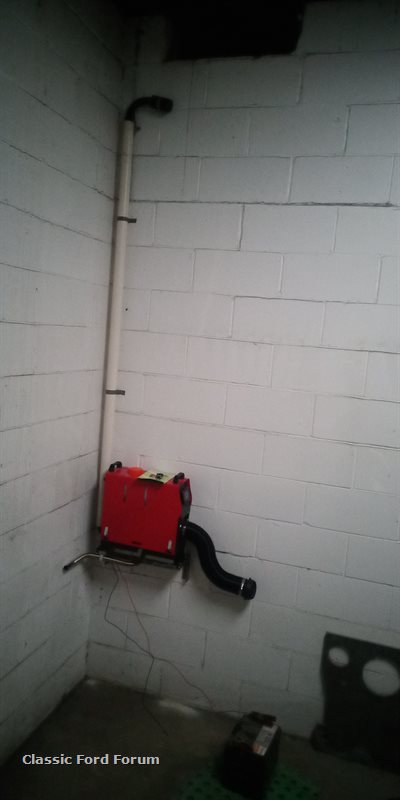
Next was to find something for the exhaust pipe, I found a derelict metal ladder in the steel pile and thought, that'll do perfectly, I just needed to shrink the joiner down to 25mm so the flex pipe slides into, I just V slotted the end and hammered them together and welded. I make mounting tabs to screw into the wall with. Then it needed to go up the wall so a intermediate piece was cut and welded on then the vertical piece welded on.

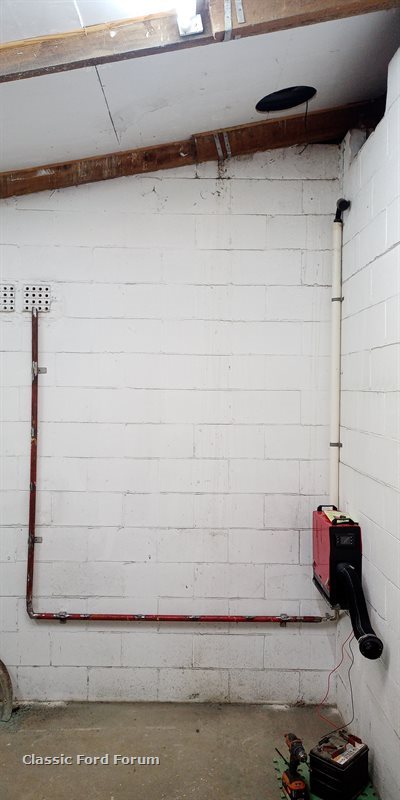
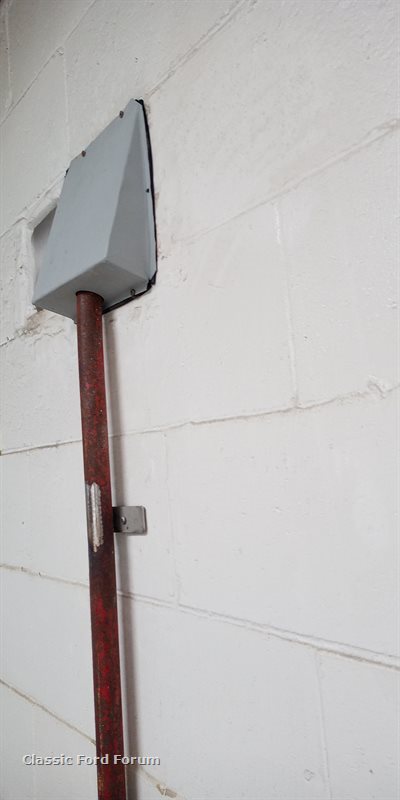
And this is the end bit aiming to the brick vent holes

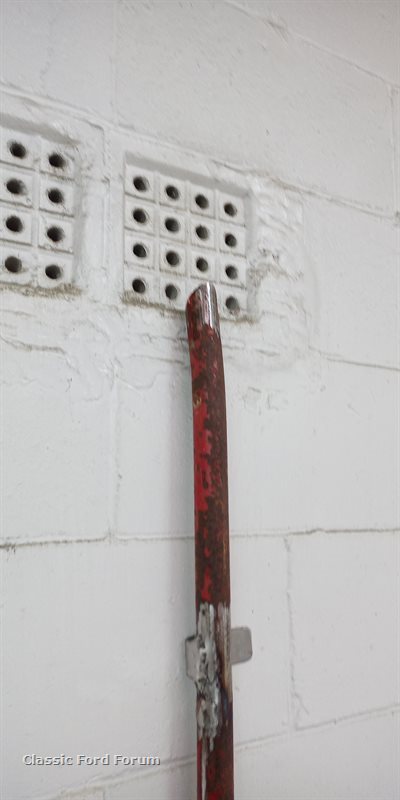
Today I made an enclosure for the exhaust so it can only go out the vent, it was made from thin gauge sheet and folded to shape. There is also high density foam around the edges and the pipe intake hole. Once the heater gets to temp I went outside to check on the exhaust, it's very minimal and hardly any fumes, I suppose when they use about 200mls an hr on low setting it's pretty good

Now I can take on winter without going cold !

Attached Image(s)

2024/04/28 15:58:07
escortinadriver
Diesel heaters work pretty well, and pretty efficient cost wise for what they are. Simple and easy.

Looking at your build, and planning ahead for mine, it looks as though I'm going to need to purchase some kind of den puller.

I've had a look at the weld on stud/nail types woth what looks like a slide hammer, and also the ring/hook type.

Do you have a preference? Is there one or the other that works better for different things? I've no experience with these so happy for any input or advice you can provide.

Thanks, Shaun
2024/04/28 22:00:42
martymexico
Hi Shaun
The one I have is a hand held jobbie bought on ebuy vivor model for about $160, possibly the same one you've looked at, mine has a 'volume' control for different thickness panels or for welding those key shape loops on. I haven't used all the types in the box yet, only the nail pins and washers.
Only thing I have a gripe about is the slide pull locking jaw really needs a spanner to get them tight so I'll be welding wings to help tighten it up. It's been used on the mk1 roof and the mk2 Rally Pack front panel so far , if you have a few cars in line for bodywork it'll be well worth getting one, there's millions of nails and other weld washers etc for a long time supplied in the package.
<< ..4950.. >> - Powered by APG vNext Trial

© 2025 APG vNext Trial Version 5.1

Use My Existing Forum Account

Use My Social Media Account