2025/10/08 08:31:29
PartTimeMK2
Awesome stuff! I had a very similar experience with my scorcher electronic ignition back in the day. It was a voltage supply issue though not a dud module. The 12v stuff can be very delicate, doesn't take much to fry something - did you do any welding with the module in the car? 
2025/10/08 14:32:03
deano
Good point, but no I dont reckon the electric ignition was in when I did the final rear welding,and will take not to disconnect it in the future.
Let me check the build thread.
 
I cant remember what day it is at the moment, so I'm glad to see the forum is still up and running.
I'm going to read back through the posts to check if I replaced the rear main gearbox seal.
Old age sucks.
2025/11/10 13:40:22
deano
Marty scored some rally good Recaro seats and mentioned sewing.
Funnily I had the industrial sewing machine instide on the dining table, and have started finally playing with recovering my RS wheel. I wasnt going to post until its complete, but we are half way so far.
 
It was purchased averagely cheap (my own word), because it has more cracks in it than Norlane:
 
Plus a few chunks missing, but ideal for recovering.
 
The rubber had come away internally from the steel ring, so I sliced it open and pumped in some maring  Sikaflex. I tested the Sika to see how well it would bond to metal, happily every tool on the workbench that got inadvertently covered, stuck down well the next morning.
 
Packing tape seemed a good idea to hold it shut while drying, except it needs air to cure.... eejit.
Its now drying with cable ties instead.
 

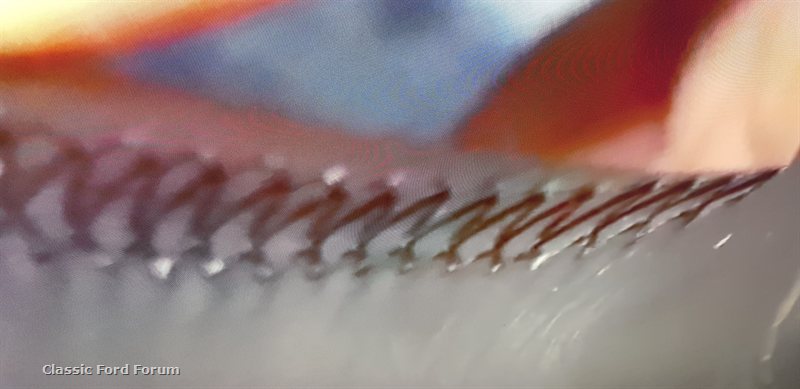
 The cut in the top centre is for the leather join, which will be in a grey contrast stitch.
My sewing machine is setup to do sail sized stuff, and while it sews through thick material ok, it's a dog to sew slowly on.
So for now, the leather is cut, sewn to form a loop, and stitched both sides.
This is the pattern i'm planning to use, just simple, not the style with skipped every second:

Marty is right about the youtubes, ive watched a few, probably to my detriment. I cant really work to instructions, and sew on the fly, in my head. If you are a pattern making guy, search for this vid from Adam Smith. Total craftmanship, but it was about hours to do. This is the best example I have found on how to do an RS wheel


Attached Image(s)

2025/11/11 09:03:25
martymexico
If you have the stencil, photostat it an send it across if ok, I wouldn't mind covering one of my clapped out RS wheels. I did buy a $3 leather(?) stitch cover from Ali but is just that bit to big and wide, actually used it on my mk1 focus..
Usually it's not ideal to contact glue them on but have seen it just to hold the cover in position as it sometimes starts to twist

Attached Image(s)

2025/11/11 11:25:57
deano
stencil? nah, that sounds like a pattern!
Either way, nope dont have one, sorry, it was live on the leather. You get one go.
 
I measured the circumference, sewed that, then shimmed it on and measured from there the width and spoke layout.
The ebay supplier sent enoguh for one wheel, and maybe the gear lever boot.
I had a quick check this morning, its glued ok and is now ready to sand down
 
Thats a good $3 cover, makes you wonder how they can do it for that. Looks like a snug fit too.
Agree about using glue, I think i might need to along the centreline so it locks down initially, but can still be stitched tight up the sides. 
 
So long as  the steering wheel does not fail a RWC for having a too loose grip.
2025/11/11 12:36:21
martymexico
Must say, that the original thickness grip is quite small compared to current cars, I think my mk2 which got a trimmer to leather the RS wheel brought the diameter up to modern car thickness but the focus has gone a little bigger again and yes it's really tight on there. For $3 they supply the cover, 2x needles and a 100mtr of thread of what ever color you choose , I don't understand how they do it either !!
might go for a drive and see if any couches are on the sidewalk with black leather, a good source of material..
Then pattern a wheel and have a go as well, and check that vid on how to measure it all up
2025/11/14 14:04:47
deano
My seats were missing the tilt release levers and unable to purchase replacements for, but I managed to find files online and printed one off as a trial.
 

Since it had very few actual flat faces, it needed to be printed upright, with break away support underneath.
It will sand down fine, plus be hidden against the seat face.


A finer print would minimise the contour bands you can see , which looks worse in the photo

 A bit of sanding and some matt black and should be fine.

Attached Image(s)

2025/11/15 08:48:31
PartTimeMK2
What type of filament is that? My stock ones ended up breaking where they slide over the metal post. 
2025/11/15 13:14:19
martymexico
I did a pair of the same ones in black petg, it's more heat tolerant.
Your going to have a mega list of stuff to make when you get yours!
2025/11/17 10:08:44
deano
it was just PLA, which was just to hand and  in the machine at the time.
If it looks like it works ok, I can change the drawing to beef it up, or get better quality.
 
Or print another.
 
<< ..7374.. >> - Powered by APG vNext Trial

© 2025 APG vNext Trial Version 5.1

Use My Existing Forum Account

Use My Social Media Account