2022/09/05 12:38:08
deano
 not much activity for a while, everyone must be beavering away, or watching the Block.
I think the rear roof mounted vent needs to be deleted, while its original, it is also butt ugly.
 
I have the rally style one going in up front soon, and having 2 seems overkill.
Any reason why it would be a problem to give it the flick while I have the welder out??
 
 
2022/09/06 10:27:19
martymexico
Only thing to worry about is causing the roof to wobble where you've welded.. either butt weld or step it using a joddler with weld thru primer.
I'm still doing stuff to Adams van, should be nearing completed in a few weeks, and I'm giving my 3dr Focus a big birthday with new wheels, bigger brakes and other go fast stuff I've learnt from my other Focus. Back to the coup soon tho
2022/09/19 13:11:13
deano
Its gone, no more roof vent.
Why so many holes FORD? Drill bits must have been cheap back then.
Anyhow, it worked out ok, not too shabby.
 

I did get some slight warping when it cooled down, I used the air compressor after each weld, and was suprised by how much it did get effected, even with the pressed ridges right nearby. Nothing major though, a few gentle whacks and it sat nice. It now has a skim of filler. 


Attached Image(s)

2022/09/19 13:28:42
deano
buoyed by my apparent improvements in welding skill, i decided to have another crack at the drivers side window panelling.
These were one of the first jobs I'd had a crack at while learning, and on this side I kept blowing through.  In the end, I got so disheartened by it no matter how I tried, I needed to cover it over with cardboard for a few months to avoid seeing the failures.
So take 2:


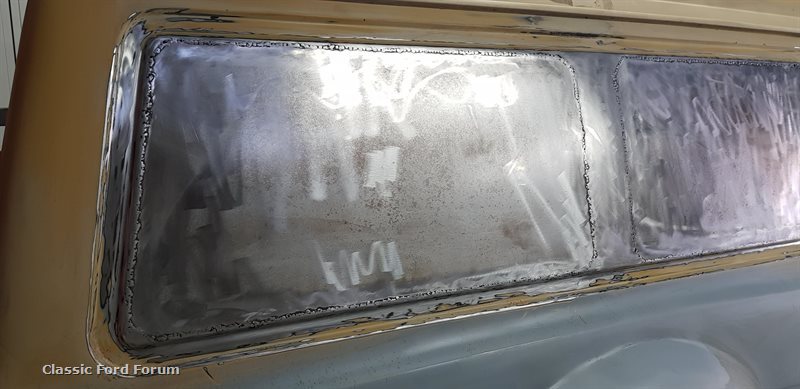
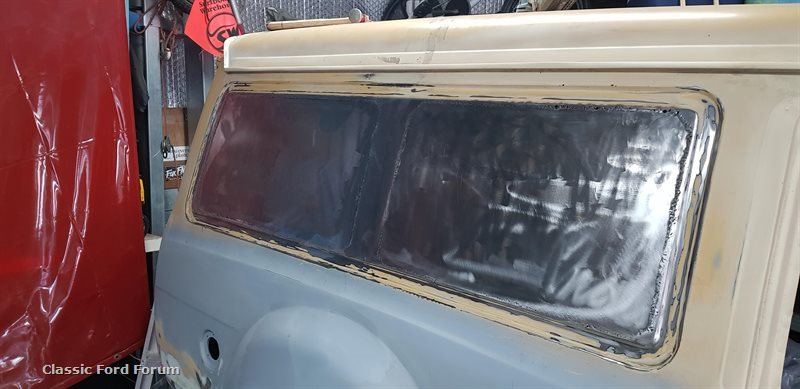
 In the end, it wasn't the welder settings, it was all down to technique. I think it was Blue that suggested how close I was holding the gun, and also the angle. This and practice, practice meant that now about 90% of the time I could redo a blowthough and add material, rather than blow it out worse. Still not a welder, but it was a good rainy day in the garage.
Again some filler, and a good sand should see a nice curve hopefully.
 
Oh yeah, I almost set fire to the garage too. I usually wax and grease remove right before welding. I did this on the roof vent delete, but absentmindedly left the chux cloth right next to the patch. Grabbed the torch, lets god. First  dab with the gun and woof! total flames from the chux, about 1/2 foot high. I was on a ladder, going ****, ****. The nearby extinguisher was on the bench, so I jumped down and grabbed it. By this stage, the chux still looked impressive, but if I shot it with the extinguisher, it was sure to blow off the room and set something else alight.
 
I know, bat it out with your glove idiot. Yes ok, . Left welding glove did a bit, but flames still too large. Use both hands.
Unfortunately rh gove  was a mechanics glove. It did it, but the palm melted. Still the fire was out, just a bit of  ouch peeling of the melted glove... Another one not to tell the boss about. What happens in the garage as they say.


Attached Image(s)

2022/09/19 13:30:24
deano
one more, thoughts about the heater bubble?
I have a new one ready to go on, is it worth gluing (sika or even seam sealer?) to make it semi removeable, or just weld it now and be done?
 
 
2022/09/19 19:33:11
martymexico
Nice going deano, a shed fire is something we all dred , even small ones like yours, makes ya really think what could've happen. Glad you controlled it without panicking..
A friend of mine had his shed melt with 2x mk1 Escort coupes cooking away with nothing he could do but watch and cry. Culprit was a Makita charger so when your done, flick the switch off regardless if it's not charged.
All of my chemical tins like paint, thinners, resin etc etc are kept in a metal cabinet in another closed off part of the shed.
Those side plates look fine from here 👍, you should be happy. As with the heater bubble panel, it's up to you. If you glue it on, use some gasket maker type of silicone, good bonding but easily peeled off when needed. If you weld it on, remember to use sika joint sealer on the inside under the dash to stop any pin holes causing leaks/rust. Also drip paint from the top edges inside the bubble cavity to also seal any bare metal as best you can. I drip in thick paint a few times to make sure it's proper coated. Done this to a car 20yrs ago and it's still like new.
2022/09/20 08:59:14
deano
Thats a sad story Marty. Makes you wonder how so many people felt with all of our bushfires. Losing a garage would be bad enough, but when people lost absolutely everything everything, it would be devastating.
It's nice to be able to switch off the shed power, and know there's nothing inadvertently left on.
 
Ok with the heater bubble, I think we'll go welded, with plenty of sealer and internal coats as suggested. That sounds like the way to go. I'm out of weld through primer, so will have to get some on the weekend.
Its nice to get some small jobs out of the way.
 
Oh, and for those that way inclined, go Cats.
Everything is suddenly becoming blue and white down here for some reason.
 
2022/09/29 12:44:28
deano
got some painting done last night.
Not too shabby in epoxy primer if you squint, cant wait until some high build goes on.
Next job will be to undercoat the front inner wheel wheels so the guards can be put back on.
 

Attached Image(s)

2022/09/29 13:27:16
martymexico
Progress on, I can see a paint run hehe, not really lol...
I've noticed when I get a panel in primer I can relax a little and know the final painting isn't to far away. Have you tested the red I sent you yet ?
2022/09/30 13:20:01
deano
no not yet Marty.
I have a small group of the suspension parts that with be Marty Red, but I want to pull the front springs off and the ARB and do them as well. I have an unused touch up gun that has been gathering dust to try out.
 
The next job listed will be to refit the heater bubble, as well as getting some paint on under the front arches so they can go on.
 
Next brainstrust question: the fuel filler update.
I have a new filler cap assembly as below hiding around somewhere and I'm pretty sure the existing bodywork flange it recesses into will be too small. What are the chances of making a round timber plug and form to press a piece of steel down to form the recess ? then cut the inner hole out afterwards. Then cut the existing filler area out and fitzy the new panel insert in.
 
I know some of you guys used this timber die method in other threads to replicate  floor ribs, but wasn't sure if it would work on what might be a bigger scale?.
I'm guessing it may be hard to clamp the panel steel tight enough to stop it warping, and youd need afair amount of pressure to create the recess?
Another method might be to use the shrinker/stretcher? or just cut the hole out and manually form the shape needed over a large pipe offcut?


Attached Image(s)

<< ..2526.. >> - Powered by APG vNext Trial

© 2025 APG vNext Trial Version 5.1

Use My Existing Forum Account

Use My Social Media Account